Plug-ins
Important
Please note that this page has been deprecated, we currently only support the WooCommerce plugin.
This page covers the use of adding Cashflows to your checkout with plug-ins.
The Cashflows Gateway delivers a range of services designed to help you manage your business payments. One of the ways that you can link your business to our gateway is by using our plug-ins. Our plug-ins use a payment page that we host for you, that you can customise to fit in with the other pages of your website to provide a seamless experience.
Collect your API access credentials
Before connecting to your plug-in you need to collect your API access credentials from Cashflows Portal. This is where you can find your:
Configuration ID- the unique identifier of the business account (also referred to as the merchant account). You need to include this in API messages so that we can recognise the business and match transactions to it.Current API key- the key to use for converting API messages that you send us in a format can’t be tampered with (hashing).
To collect these details:
Sign into Cashflows Portal.
From the Cashflows Portal menu, select Configuration.
- Select the API Data page, the API Data page displays your API configuration details:
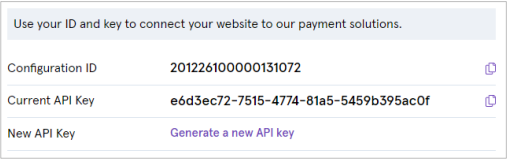
Copy these values into an intermediate document (or clipboard) as you will need them when you configure your plug-in settings later.
While you are signed into Cashflows Portal, you can also enable/disable Auto Capture for cards, as required.
WooCommerce
This section is for Cashflows customers who are using our Gateway. It explains how to add Cashflows to a checkout by installing our plug-in for WooCommerce. There is also guidance on how to configure settings, such as whether to store card details and so on.
Getting Started with WooCommerce
Although it’s not required, we recommend that you install the plug-in and perform some testing in a non-production environment, before using it for live transactions in your production environment. To support your testing, we have a dedicated integration environment.
What you need
To start the installation process, you need:
- The Cashflows Gateway WooCommerce plug-in file that you can download from the Wordpress website.
Save this file in a location where you will be able to find it when you come to upload it
Note
You don’t need to unzip the file but it should be saved on your computer.
- Access to Cashflows Portal so that you can:
Collect your API access credentials, you need these during the installation process.
Customise the Cashflows Hosted Checkout Pages., if you choose to use one.
When you first sign up with us, we send you a welcome email that includes the details that you need to sign into Cashflows Portal.
Important
You need different sign-in credentials for the integration and production environments.
Before you can connect to our production environment for going live, you need:
A production account
Sign-in credentials
We provide these when your account has been approved, but if you have not received these, you can email support@cashflows.com.
Enable/disable Auto Capture for cards
By default, the Auto Capture option for cards is enabled. When this option is enabled, we send both an authorisation (to reserve the funds on the card) and a capture request (for the funds to be transferred) to your customer’s bank. You can disable this option at any time.
To enable/disable Auto Capture for cards:
- Sign into Cashflows Portal.
For step-by-step instructions, you can visit the Cashflows Help Centre and read: How do I sign into Cashflows Portal.
Select Payment Methods.
Select Card.
Set or clear the Auto Capture box.
Install our plug-in for WooCommerce
To install the WooCommerce plug-in, you need the plug-in file that you have downloaded from the WooCommerce website. Save this file in a location where you will be able to find it during the installation process.
Note
The steps that follow require that you have signed into your WooCommerce account and are in the Site Admin section.
To install the plug-in:
From the WooCommerce Menu bar on the left-hand side, select Plugins.
Select Add New (either from the sub-menu, or at the top of the page).
Select Upload Plugin.
Select Choose File and select the plug-in file that you downloaded.
Select Install Now. The plug-in is installed into your WooCommerce website.
Important
If you receive an error message, email the details of the error to support@cashflows.com.
Configure the plug-in settings
To configure the settings in WooCommerce, you need the API details that you collected from Cashflows Portal. For more information, see Collect your API configuration details.
The steps that follow, require that you have signed into your WooCommerce account, and are in the Site Admin section.
To configure the WooCommerce settings:
In WooCommerce, select Settings.
- Select the Payments page:

Enter the Production API Key and Production Configuration ID. These are the values that you should have collected from the production version of Cashflows Portal.
If you are using an integration environment, enter the Integration API Key and Integration, configuration ID values that you collected from the test/integration version of Cashflows Portal. Otherwise, you can leave these boxes blank.
- If you are using an integration environment, set the Integration mode. Otherwise leave this box unchecked.
Warning
If you leave Integration mode enabled when moving to production you may encounter errors.
- Additional customer data
If you select this option, you will send customer data (for example, address and items purchased) to Cashflows to be stored with the payment. These details can be viewed together with payment transactions in Cashflows Portal.
Important
This requires that your terms and conditions alert the customer to the fact you are storing these purchase details. This is a GDPR requirement for which you, as the merchant, are responsible.
- Store Customer data
If you select this option, this enables Cashflows to securely store card details within your merchant account in the Cashflows Gateway. This feature gives your customers the option to securely save their card (as a token) so that when they return to your site, they will be able to select from their saved card(s). For security, the security code (CVV) is never stored and must always be presented by the customer.
Scroll to the lower half of the Payment methods screen.
Ensure that Cards via Cashflows is Enabled.
Select Manage next to the Cards via Cashflows option.
In the Customer Message section, you can specify your own text for the payment option presented to your customers on your checkout page:
Save your changes.
Select Settings again and select the Payments page.
Scroll to the bottom of the page and enable the Cards via Cashflows option.
Select Save changes again. Setup is now complete. You can start testing
Enabling Apple Pay with WooCommerce
Cashflows handles most of the work for Apple Pay behind the scenes, to enable Apple Pay in Embedded Frames you need to:
Login to Cashflows Portal, then navigate to Configuration.
Select Payment Methods, then select Card.
- Enable Allow Apple Pay in the configuration section:
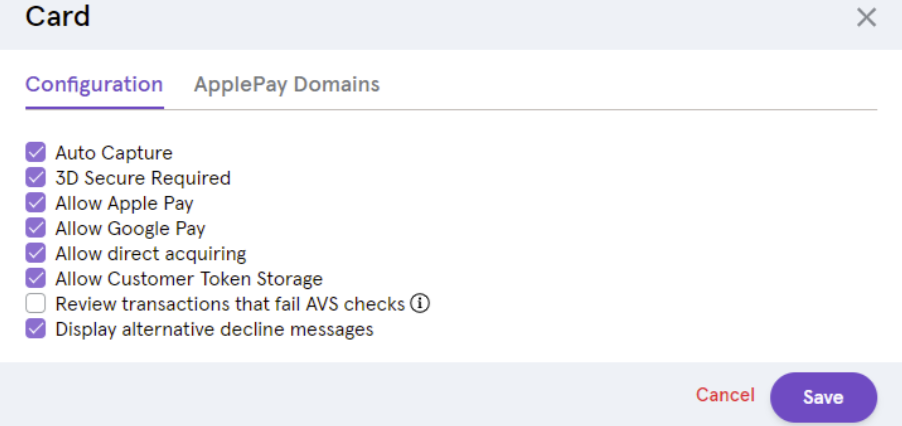
Select ApplePay Domains.
Select Add Domain, enter your domain and select Save, this will automatically request Apple to check your domain. Note - you don’t need to include the protocol, just the domain, for example:
cashflows.com, nothttps://cashflows.com/.
Once Apple has approved your domain (usually after an hour), you will be able to take payments with Apple Pay through Embedded Frames.
Enabling Google Pay with WooCommerce
Cashflows handles most of the work for Google Pay behind the scenes, to enable Google Pay in Embedded Frames you need to:
Login to Cashflows Portal, then navigate to Configuration.
Select Payment Methods, then select Card.
- Enable Allow Google Pay in the configuration section:
-
Include a button in your checkout page that is referenced in the initialisation step.
Storing Shopper Details with WooCommerce
If enabled, your customers can choose to have their Card Details tokenised and stored with Cashflows to speed up future checkouts.
Important
It is your responsibility to ask the customer’s permission to store their card details.
To enable Stored Shopper Details:
Login to Cashflows Portal, then navigate to Configuration.
Select Payment Methods, then select Card.
- Enable Allow Customer Token Storage in the configuration section:
-
BigCommerce
This section is for Cashflows customers who are using our Gateway with BigCommerce. It explains how to add Cashflows to a checkout by installing our app for BigCommerce. There is also guidance on how to configure settings such as whether to store card details and so on.
Getting Started with BigCommerce
Although it’s not required, we recommend that you install the plug-in and perform some testing in a non-production environment, before using it for live transactions in your production environment.
What you need
To start the installation process, you need:
A BigCommerce website
- Access to Cashflows Portal so that you can:
Collect your API access credentials, you need these during the installation process.
Customise the Cashflows Hosted Checkout Pages., if you choose to use one.
When you first sign up with us, we send you a welcome email that includes the details that you need to sign into Cashflows Portal. You can also visit the Cashflows Help Centre and read: How do I Sign into Cashflows Portal?
Important
You need different sign-in credentials for the integration and production environments.
Before you can connect to our production environment for going live, you need:
A production account
Sign-in credentials
We provide these when your account has been approved, but if you have not received these, you can email support@cashflows.com.
Installing the Cashflows app with BigCommerce
To install the Cashflows app within BigCommerce you need to find the Cashflows app on the BigCommerce marketplace.
Locate the Cashflows app.
Select the Cashflows app.
Select GET THIS APP.
If you’re not already signed in, sign in to your BigCommerce store.
Select Install.
Wait for the app to install.
To complete the installation, select the PCI DSS compliance box.
Select Confirm.
If you have a Cashflows Gateway account with us, provide your Configuration ID and API key and select Submit. Otherwise select Signup to Cashflows to start creating an account.
Enable/disable Auto Capture for cards
By default, the Auto Capture option for cards is enabled. When this option is enabled, we send both an authorisation (to reserve the funds on the card) and a capture request (for the funds to be transferred) to your customer’s bank. You can disable this option at any time.
To enable/disable Auto Capture for cards:
- Sign into Cashflows Portal.
For step-by-step instructions, you can visit the Cashflows Help Centre and read: How do I Sign into Cashflows Portal?
Select Payment Methods.
Select Card.
Set or clear the Auto Capture box.
Turning on the app
When you are ready to take payments, you need to turn on the app.
To turn on the app:
In Payment Options, set the Action switch next to Capture on order placed to on.
Select Update. The app is activated and your website is connected to the Cashflows Gateway.
Magento 2
This section is for Cashflows customers who are using our Gateway. It explains how to add Cashflows to a checkout by installing our plug-in for Magento 2. There is also guidance on how to configure settings such as whether to store card details and so on.
Getting Started with Magento 2
Although it’s not required, we recommend that you install the plug-in and perform some testing in a non-production environment, before using it for live transactions in your production environment. To support your testing, we have a dedicated integration environment..
What you need
To start the installation process, you need:
- The Cashflows Gateway Magento 2 plug-in zip file, that you can obtain from the Magento Marketplace.
Note
You don’t need to unzip the file, but it should be saved on your computer.
- Access to Cashflows Portal so that you can:
Collect your API access credentials, you need these during the installation process.
Customise the Cashflows Hosted Checkout Pages., if you choose to use one.
When you first sign up with us, we send you a welcome email that includes the details that you need to sign into Cashflows Portal. You can also visit the Cashflows Help Centre and read: How do I Sign into Cashflows Portal?
Important
You need different sign-in credentials for the integration and production environments.
Before you can connect to our production environment for going live, you need:
A production account
Sign-in credentials
We provide these when your account has been approved, but if you have not received these, you can email support@cashflows.com.
Enable/disable Auto Capture for cards
By default, the Auto Capture option for cards is enabled. When this option is enabled, we send both an authorisation (to reserve the funds on the card) and a capture request (for the funds to be transferred) to your customer’s bank. You can disable this option at any time.
To enable/disable Auto Capture for cards:
- Sign into Cashflows Portal.
For step-by-step instructions, you can visit the Cashflows Help Centre and read: How do I Sign into Cashflows Portal?
Select Payment Methods.
Select Card.
Set or clear the Auto Capture box.
Install our plug-in for Magento 2
Before you can install the Magento 2 plug-in, you need to obtain the plug-in file from the Magento Marketplace and save it in a location where you can find it again later in the installation process.
To install the plug-in:
Using FTP, SCP, or another file transfer tool, upload the plug-in to the root folder of your Magento 2 installation. The app/code/ folder should be merged with the contents of the Magento 2 installation.
- Run the following SSH commands:
php bin/magento cache:clean
php bin/magento setup:upgrade
php bin/magento setup:static-content:deploy
php bin/magento setup:di:compile
Sign in to the administrator environment of Magento 2.
Go to Stores -> Configuration.
Select Sales -> Payment methods.
Scroll down to Cashflows.
Configure the plug-in settings
To configure the settings in Magento 2, you need the API details that you collected from Cashflows Portal. For more information, see Collect your API access credentials.
To configure the Magento 2 settings:
Go to your Magento 2 Admin page and configure the plug-in settings.
Select Stores and then Sales.
Select Payment Methods.
- Select Cashflows. You will see the following page:
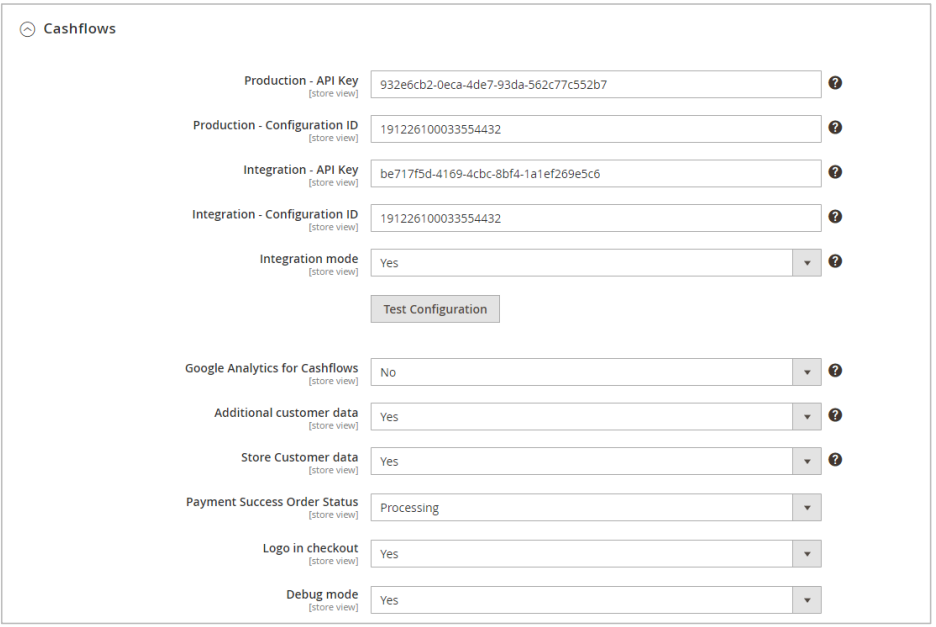
Enter the Production API Key and Configuration ID. These are the values that you should have collected from the Production Cashflows Portal.
If you are using an integration environment, enter the integration API Key and Configuration ID values that you collected from the test/integration Cashflows Portal. Otherwise, you can leave these boxes blank.
- If you are using an integration environment, set the Integration mode to Yes. Otherwise select No.
Warning
If you leave Integration mode enabled when moving to production you may encounter errors.
- Google Analytics for Cashflows
This option sends the content of the Google Analytics cookie to Cashflows. Select Yes or No as required.
- Additional customer data
If you select this option, you will send customer data (for example, address and items purchased) to Cashflows to be stored with the payment. These details can be viewed together with payment transactions in Cashflows Portal.
Important
This requires that your terms and conditions alert the customer to the fact you are storing these purchase details. This is a GDPR requirement for which you, as the merchant, are responsible.
Store Customer data If you set this option to Yes, this enables Cashflows to securely store card details within your merchant account in the Cashflows Gateway. This feature gives your customers the option to securely save their card (as a token) so that when they return to your site, they will be able to select from their saved card(s). For security, the security code (CVV) is never stored and must always be presented by the customer.
In the Cards by Cashflows list, select Yes for Enabled:
Select Save Config.
You have now completed the basic configuration and you can now start testing.
OpenCart
This section is for Cashflows customers who are using our Gateway. It explains how to add Cashflows to a checkout by installing our plug-in for OpenCart. There is also guidance on how to configure settings such as whether to store card details and so on.
Getting Started with OpenCart
Although it’s not required, we recommend that you install the plug-in and perform some testing in a non-production environment, before using it for live transactions in your production environment. To support your testing, we have a dedicated integration environment.
What you need
To start the installation process, you need:
The Cashflows OpenCart plug-in file that you can downloaded from the OpenCart marketplace.
- Access to Cashflows Portal so that you can:
Collect your API access credentials, you need these during the installation process.
Customise the Cashflows Hosted Checkout Pages., if you choose to use one.
When you first sign up with us, we send you a welcome email that includes the details that you need to sign into Cashflows Portal. You can also visit the Cashflows Help Centre and read: How do I Sign into Cashflows Portal?
Important
You need different sign-in credentials for the integration and production environments.
Before you can connect to our production environment for going live, you need:
A production account
Sign-in credentials
We provide these when your account has been approved, but if you have not received these, you can email support@cashflows.com.
Enable/disable Auto Capture for cards
By default, the Auto Capture option for cards is enabled. When this option is enabled, we send both an authorisation (to reserve the funds on the card) and a capture request (for the funds to be transferred) to your customer’s bank. You can disable this option at any time.
To enable/disable Auto Capture for cards:
- Sign into Cashflows Portal.
For step-by-step instructions, you can visit the Cashflows Help Centre and read: How do I Sign into Cashflows Portal?
Select Payment Methods.
Select Card.
Set or clear the Auto Capture box.
Install our plug-in for OpenCart
Before you can install the OpenCart plug-in, you need to obtain the plug-in from the OpenCart marketplace and save it in a location where you can find it again later in the installation process.
To install the plug-in:
Sign in to the OpenCart portal as an administrator.
From the OpenCart NAVIGATION menu, select Extensions.
Select Installer.
Select Upload.
Select the plug-in-in file.
Select Open.
From the OpenCart NAVIGATION menu, select Extensions and then Extensions again
From the list of extension types, select Payments.
Scroll to Cashflows.
Select Install.
You can then edit the module to configure it for your Cashflows account.
Configure the plug-in settings
To configure the settings in OpenCart, you need the API details that you collected from Cashflows Portal. For more information, see Collect your API access credentials.
To configure the OpenCart settings:
From the OpenCart NAVIGATION menu, select Extensions and then Extensions again.
From the list of extension types, select Payments.
Scroll down to find Cashflows.
Select the Edit button on the right.
- On the General Tab, enter the Production API Key and Configuration ID. These are the values that you should have collected from the Production Cashflows Portal.

If you are using an integration environment, enter the Integration API Key and Configuration ID values that you collected from the test/integration Cashflows Portal. Otherwise, you can leave these boxes blank.
- If you are using an integration environment, enable Integration mode. Otherwise leave this box unchecked.
Warning
If you leave Integration mode enabled when moving to production you may encounter errors.
- Order status “Complete”
This is the status that you want OpenCart to display when a payment has been successfully completed.
- Order status “Cancelled”
This is the status that you want OpenCart to display when a payment has been cancelled.
Send customer data to Cashflows If you enable this option, you will send customer data (for example, address and items purchased) to Cashflows to be stored with the payment. These details can be viewed together with payment transactions in Cashflows Portal.
Important
This requires that your terms and conditions alert the customer to the fact that you are storing these purchase details. This is a GDPR requirement for which you, as the merchant, are responsible.
Store Customer data on Cashflows servers If you select this option, this enables Cashflows to securely store card details within your merchant account in the Cashflows Gateway. This feature gives your customers the option to securely save their card (as a token) so that when they return to your site, they will be able to select from their saved card(s). For security, the security code (CVV) is never stored and must always be presented by the customer.
Send the contents of the Google Analytics cookie to Cashflows. This option sends the content of the Google Analytics cookie to Cashflows. Select Enabled or Disabled as required.
Select Save.
On the Card page, make sure that Status is Enabled.
Customise the Cashflows Hosted Checkout Pages
To provide a seamless experience for your customers, we offer the option to add a secure payment webpage that looks and feels like part of your website but is created and hosted by us. We call this a Hosted Checkout Pages.
Our Hosted Checkout Pages is a secure webpage that you can incorporate into a website. By connecting our Hosted Checkout Pages to your website, you are integrating with the Cashflows Gateway and all of the functionality that comes with it for processing online payments. You direct your customer to our Hosted Checkout Pages where they check out and pay. We take care of the processing, including security aspects and many of the technical complexities. Then when we have finished the payment processing, we redirect the customer back to your website.
You can use the default Hosted Checkout Pages as we provide it, or you can customise the look and feel to match the other pages of your website. For example, you can add your logo, apply your branding, font, and colours.
You can choose what to change and what to leave as it is. We recommend that you consider changing the following elements as a minimum:
Business logo
Colour of the text and background of the content header bar
Page background colour or add an image
Pay button
For step-by-step instructions that show you how to customise a Hosted Checkout Pages, see the Hosted Checkout Pages page.
Testing
When you have completed the configuration described, we recommend that you carry out sufficient testing to ensure that everything is working as expected. For payments made in the production environment, you can cancel or refund them, if required.
For more information about testing and going live, see the: