Cashflows for partners
Fast Onboarding for Partners
To get your merchants up and running with a Cashflows account and taking payment as quickly as possible, we have an online portal called Cashflows Fast Onboarding. It’s where you manage your merchant applications with us.
When you sign in you can:
View all your merchant applications in one place, including the real-time status. For more information, see Viewing applications.
Start a new application for one of your merchants. For more information, see How to apply for an account.
Respond to requests for more information one of your merchant applications from us.
How can using Cashflows Fast Onboarding help you?
See your merchant applications in one place.
Have merchant information pre-filled for you from third party data.
Manage all merchant documents for an application in one place.
Receive application decisions faster.
How to use Cashflows Fast Onboarding
When you sign into Cashflows Fast Onboarding, you can:
- See summary information about your applications:
Working on – you’ll see a list of open applications that are currently assigned to you.
Other Activities in your Worklist – you’ll see a list of unassigned or unlocked applications that you can work on.
Waiting Activities – you’ll see a list of applications that you’ve worked on, that are awaiting action from someone else. For example, when you’ve submitted an application and the merchant is yet to sign the contract.
Quickly search for an application. For more information, see Quick search.
Here’s an example that shows what you see when you sign in to Cashflows Fast Onboarding. The first page displayed is the Home page.
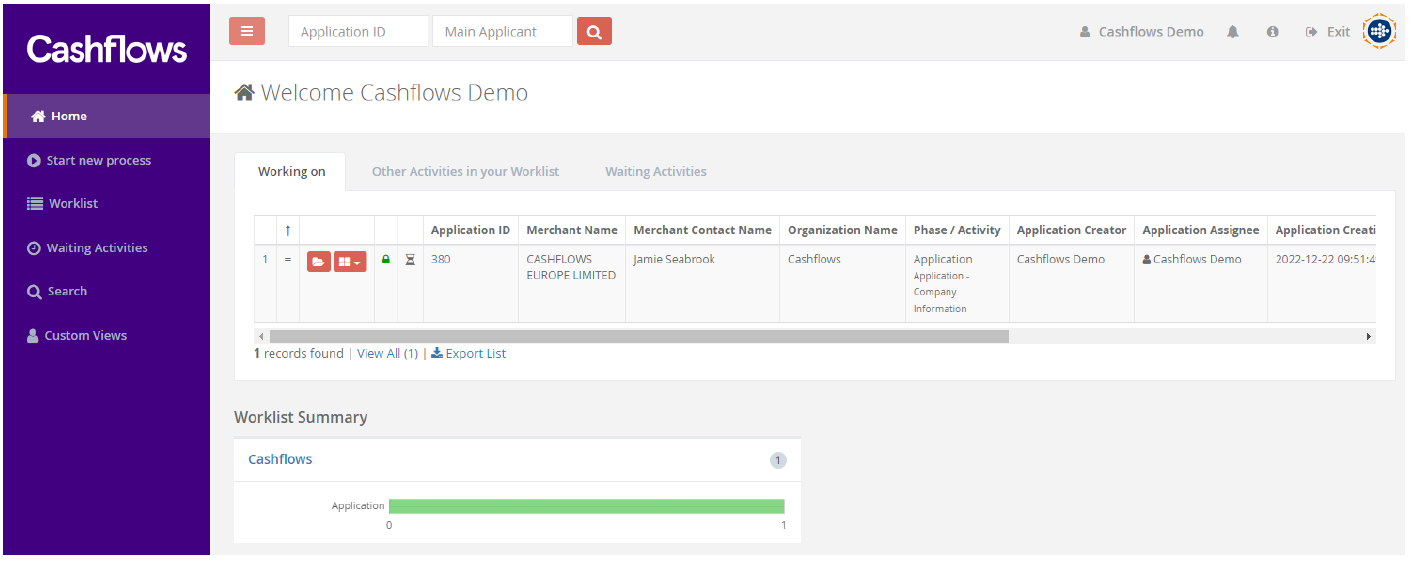
The default menu that you see when you sign in as a partner, has options that:
Enable you to start new applications. For more information, see How to apply for an account.
Allow you to view and search for your applications and your organisations applications. For more information, see Viewing applications.
Enable you to securely sign out from Cashflows Fast Onboarding.
Getting started with Fast Onboarding
This section explains how to start using Cashflows Fast Onboarding.
What you need
To use Cashflows Fast Onboarding you need:
An internet connection.
A browser (we recommend Google Chrome).
- A Cashflows Fast Onboarding account with partner access permissions.
Note
When you become a partner with us, we create accounts for your users.
What you need to do
To start using Cashflows Fast Onboarding:
Sign in to Cashflows Fast Onboarding with your partner account details. For more information, see How to sign in.
Set your password.
Preparing your application
We know how important it is to get new merchants trading as soon as possible. The Fast Onboarding portal will help to speed up the process, but the better you’re prepared for each application, the higher the chance of an automatic approval.
The Merchant Category Code (MCC) and the amount of merchant information you have are both essential for successful applications.
Choosing better Merchant Category Codes
Businesses which have a mainstream Merchant Category Code (MCC) are much more likely to be approved automatically by our system. This is because there are usually fewer checks required.
Higher risk MCC merchants might require additional information or further checks, which can slow the process down.
You can find our Sector Appetite Guide in your Partner Toolkit, something which we emailed you. If you don’t have this, please contact support who can send this to you again.
Note
You can email them using support@cashflows.com or by calling 0330 128 9855, Option 1. They are on hand to help, each business day, Monday – Friday, 09:00 - 17:00.
Required merchant information
You can improve your application experience by having key merchant information to hand when submitting your application. Here is a reminder of the key information you will need to know regarding the merchant:
Pricing information (IC++ or Blended)
- Third-party connections that will power your payments
Gateway provider (if applicable)
Shopping cart provider (if applicable)
Bank details
- Trading history
Main type of sales
Monthly card sales (in GBP)
Average transaction value (in GBP)
Average delivery days
Settlement day
Trading regions
Brief description of business
- Store information
Quantity of stores and any unique information about each store
Website address (URL, if applicable)
Support website address (URL, if applicable)
Customer service email
Customer service phone
Registered address
Trading currencies
Percent (%) of card takings by acceptance type
Merchants authorised signatories and their contact information required for the contract esignature.
How to sign in
Go to https://fastonboarding.cashflows.com/cf-gateway/cf.html#/login.
Enter your username.
- Enter your password.
Note
Passwords are case sensitive.
- Select Sign in.
Tip
Do not have more than one browser tab of the portal open at any one time.
Warning
If you forget your password and try unsuccessfully to sign in too many times, your account becomes locked. You cannot unlock your own account.
How to set your Cashflows Fast Onboarding password
The first time you sign into your partner account, you’ll be prompted to reset your password.
You need to provide your existing password and enter a new password.
How to change your password
Email: applications@cashflows.com.
In the email, provide the username you use to sign in.
How to sign out
It’s good security practice to sign out from Cashflows Fast Onboarding instead of only closing the browser.
Select Exit in the top right of the page.
How to quickly search for an application
You can quickly search for an application from the Home page by the Application ID or Merchant Name in the top left of the page.
Enter either the Application ID or Main Applicant (merchant name).
Select Search.
How to unlock an application that is assigned to one of your users
In the scenario where someone who has started an application is out of office and someone else needs to continue working on the application, you can contact our Customer Success team to get it unlocked and re-assigned.
Email: applications@cashflows.com.
In the email, provide the Application ID and the user or users who need to be able to access the application.
How to apply for an account

Starting an application
Mandatory fields are highlighted in yellow. At any point, you can upload merchant documents by selecting the upload icon in the top right of the page.
Your application is saved as you move between pages, and you can save your work at any time by selecting the save icon in the top right of the page.
On all pages, there is the option to Cancel. If you select Cancel, this will close your application and return you to the Home page. All applications that are cancelled can’t be recovered and must be started again.
Note
Phone numbers need to be entered following the international calling codes standard. E.g., for UK phone numbers, they should start with “+44” and be between 10-15 digits.
Tip
You can save an application, close the application, or close your browser, and come back to complete it another time. For more information, see Resuming a saved application.
To start a new application:
Select Start New Application.
Select Start on the Cashflows process.
Select Start.
Find or add company information and accounts Cashflows Fast Onboarding is linked to the Companies House database. If a business is registered, it’s quick and easy to find the details and fill them in automatically. This saves you having to spend time entering details manually.
If the business is a sole trader:
Type the sole trader’s name into the Company Name field.
Select Add.
Enter the rest of the mandatory fields.
Otherwise:
- In the Company Name field, start typing the name of the merchant. When you’ve entered three characters, a list of merchants is displayed. The list changes as you continue to type.
Tip
If you paste a value into the Company Name field, the dynamic search won’t be run, and we won’t be able to fill in the details for you.
To select a merchant from the dynamic search, you must select the merchant name with your mouse rather than using the Enter key on your keyboard.

- When you’ve found the merchant in the list, selecting them completes the following fields automatically:
Company Name
Company Status
Company Registration Number (if appliable)
Address Line 1
Address Line 2 (if appliable)
City
Post Code
Country
Once the fields are automatically filled, you need to select the Company Type.
- Before moving to the Company Contact Information section, select the merchant category code and description from the list.
Tip
The list is searchable, and the possible combinations will be narrowed down as you start typing. For more information on our MCC codes and descriptions, see our Sector Appetite Guide in your Partner Toolkit.
- Enter the primary contact of the merchant for this application.
Note
This information is used for sending the quotation email (if applicable) and for requesting documents from the merchant (if applicable).
- Select the merchant’s:
- Gateway Provider (if applicable)
Note
If the merchant is going to use the Cashflows Gateway, you must ensure that you select and enter the Gateway pricing in the next screen. If they are not using the Cashflows Gateway, then you do not need to enter any gateway pricing on the next screen.
Shopping Cart Provider (if applicable)
State whether they would like Cashflows to provide their card machines. If they’d like to use Cashflows card machines, you need to complete the separate Terminal Order form once the application has been approved.
When you’re satisfied that all of the required details have been filled in, select Next.
Setting the merchants pricing
Important
Please ensure the price to the merchant is higher than your agreed buy rate for the respective fee type or product. We will not validate the price you define against your pricing plan. If you do not know the rates set in your pricing plan, we recommend you sign in to your Cashflows Portal account to view it or contact your relationship manager.
On this screen, you’ll be required to capture the pricing you’ve agreed with the merchant for the Cashflows products.
There are several mandatory pricing groups that need to be selected and values defined:
Merchant Service Charge – Blended or Interchange++.
Transaction and dispute fees.
Remittance fees.
To get started:
Select a pricing plan from the list. You can either choose one of the default Cashflows plans or your own if you’ve created any.
Select Load Pricing Plan.
- Set your pricing by entering a value in the corresponding cell of the pricing levers.
Important
A maximum of two decimal places is supported. You must not include commas in your pricing values as they are not supported.
Pricing values will only be accepted if a value is entered. If a pricing field is left empty, this will be treated as not selected. For more information on creating your own pricing plans, contact your relationship manager.
Note
By default, we will not send a quotation email to the merchant’s application contact you defined on the Company Information and Accounts screen previously. However, if you would like us to, you can select Send quotation email to merchant at the top of the screen and we will send them a copy of the products and pricing you’ve defined on this screen once you’ve selected Next. Doing this will not delay your ability to proceed with the application submission.
When you’re satisfied that all the required details have been filled in, select Next.
Validating the merchant’s bank details
The merchant information populated on the Company Information & Accounts screen will be automatically pre-filled on this screen.
Note
We support automated bank validation for banks that are part of the Commercial Credit Data Sharing (CCDS) scheme, which currently includes all major banks: Danske Bank, Allied Irish Bank, Bank of Ireland, Barclays, Clydesdale, Yorkshire Bank, HSBC, Lloyds, Bank of Scotland, Agricultural Mortgage Corporation, RBS, Lombard, NatWest Bank, Ulster Bank & Santander. If your merchant uses a bank that is not part of the CCDS scheme, you’ll need to upload a recent bank statement (within the last three months) to help our underwriting team validate the merchant’s bank account. The format of the bank statement must be PDF for our underwriting team to accept it. For more information on how to upload this document, see How to upload documents.
To validate the merchant’s bank details:
- Enter the merchant’s:
Account Holder name.
Sort Code.
Account number.
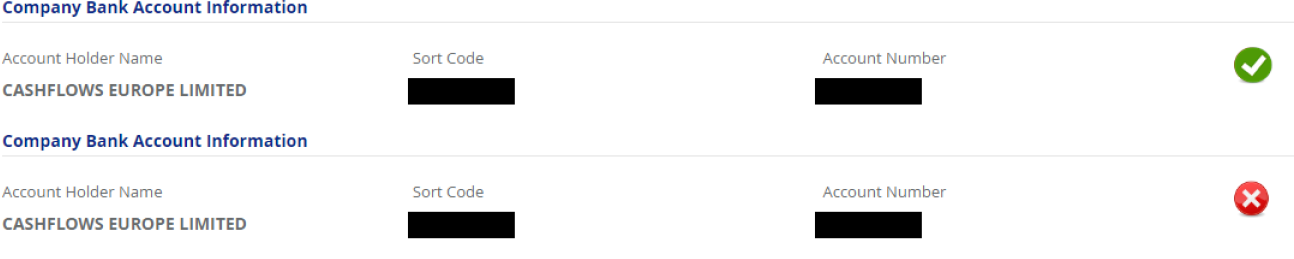
- Select Search. When you select Search, we validate the information you’ve provided with our third-party provider.
Note
If the bank account has been successfully matched, a green tick will be displayed on the page. If we can’t validate the bank account information provided, a red cross will be displayed on the screen, and you’ll need to provide documentation to help our underwriting team validate the merchant’s bank account.
- After the bank search is complete, four additional fields are displayed on the page under the Company Information. We will have pre-filled them from our third-party providers data if the company has been found in their records. These fields are:
Country of incorporation.
Date of incorporation.
VAT registered.
VAT number (visible if VAT registered is selected).
Note
If the merchant isn’t found in our third-party providers data, you can enter the country of incorporation, date of incorporation, VAT registered and VAT number fields manually.
When you’re satisfied that all the required details have been filled in, select Next.
Adding merchant stakeholders
If we can find the merchant via our third-party provider, several stakeholder record fields will be prefilled for you.
If a merchant’s stakeholder is identified as being both a shareholder and a company director, you’ll see them represented as two individual records. In this scenario, you should merge the two records together by selecting Company Director on the shareholder record and then remove the duplicate.
Only stakeholders with a 10% or more shareholder ownership will be automatically pre-filled from our third-party data providers records.
Each stakeholder record has an optional authorised Signatory tick box, this tick box is for you to mark which stakeholders are required to sign the merchant contract within their company. For this reason, you must select a minimum of one stakeholder as an authorised Signatory. For more information, see How merchants sign the contract.
At least one of the stakeholders must be marked as a Company Director.
If you are unable to provide us with stakeholder information that doesn’t reach a minimum of 80% of the merchant’s ownership structure, we may require further documents from you to assess the ownership structure.
To enter the stakeholder information:
Select an existing stakeholder record if you need to edit a pre-filled stakeholders record or select Add Stakeholder.
- Enter the mandatory fields:
First name.
Last name.
- Date of birth.
Enter the DOB value by typing it into the field following the format stated above. OR
Select the DOB field, highlight the year and type it in, select the month from the dropdown and finally select the day.
Note
The date format is DD/MM/YYYY.
Country of birth.
Nationality.
Country of residence.
Email address.
Phone number.
House name and/or number.
Street.
Note
If we are able to pre-populate the address information for you, you’ll notice that the house name and/or number is populated in the Street field. You need to move this to the separate House Name and/or Number.
Town.
Country.
Postcode.
If they are a shareholder, select Shareholder and enter the Ownership %.
If they are a company director, select Company Director.
If they are a primary contact, select Primary Contact.
If they are an authorised signatory, select authorised Signatory.
If they are an individual who will control the merchant account with Cashflows, select Person with Significant Control
When you’re satisfied that all the required details have been filled in, select Next.
Adding trading history information
As part of our decision process, we require information about your merchant’s trading history. This information helps us to make better informed decisions about applications. For example, the types of sale they make, monthly card sales, average transaction value and average delivery days.
To enter the trading information:
- Enter the merchant’s Trading Name.
Note
If they trade under the same name as the Company Name, you should fill in the Trading Name to match the Company Name. In the next screen, you will be able to set a Trading Name per store, for the cases where it differs per store.
- Enter the mandatory fields:
Main type of sales.
Monthly card sales (in GBP).
Average transaction value (in GBP).
Average delivery days.
Settlement day.
- Trading regions.
Note
Multiple trading regions can be selected if applicable.
Brief description of business.
Note
Settlement Day enables you to specify which settlement frequency the merchant would like from our offering. If the merchant wants T+0, this is known as our Anytime Settlement feature which is subject to an additional set of due diligence checks, pricing and risk assessments as per point 3.2 in our T&Cs. For more information, please contact your relationship manager.
When you’re satisfied that all the required details have been filled in, select Next.
Adding merchant store information
Important
You need to capture each store the merchant has that they want to trade through Cashflows.
To fill in the store information:
Select Add Store.
- Enter the store’s Trading Name.
Note
This can be different to the Company Name and Trading Name previously set if the Merchant trades under a different name for this store.
Review the Merchant Category Code (MCC) and description. You can select a different value if the MCC and description for the store is different to the merchant’s company level definition.
- Enter the website and customer service information:
Website link.
Support website link (if appliable).
Customer service email.
Customer service phone.
- Enter the store address information:
Address.
Town.
Country.
Postcode.
Select the Currencies that the store will trade in. You can add another currency by selecting the Add Another which will make an additional currency field available on the screen.
- Set the % breakdown of card takings by acceptance type for the store.
Note
The values provided must total 100%.
This information is required to enable us to setup the Merchant IDs (MID) correctly in our system once they are approved.
When you’re satisfied that all the required details have been filled in, select Next.
How to submit your application
Before you submit the application, you’re able to do a final review of the information you’ve entered, edit any information, and upload any supporting documents required.
To change the information you’ve entered:
Select EDIT under the appropriate header
Change the values
To upload documents before submitting the application, see How to upload documents.
To request documents from the merchant before submitting the application, see How to request documents from the merchant.
To submit your application:
- When you’re satisfied that all the required details have been filled in, select Submit.
Important
Before the application moves to the underwriting phase, the merchant’s stakeholders you have marked as authorised signatures must all sign the merchant contract that has been sent to them via email using our e-signature provider. Should an authorised signatory decline the contract, the application will be marked as Contract Void and Closed.
Note
Once you’ve submitted the application, you’ll be returned to the portal home page where you can monitor your application’s status or carry out other actions in the portal. At any point you can return to the application and upload supporting documents if the application isn’t in the Closed phase.
How to resume a saved application
If you saved an application before submitting it, you can resume the application at any point.
To do this:
Find your application on the home page or by searching for it.
Select the open icon.
Continue entering the application information.
Important
If after 90 days from creating the application, it isn’t submitted, the application will be closed, and a new application must be started.
How merchants sign the contract
Once an application has been submitted, we distribute the contract via DocuSign for signature by the merchant’s authorised signatories that you captured in Stakeholder Information. The contract must be signed by all authorised signatories before application is moved to the underwriting stage.
Important
If after 90 days the contract isn’t signed, the application will be closed, and a new application must be started.
Should an authorised signatory decline the contract, the application will be marked as Contract Void and Closed.
Receiving email notifications
You’ll receive email notifications from us at specific points in the application journey through Fast Onboarding. Each email will summarise the applications status and prompt you to visit the portal to see more information or carry out specific actions. All emails are sent to the individual application creator.
Credit Approved
We have assessed the application and can confirm that credit has been approved. This is the first step toward being accepted.
There are still some compliance checks required to complete the underwriting process, so please be aware that full approval will only be granted once we have completed these and are happy with the result.
We may require further information from you to do this, which we will contact you about if that is the case.
More Information Required
We have reviewed your application and have found there is outstanding information or documentation which we require. Please visit the application portal to provide the additional information so we can complete your application.
Reminders are sent at the following frequency if the request for more information isn’t actioned:
3 days
7 days
14 days
30 days
60 days
Application Approved
The application has been approved. The merchant’s account will now be activated. Additional key information will be sent to you, covering their account details, terms, and how to access their online account.
Application Declined
We have assessed the application for your merchant and regrettably, we’re unable to offer them our services at this time. You can find out the specific reason for this in the application portal.
Application has expired
Your application has unfortunately expired.
Understanding the progress of your applications
Receiving a decision
Following the successful signing of the merchant contract, we run each merchant application through our decision engine to validate the application information provided and gathered from our third-party providers against a set of rules that cover both credit and compliance risk.
The possible application results are:
Approved.
Declined.
More information required.
Approved
When the merchant application is approved, you’ll see the application phase change to Closed and the activity set to Approved. As part of the approval decision, a risk score and rating are set in our system to configure the merchant for periodic monitoring.
Important
At this point, we initiate the account setup within our system, and you will receive communication from us once we’ve successfully activated the merchant’s account.
Declined
When the merchant application is declined, you’ll see the application phase change to Closed and the activity set to Declined. Where we can, we will share the reason why it has been declined as part of notes against the application, so that you can understand why we’ve declined it.
More information required
If we need more information from you to proceed further with the merchant’s application:
We assign the application back to you which will make it appear in your Other Activities in your worklist list. Once you open it, it will move to your Working on list.
The application is updated with the activity Additional Information Requested.
A list of documents required will be available to you when you open the application.
Before we can proceed further with your application, we require that you attach the documents and send the application back to us.
For more information, see Managing the documents to support an application.
Important
If after 90 days the documents haven’t been provided, the application will be closed, and a new application must be started.
This result is one which an application can go through multiple times before a final decision of Approved or Declined is made.
How to track the status of your applications
You can track your merchant applications and depending on your permissions, track all applications submitted by your organisation.
You can view your applications and your organisations applications in a variety of ways. For more information, see Viewing applications.
The status of each application is reported by the combination of Phase and Activity.
Click to see the status Phase and Activity table:
Phase |
Activity |
Description |
|---|---|---|
Quotation |
|
An application has been started and is at the Company Information and Accounts or the Pricing stage whereby a quotation can be sent to the merchant from our system. |
Application |
|
The full application information is being populated across the Company Information, Stakeholder Information, Trading Information and Store Information stages. |
Application |
|
The application creator has requested documents from the merchant and is waiting to receive the requested documents back. |
Application |
|
The application has been submitted and is awaiting the merchant’s authorised signatories to e-sign the contract. |
Underwriting |
|
The application has been submitted and the merchant’s authorised signatories have completed their e-signatures for the contract. |
Underwriting |
|
The Underwriter has reviewed the submitted application and has requested the application requestor provide additional documents to support the merchant’s application. |
Underwriting |
|
The application creator has requested documents from the merchant and is waiting to receive the requested documents back. |
Closed |
|
The application has been closed following the merchant being approved. The activation of the merchant will now be carried out. |
Closed |
|
The application has been closed following the merchant being declined. |
Closed |
|
The application creator has cancelled the application. |
Closed |
|
The application has been closed following the merchant not signing the contract within the given period. |
Closed |
|
The application has been closed following the merchant or application creator not providing the requested documents within the given period. |
Closed |
|
One of more of the merchant’s authorised signatories has declined to sign the contract or we have been unable to deliver the contract to the provided email addresses. |
Managing the documents to support an application
When applying for an account, you might need to provide us with additional documents that contain important information about the merchant or their stakeholders.
We group these additional documents into two categories:
Company – documents relating to the company that validate the information you’ve provided.
Stakeholder – documents relating to the individuals you’ve set as either directors or shareholders of the merchant that validate the information you’ve provided.
When requesting documents from the merchant or uploading documents in the portal, you’ll be presented with a list of document types to choose from. These document types are the common types that we require when additional documents are needed. If you can’t find the document type you require, you should select Other and write the document you need.
In this section you can find out more information about:
How to upload documents.
How to handle requests for documents from us.
How to ask your merchant contact to send additional documents.
How to track which documents have been uploaded.
How to return your application back to the Underwriter following a request for additional information.
How to upload documents
Documents can be uploaded at any time before you’ve submitted the application via each application screen.
To do this:
Select the upload icon in the top right of the screen you are on.
Select the Application ID.
Select New File.
- Select Choose file.
Find the file you want to upload.
Select Open.
Enter a name for the document in the Document Name field.
Select the Document Category that best represents the document you are uploading.
Add supporting information in the Note field.
Select Add.
Repeat steps 3-8 as many times as you require.
Select Close.
How to handle receiving requests for additional documents from us
After you’ve successful submitted an application, our team might ask you for additional documents to enable them to make a final decision.
In this scenario:
The application will be assigned back to you and in your Other Activities in your Worklist list.
- To view the requested documents:
Select the open icon. This moves the application into your Working on list.
Under the Application Decision tab, the document types required for the Company and/or Stakeholders are listed under the appropriate headings.
To upload the documents required, you can either gather them from the merchant using your own tools or processes and upload them yourself or request that the merchant upload them via Cashflows Fast Onboarding.
Once you or the merchant have uploaded the documents required, you need to send the application back to the Underwriter.
How to request documents from the merchant
Important
If you choose to request documents from the merchant through the available Cashflows Fast Onboarding document management feature, this will lock the application until the merchant has submitted the documents back to you. Using this functionality is optional and if you’d prefer to request the documents via your own tool or process, you can do this and simply upload the documents. For more information, see How to upload documents and Returning an application to the underwriter.
There are two scenarios when you might want to request documents from the merchant via the Cashflows Fast Onboarding. These scenarios are:
When you’ve populated the application information and are on the application summary screen ahead of submitting the application but know that you need to upload supporting documents which the merchant needs to provide
When you’ve submitted the application, reviewed by an Underwriter and it has been sent back to you for supporting documents.
In both cases, you should ensure you have the application open and on the application summary screen, then select the Documents Overview tab.
To request documents from the merchant, you need to:
- Select Request Documents.
Note
The documents required are grouped by company and individual stakeholders. A free text notes section is available for you to be able to provide written instructions if required.
Select the Company and/or Stakeholders you want to request documents for and select the document type for each. You can ask for multiple documents for the company or unique stakeholders.
Enter accompanying notes (optional).
- Select Request Documents to send the request to the merchant.
Note
Whilst the application is awaiting the merchant to upload the documents requested, the application will be moved from your Working on list to your Waiting Activities list.
The merchant is sent an automated email via the online portal asking them to provide additional documents to support their application.
Following receiving the email, they will need to:
Select the link in the email they’ve received which will open a webpage.
Read the documents requested and notes you’ve included.
Upload the documents requested via the Upload Documents.
Send the documents back to you by selecting the Submit Documents.
Note
When the merchant is uploading their documents for the company and stakeholders as you’ve requested, there isn’t a form of visual confirmation on the browser that the documents have been attached nor are the documents listed/removable. The documents however have been attached and upon selecting Submit Documents, they are attached the application in the portal.
Once the merchant has submitted the documents for the application, your application will be moved from your Waiting Activities list to your Other Activities in your Worklist list. From here, you can select Open Activities to resume working on the application which will move it back into your Working on list.
How to recall the application back from the merchant after you’ve requested documents from them
If you’ve used Fast Onboarding to request documents from the merchant but they’ve provided them to you via a different method, you can recall the application back to yourself without the merchant needing to do anything further.
You can do this by:
Find the application using the search functionality.
Select Unfreeze Activity (arrow) icon
Select YES when asked if you want to advance this application manually
Now that the application has been recalled, you can continue progressing it.
How to manage the documents uploaded by the merchant
When you’ve requested documents from the merchant, you can view the returned documents by:
Opening the application by selecting Open Activity icon.
Select Documents icon in the top right.
Select the application ID on the left-hand side.
View the summary of the listed documents.
Select Options icon.
Select Download.
Returning an application to the underwriter
If you’ve received a request to provide additional documents, after you’ve uploaded the documents either yourself or by requesting the documents from the merchant, you’ll need to return the application to the Underwriter.
To do this:
Opening the application by selecting the Open icon.
Navigate to the Application Decision tab.
Select Send back to Underwriter.
Important
If after 90 days the application hasn’t been returned to the underwriter, the application will be closed, and a new application must be started.
Viewing applications
There are several ways to search for applications in Cashflows Fast Onboarding.
View a detailed list of applications you are actively working on.
View a detailed list of applications that are awaiting actions from someone else.
Run a filtered search for applications.
Create and save custom views.
View individual applications detailed information.
How to view applications you are working on
Select Worklist.
- View your applications in the results table.
Tip
By default, 10 records are displayed with the latest application at the top. You can change the number of records per page by selecting another value from the dropdown.
How to view applications that are awaiting actions from someone else
You can view the applications that you’ve worked on but are currently assigned to someone else for them to progress the application. For example, your applications that have been submitted and are in the underwriting phase pending a decision will be visible here.
Select Waiting Activities.
- View your applications in the results table.
Tip
By default, 10 records are displayed with the latest application at the top. You can change the number of records per page by selecting another value from the dropdown.
How to run a filtered search
Search enables you to filter your organisations applications by setting criteria to narrow your down the results.
To search your organisations applications, you need to:
Select Search on the left-hand side.
Select Cashflows as the Business Process.
- Select your search criteria or you can leave them empty and do a default search.
Tip
Selecting the Business Process as Cashflows will enable additional filter options such as Phase and Current Activity.
Application ID – enables you to filter the applications by the value(s) you provide. This will carry out a partial match search. For example, ‘4’ will return all applications that have an ID with 4 as one of the numbers.
Merchant Name – enables you to filter the applications by the value(s) you provide. This will carry out a partial match search. For example, ‘p’ will return all applications where the Merchant Name contains the letter ‘p’.
Application Creation Date – enables you to filter the applications by a date range for when they were created.
Tip
You can choose from several standard periods by selecting the down arrow next to the from date.
Application Owner: User – enables you to filter the applications to a single application creator.
Application Owner: Organization - enables you to filter the applications to a single organisation.
Phase & Current Activity – returns your applications that currently fall into the defined Phase and Current Activity.
- Select Search.
Tip
If you select Save, this will create your search criteria as a custom view which will be manageable from the custom views section.
- View the Search results. You can manage the results list in the following ways:
Select the number of applications per page. Enter the desired number in the Display XX record per page field.
Select the display order. Choose from the following fields and then select ascending or descending order.
How to view the detail of an application without the application being assigned to you
You can view the details of your applications regardless of it’s current status at any time.
To do this:
Firstly, find your application in any of the pre-defined views or by using the search or custom view functionality described in this section
Select the Open Activity icon.
Select Process Details.
Allow the screen to load the information.
Navigate between the tabs to see the application details.
Managing custom views
Custom Views enables you to create and save your own application searches and filters that you can use later to retrieve results quickly.
Custom views can be created for four different groupings. These are:
Search, Online – All applications that are currently being worked on or if they are closed, were closed within the last 6 months.
Search, Archive – All applications that were closed over 6 months ago can be found in the archive grouping. Archived applications can still be viewed but only the summary information will be available to users.
Worklist – Only applications you are actively working on.
Waiting Activities - Only applications that you’ve worked on but are currently assigned tosomeone else for them to progress the application.
How to create a custom view
Select Custom Views on the left-hand side.
Select Add next to Search, Online.
Enter a name for your custom view.
Select Cashflows as the Business Process.
- Select your search criteria or you can leave them empty.
Tip
Selecting the Business Process as Cashflows will enable additional filter options such as Phase and Current Activity.
Application ID – enables you to filter the applications by the value(s) you provide. This will carry out a partial match search. For example, ‘4’ will return all applications that have an ID with 4 as one of the numbers.
Merchant Name – enables you to filter the applications by the value(s) you provide. This will carry out a partial match search. For example, ‘p’ will return all applications where the Merchant Name contains the letter ‘p’.
- A**pplication Creation Date** – enables you to filter the applications by a date range for when they were created.
Tip
You can choose from several standard periods by selecting the down arrow next to the from date.
Application Owner: User – enables you to filter the applications to a single application creator.
Application Owner: Organisation - enables you to filter the applications to a single organisation.
Phase & Current Activity – returns your applications that currently fall into the defined Phase and Current Activity.
Select Test to validate your filter criteria returns the results you want.
Select Save.
How to view one of your custom view’s results
Select Custom Views on the left-hand side.
Select the custom view.
How to edit one of your custom views
Select Custom Views on the left-hand side.
Select Modify for the custom view next to the one you want to change.
Modify the search criteria.
Select Test to validate your filter criteria returns the results you want.
Select Save.
How to delete one of your custom views
Select Custom Views on the left-hand side.
Select Delete for the custom view next to the one you want to delete.
How to view an application’s detailed information
Following finding the application, you can view the applications detailed information without having to be the application owner or having it locked to you.
To do this:
Select the Options icon.
Select Process Details.
Cashflows Portal for Partners
Cashflows Portal is our secure online portal. When you sign in as a partner you can:
View in one place transactions for all of your customers. This includes all of the businesses and outlets (merchants) that you work with. For more information, see To work in partner context.
View transactions for a specified customer (business or outlet). For more information, see How to choose a partner, business or merchant context.
View the business details of your customers that are stored in Cashflows Portal, for example business name, ID, and contact details. For more information, see How to view business and contact details of a merchant.
- View your commission and pricing plans. For more information, see:
Manage users. For example you can add more users and control access permissions. For more information, see Managing users.
Benefits of using Cashflows Portal
See all of your customer transactions in one place.
Specify a business or outlet (merchant ) and see what they see.
You don’t need to sign in as a different business or outlet (merchant) user and you don’t need to sign into a different system.
How Cashflows Portal looks
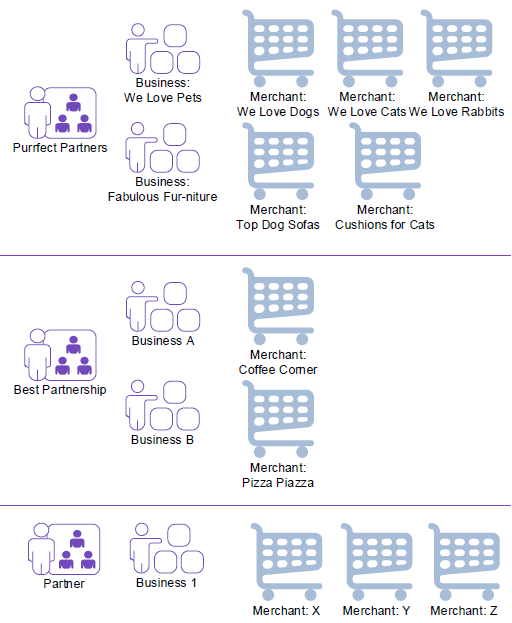
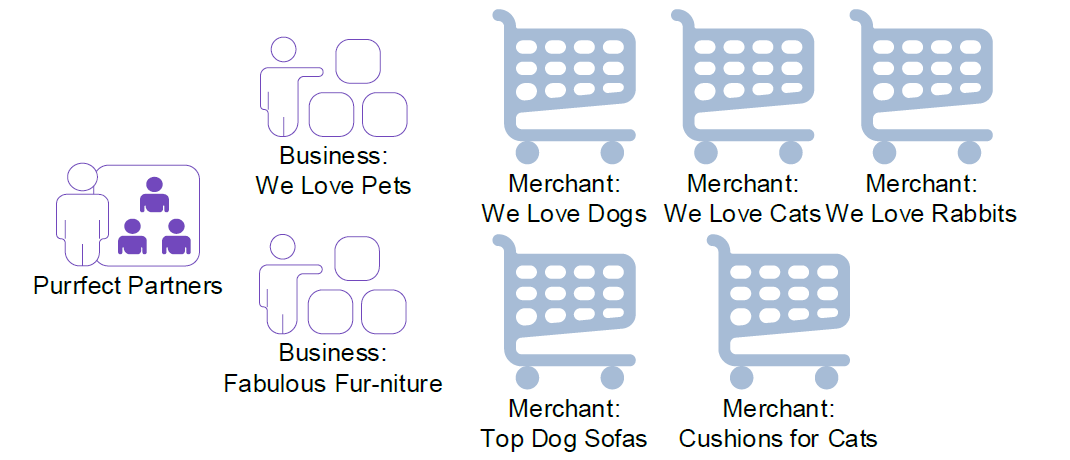
In Cashflows Portal there’s a hierarchy of:
Partner Your organisation
Business Your customers. Each merchant is set up with a business ID and can have multiple merchant IDs to one business ID.
Merchant Your customers. The individual merchant IDs under the business ID. Your customers access Cashflows Portal via their Business ID and then select the merchant ID of the customer that they want to look into.
Each business and outlet (merchant) can have its own Cashflows Portal account.
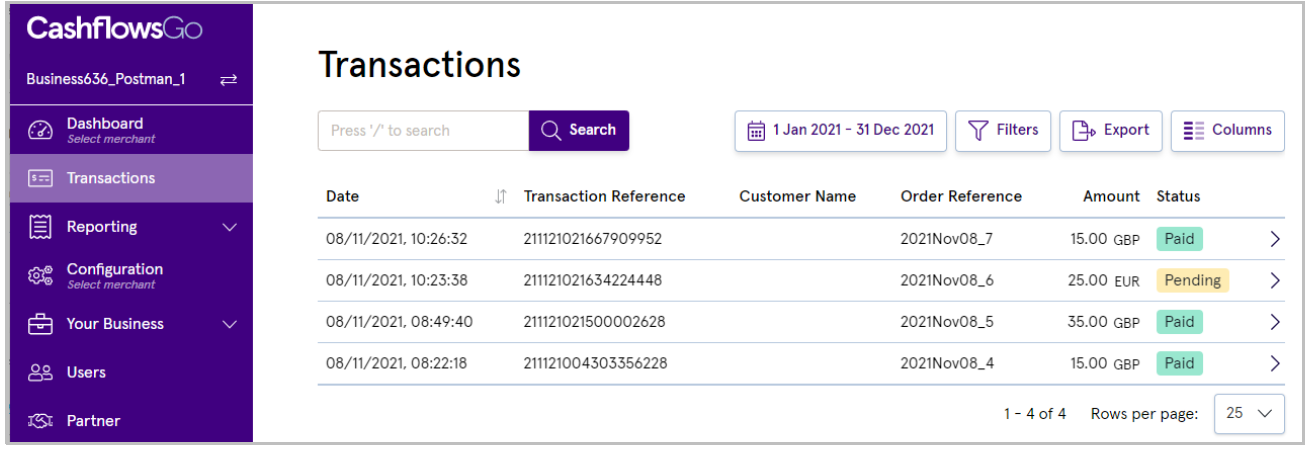
When youSign into Cashflows Portal as a partner, you can choose to work in the context of partner and see transactions for all of your customers and business information for your organisation. You can also choose to view transactions and business information for a selected customer or an individual outlet. This enables you to see what your customers see and is useful if any of them need support. For more information, see How to choose a partner, business or merchant context.
Here’s an example that shows what you see when you sign in to Cashflows Portal in partner context, without selecting a business or merchant. The first page displayed is the Transactions page.
Note
The columns shown in the examples throughout this guide depend on whether the display has been customised. If a page has a Columns button, you can use it to choose which columns to show or hide. This enables you to focus on the detail that you need most. For more information, see How to customise the display.
Tip
Your organisation’s name is displayed at the top of the menu. Your initials are displayed at the bottom.
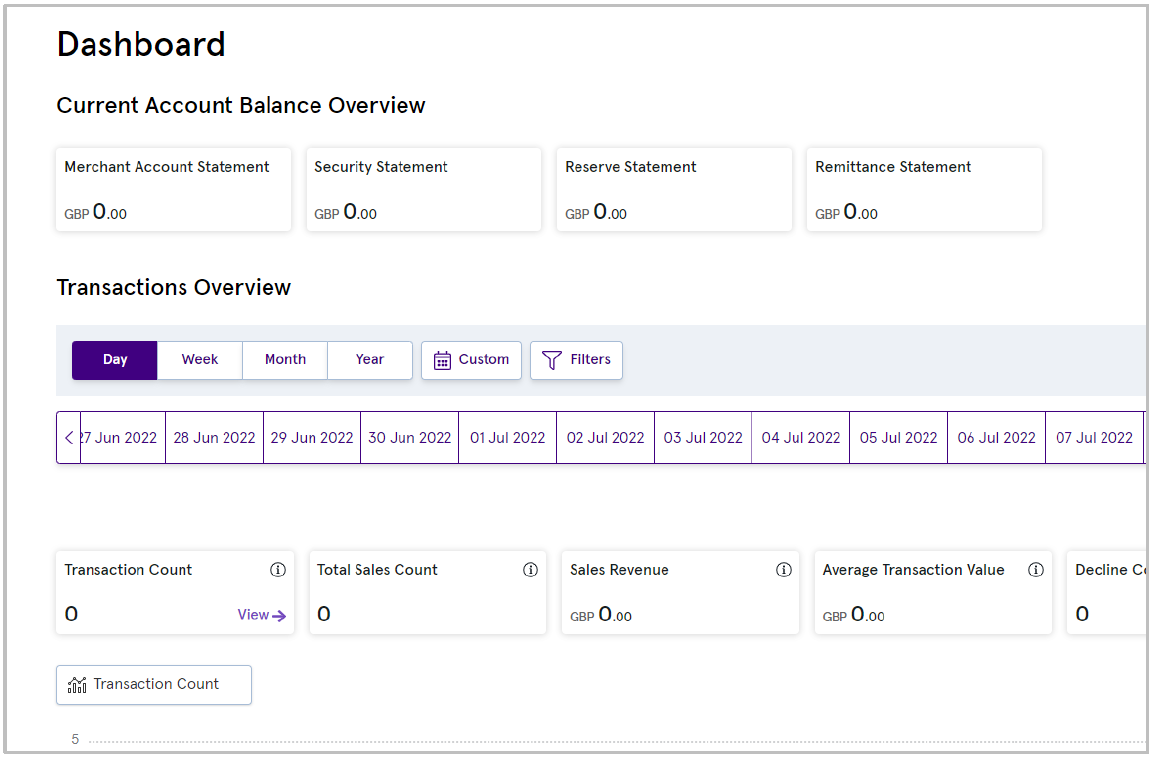
Here’s an example that shows what you see when you sign in to Cashflows Portal as a partner and then select a business and a merchant. The first page displayed is the Dashboard page for the selected merchant.
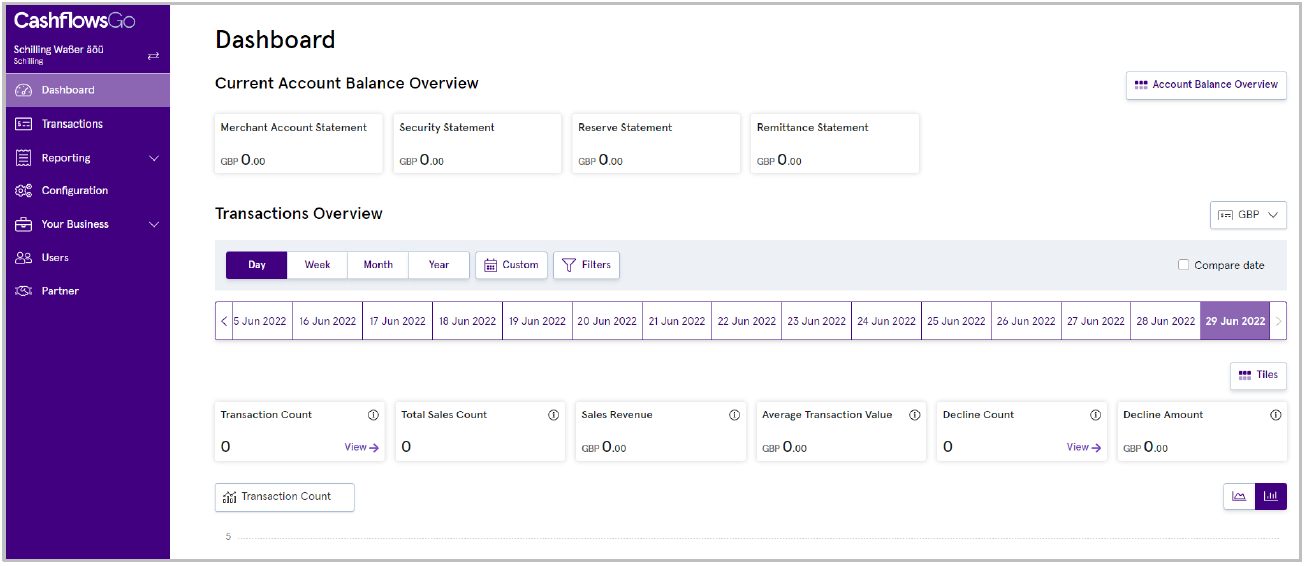
Tip
The name of the selected business and merchant are displayed at the top of the Cashflows Portal menu.
The available menu options on the left, depend on the context that you choose.
The menu that you see when you sign in to Cashflows Portal as a partner is different to the menu that merchants see. For an overview of Cashflows Portal for merchants, see the Cashflows Portal guide.
The default menu that you see you when you sign in as a partner, has options that:
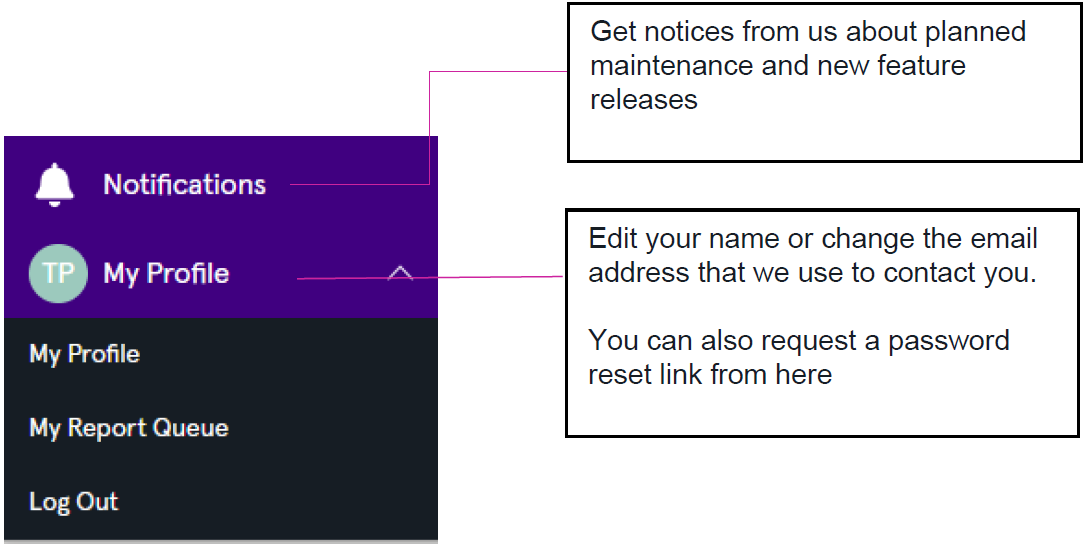
Take you straight to the Notifications centre This is where we communicate about planned maintenance and announce new features and releases.
Display your profile so that you can view contact details if you need to.
Enable you to securely sign out from Cashflows Portal.
Notifications
Unread notifications, have a red dot displayed next to the notifications icon together with the number of unread notifications in brackets.
To read the latest notifications:
From the Cashflows Portal menu, select Notifications. The Notifications Center page displays a list of message summaries. New notifications have a New label in red so that they stand out from the list.
To find out more about a notification, select Read Notification.
Recent and favourite merchants
You can easily return to a merchant that you were recently working on. Select or clear the star next to the business or merchant name to mark the ones that you work with most often as your favourites.
Your favourite merchants are then listed on a separate page.
Getting started with Portal
This section explains how to start using Cashflows Portal as a partner.
What you need
To use Cashflows Portal as a partner you need:
An internet connection
A browser
A Cashflows Portal account with Partner access permissions. When you become a partner with us, we send you a welcome email from noreply@Cashflows.com. The email tells you that we have created an account for your organisation and includes a link for setting the password for the first user.
Tip
The link in the email expires after 24 hours. Therefore, we advise you to set your password as soon as you receive your welcome email.
If you have not received this email, check your Junk folder or contact your account manager.
You can always request a new password email if you select Forgotten password? on the Login page.
What you need to do
To start using Cashflows Portal as a partner:
Sign in to Cashflows Portal with your partner account details.
Set your password.
Add a second partner user.
How to sign in to Cashflows Portal
Select Cashflows Portal.
Enter your email address.
- Enter your password.
Note
Passwords are case sensitive.
- Select Sign in.
Warning
If you forget your password and try unsuccessfully to sign in too many times, your account becomes locked. You cannot unlock your own account. You either need to ask another partner user to unlock your account or for you or use the Forgotten Password link on the Login page to request a password reset.
How to set your Cashflows Portal password
If you are the first user, you can sign in with the account details that we send in the welcome email. For security, the first thing you need to do is set your own password.
Note
You can try to sign in to Cashflows Portal up to six times. If the sixth attempt is unsuccessful, your account becomes locked for at least 30 minutes or until we can confirm your identity.
We set this password policy at Cashflows. You cannot change this.
To set your own Cashflows Portal password:
Display the Cashflows Portal sign in page.
Select Forgotten password?
Enter your email address.
Select Email link. We send you an email that contains a link that you can use to set a new password.
Select the link. You see the Change password page.
On the Change password page, enter a new password.
Retype your new password into the Confirm New Password field.
Select Submit. When you have successfully entered your new password, you see a confirmation page to tell you that your new password is now active. We also send you a confirmation email.
How to change your Cashflows Portal password or request a reset
You can change your own password at any time. If you have forgotten your password, you can request a reset. We send you a link with instructions to follow so that you can set a new password.
Passwords are case sensitive. Your new password must:
Be at least ten characters long.
Contain both letters and numbers.
Contain at least one non-alphanumeric character (such as a symbol).
Tip
A password may not be accepted if it has been used already in the previous 10 passwords.
To change your Cashflows Portal password or request a reset:
Display the Cashflows Portal sign in page.
Select Forgotten password?
Enter your email address.
Select Email link. We send you an email that contains a link that you can use to set a new password.
Select the link. You see the Change password page.
On the Change password page, enter a new password.
Retype your new password into the Confirm New Password field.
Select Submit. When you have successfully entered your new password, you see a confirmation page to tell you that your new password is now active. We also send you a confirmation email.
Note
These emails sometimes go to the Junk or Spam folder and the link in the email expires after 24 hours. If you have not used the link within 24 hours, you can trigger a new email in the same way.
You can now add more users. It’s good practice to add a second partner user as soon as possible in case the first partner account ever needs to be unlocked. For more information, see Managing users.
How to sign out from Cashflows Portal
It’s good security practice to sign out from Cashflows Portal instead of only closing the browser.
To sign out from Cashflows Portal:
From the Cashflows Portal menu, select My Profile.
Select Log Out. The Login page is displayed.
How to choose a business or merchant context
When youSign into Cashflows Portal as a partner, you have access to all of your merchant accounts with Cashflows in one place.
When youSign into Cashflows Portal as a partner, you can choose to remain working at partner level or in the context of a business or merchant and see transactions and other business information that they see. This is useful if any of your customers need support.
Note
As a partner, your access to merchant information is read-only. You cannot change any merchant details.
To select a context:
Sign into Cashflows Portal as a partner. The Welcome page is displayed.
Select a level (context) at which you would like to work.
You can choose any of the following context options.
To work in partner context:
Select Continue without Business:

Select Apply.
To work in business context:
Select a Business.
Select Continue without Merchant:
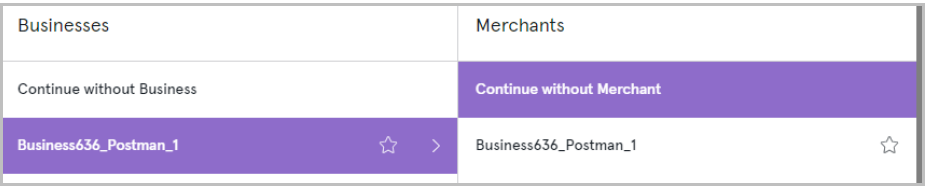
Select Apply.
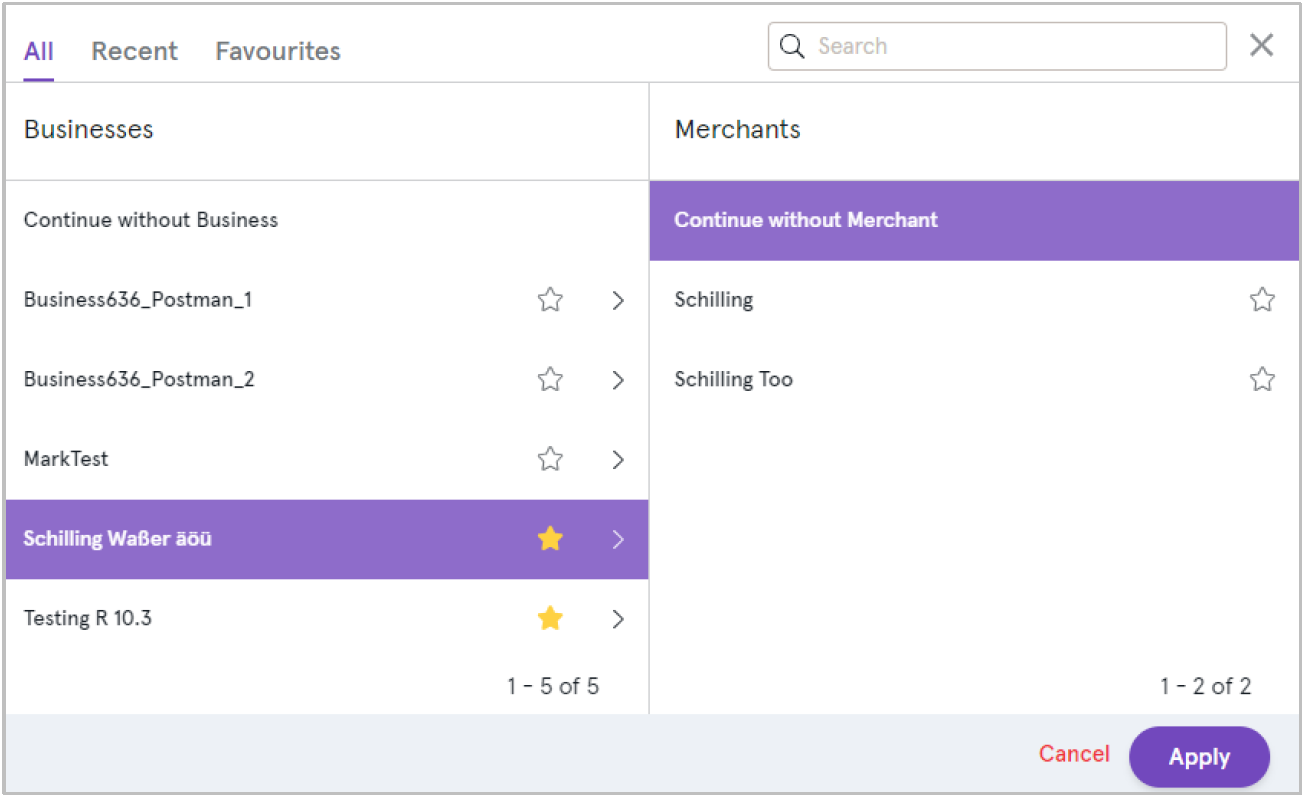
To work in merchant context:
Select a Business.
Select a Merchant:
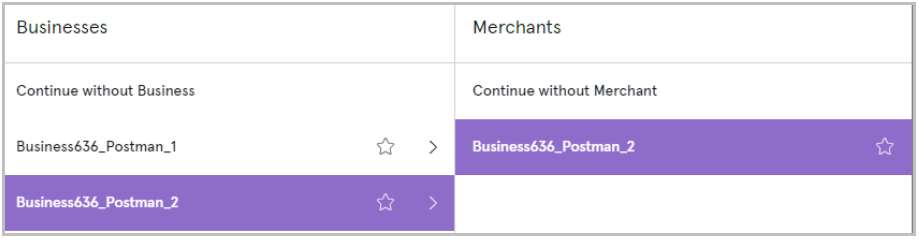
Select Apply. If you selected a business, you see the Transactions page, if you selected a merchant, you see the merchant Dashboard.
For more information about merchant dashboards, see the Cashflows Portal guide.
How to customise the display
The columns shown in the examples throughout this guide depend on whether the display has been customised. If a page has a Columns button, you can use it to choose which columns to show or hide. This enables you to focus on the detail that you need most.
How to show or hide columns
Select the Columns button.
Select each column that you want to display.
Clear any columns that you don’t want to display.
Select Apply. The columns are immediately updated on the page that you had displayed.
Managing users
Each Cashflows Portal user has a user role. Your user role controls the accounts that you have access to, the options that you can use and the tasks that you can carry out. We set up the initial user with the role of Partner. As the first Partner user, you can create additional partner users and assign them a permissions role.
Important
It’s good practice to add a second user with Partner permissions as soon as possible. This means that there is always a second person with the highest level access permissions. This is essential, for example, if a partner user account ever becomes locked.
As a partner user, you see a Partner option on the Cashflows Portal menu. If you select this option, you can see a list of current users, if there are any, and an option to add more users.
How to add a user
To add a user:
Sign into Cashflows Portal as a partner and do not choose a business or merchant context.
From the Cashflows Portal menu, select Partner.
Select the Users page.
Select +New User.
Enter the user’s first and last names.
Enter their email address.
Select Add User to create the new user.
Select Save User. The user details are validated. If there are no errors, the user is created and their account is activated. An email is automatically sent to the specified email address with a message to invite the newly created user to follow a link and set their password.
How to change user details
As a partner user you can change some of the details about other partner level users for your organisation. You can change a user’s:
First name
Last Name
Email address
User role(s)
To change a user’s details:
Sign into Cashflows Portal as a partner and do not choose a business or merchant context.
From the Cashflows Portal menu, select Partner.
Select the Users page.
Select the user whose details you want to change.
Change the details as required.
Select Save User.
How to delete a user
It’s good user management to delete users who no longer need access to your systems, for example if they leave your business or change to a role that no longer requires access to Cashflows Portal.
To delete a partner user:
Sign into Cashflows Portal as a partner and do not choose a business or merchant context.
From the Cashflows Portal menu, select Partner.
Select the Users page.
Select the user that you want to delete.
Select Delete User.
A confirmation message is displayed. If you don’t want to delete the user, select Cancel. If you’re sure that you do want to go ahead and delete the selected user, select Delete.
How to unlock a partner user account
For security reasons, if another user enters incorrect sign-in details too many times, their account becomes locked and they may contact you to unlock their account. As the primary partner user, you can do this for any of the partner level users at your organisation.
To unlock an account:
Sign into Cashflows Portal as a partner and do not choose a business or merchant context.
From the Cashflows Portal menu, select Partner.
Select the Users page.
Select the user whose account you want to unlock.
Select Unlock Account.
How to lock an account
If you ever need to prevent a user from using Cashflows Portal, you can lock their account so that they are unable to sign in.
Important
Locking an account is temporary and you can always unlock an account. However, deleting a user’s account is permanent and may not be reversed. They need to be added again as a new user.
To lock an account:
Sign into Cashflows Portal as a partner and do not choose a business or merchant context.
From the Cashflows Portal menu, select Partner.
Select the Users page.
Select the user whose account you want to lock.
Select Lock account. The user is immediately unable to sign into their account. If a user is already signed in when you lock their account, they are automatically be signed out and cannot sign back in.
Viewing customer business information
As a partner user, you have read-only access to some business details that relate to your customers. These details include business name, ID, address and nominated signatories. This is the information that was provided to us when you became a partner with us and is stored in Cashflows Portal. You can also view a list of outlets (merchants) that are associated with each of your customers.
Note
If it’s ever necessary to change any of these details, you need to contact the Cashflows support team: techsupport@cashflows.com.
As a partner user, you also have read-only access to information about your merchant customers such as name, ID, and support details.
How to view business details of your customers
As a partner user, you can view details that we store in Cashflows Portal about any of the businesses or merchants that are associated with your partner organisation.
To view your business details:
Sign into Cashflows Portal as a partner.
Select your Business.
Select Continue without Merchant.
Select Apply.
From the Cashflows Portal menu, select Your Business.
Select Business Details.
If you select one of your associated merchants from the list, you have ready-only access to their business details. For more information, see How to view business and contact details of a merchant.
How to view your partner commission plans
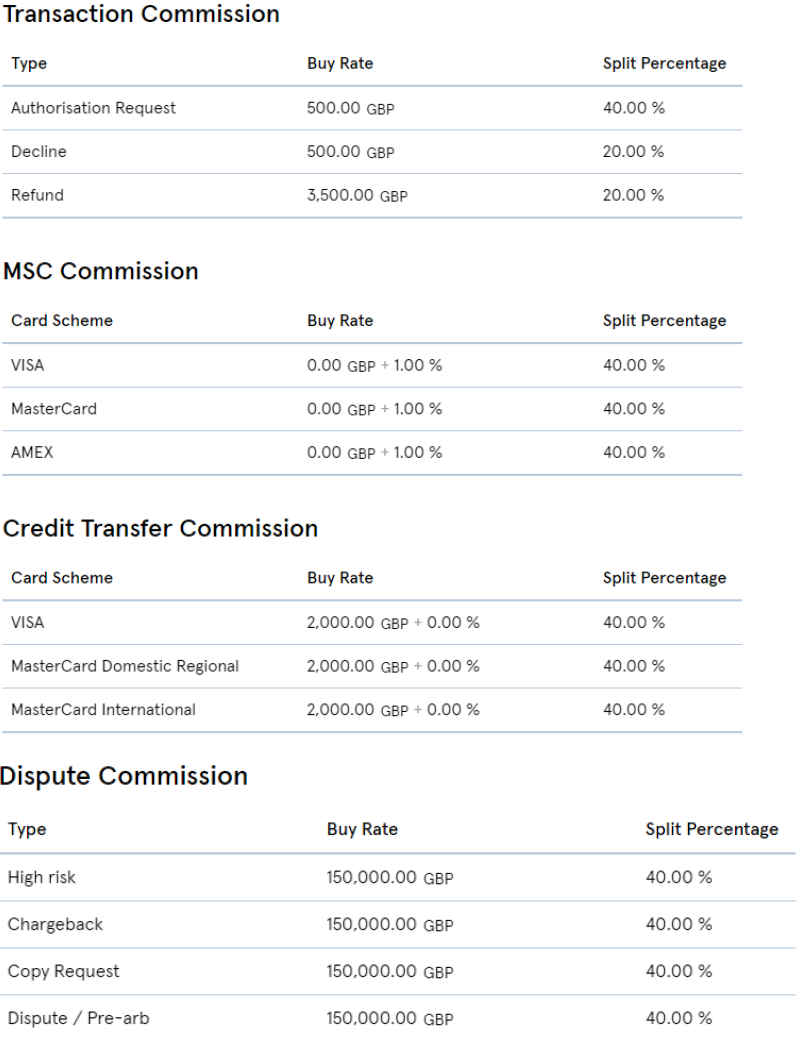
With Cashflows Portal you can view a single page that shows the following different commission plans that are in place for your partner organisation:
Transaction commission - Commission that your organisation earns per transaction
Merchant Service Charge (MSC) commission - Commission that your organisation receives from us for a specified service
Credit transfer commission - Commission that your organisation receives if one or your merchant customers is using Credit Transfers
Dispute commission - Commission that your organisation receives if one or your merchant customers is using disputes / chargebacks
To view your commissions plans:
Sign into Cashflows Portal as a partner and do not choose a business or merchant context.
Select Continue without Business.
Select Apply.
- From the Cashflows Portal menu, select Partner.
A list of merchants for which commission plans have been set up is displayed below the Partner Details.
Select a merchant to display the full list of commission plans that your organisation has in place for selling the services of the selected merchant.
How to view all of your customer transactions
Cashflows Portal provides a complete view for all of your customer transactions. The Transactions page is a real-time list that updates to display all incoming transactions together with their status such as Paid or Pending. The status is updated as a payment passes through the payment processing lifecycle.
To view all of your customer transactions:
Sign into Cashflows Portal as a partner and do not choose a business or merchant context.
Select Continue without Business.
Select Apply to display the transactions page.
You can customise the list to suit your information needs and focus on exactly what you need to investigate. For more information, see How to customise the display.
The Transactions page has a search feature that you can use to search for one or more transactions that match specified criteria.
How to search for transactions
There are many ways to search for transactions in Cashflows Portal. To help you locate a specific payment or a set of payments that match specific criteria, you can apply a filter.
Tip
If you often carry out the same search, you can also save a search filter and re-use it.
You can search for and focus on one or more payments that:
Took place on a specific date or between a start and end date.
Have the same payment status, for example Paid or Declined.
Match a specified amount or fall between a minimum and maximum amount.
Are all in the same currency.
Were made using the same payment method, for example by card or with PayPal.
- Were made via the same channel, such as:
Online payments via our Cashflows Gateway.
In-store payments via a card machine (as part of our cardholder present solution).
Via our acquiring platform.
To search for one or more payments in Cashflows Portal:
Sign into Cashflows Portal as a partner.
Select a context.
From the Cashflows Portal menu, select Transactions.
To search for one or more transactions, specify the search criteria to match.
If any payments match the conditions that you have specified, they are displayed on the page. You can choose which columns to display and hide any that you don’t need to see. Select Columns.
Select the columns that you want to display and clear the columns that you don’t need.
You can also choose how many payments to display per page, for example or 10 or 50 or 100.
When you have found the payment(s) that you needed to find, you can select a payment to investigate in more detail.
Viewing merchant dashboards
As a partner, you have read-only access to the dashboards of your merchant customers. A merchant dashboard presents payment information in a user-friendly graphical format.
You can search for and view transactions placed via the Cashflows Portal Virtual Terminal and/or any other channels such as Card or PayPal.
You can also:
View the business and contact details of a merchant.
View a pricing plan for a selected merchant. For more information, see How to search for transactions.
How to view business and contact details of a merchant customer
If you need them you can find the business details, such as Merchant ID, and contact details for any of your merchants in one handy place via Cashflows Portal.
To view the business and contact details of a merchant:
Sign into Cashflows Portal as a partner.
Select a business.
Select a merchant.
Select Apply.
From the Cashflows Portal menu, select Your Business.
Select Merchant Details. An overview pages is displayed with the business and support details for the selected merchant.
How to view merchant transactions
As a partner, you have read-only access to the payment information of your merchant customers. You can view a merchant dashboard for a real-time graphical snapshot. You can also view transaction information in more detail. You can then search for and view transactions placed with the merchant via the Cashflows Portal Virtual Terminal and/or any other channels such as Card or PayPal.
To view merchant transactions:
Sign into Cashflows Portal as a partner.
Select a business.
Select a merchant.
Select Apply. The dashboard is displayed for the selected merchant.
From the Cashflows Portal menu, select Transactions. The Transactions page is displayed.
You can customise the list to suit your information needs and focus on exactly what you need to investigate. For more information, see How to customise the display.
The Transactions page has a search feature that you can use to search for one or more transactions that match specified criteria. For more information, see How to search for transactions.
You can also request to have a daily Transaction Report set up.
How to view a breakdown of your pricing plans
At any time you can view a breakdown of your account pricing plans for a selected merchant.
To view a merchant pricing plan:
Sign into Cashflows Portal as a partner.
Select a business.
Select a merchant.
Select Apply.
From the Cashflows Portal menu, select Pricing Plan.
A full list of pricing plans is displayed for the selected merchant.
How to view a list of all customer in one place
You can view a list of all of your customers (their business IDs and their merchants that are assigned to your partner organisation).
To view all customers in one place:
Sign into Cashflows Portal as a partner.
Select a business.
Select a merchant.
Select Apply.
From the Cashflows Portal menu, select Partner.
Select the Associated Businesses page.
From the Associated Business page you can:
Select a business ID to display an Overview of the selected business together with a list of associated merchants.
Select the business URL to visit the website for the selected merchant
Select View Transactions to display the Transactions page for the associated business.
Transaction Report
As well as using the merchant dashboard to monitor transactions, you can also request to set up a report covering all unique successful and unsuccessful transactions within a specified reporting period.
The report covers the proceeding day’s transactions and is distributed daily by SFTP as an xlsx file at approximately 1300 UTC.
The naming convention for the report is {partnerName}_transactionreport_{reportDataDate}. For example, a transaction report covering the transactions of a partner called Example for the 13 October 2024 would be: Example_transactionreport_20241013.xlsx.
To receive the report, please contact support with an SSH key ready we can use to set up an SFTP server.
Note
Transaction Reports will be held on the SFTP server until the 15th of each month, upon which date any reports over a month old will be archived. Please contact support if you need to retrieve an archived report.
Report fields
Click to show
Field Name |
Type |
Description |
|---|---|---|
|
Integer |
Unique identifier for the business account |
|
String |
Descriptive name for the business account |
|
Integer |
Unique identifier for the merchant account |
|
Integer |
Unique identifier for which partner account the transaction is processed under |
|
Integer |
Descriptive name for the merchant account |
|
Integer |
The ID of the terminal that the transaction was processed under by Cashflows |
|
DateTime |
The date and time that the transaction was performed |
|
String |
The unique primary identifier for the transaction with Cashflows |
|
String |
The unique acquirer reference number for the transaction |
|
String |
The unique identifier passed by the requestor to Cashflows for the transaction |
|
String |
Used to link the transaction back to the original |
|
String |
Used to link the transaction to the previous transaction |
|
String |
Enum for the type of transaction performed. For example:
|
|
String |
Enum for the status of transaction performed. For example:
|
|
String |
The currency the transaction was performed using |
|
String |
The FX rate being applied to the transaction to convert to GBP (if applicable) |
|
String |
The scheme which the transaction was performed with |
|
String |
Auth status for the performed transaction |
|
String |
A code that provides a reason for the response |
|
String |
The transaction ID provided by the scheme |
|
String |
The response message provided by the scheme |
|
String |
The response code provided by the scheme |
|
String |
The response message provided by the scheme |
|
Integer |
The response from the 3DS server |
|
String |
The type of ewallet that used for the transaction. |
|
String |
The type of card that was used for the transaction. For example:
|
|
String |
The country that the merchant is operating from |
|
String |
The country that the card originates from |
|
String |
The card region categorisation. For example:
|
|
String |
The method used to make the transaction. Also known as Input Method. For example:
|
|
Decimal |
The monetary amount of the transaction |
|
Decimal |
The monetary amount of the transaction converted to GBP |
|
Decimal |
The cost of processing the acquiring transaction. This includes:
|
|
Decimal |
The cost of processing the acquiring transaction converted to GBP |
Configuration
When you sign in to Cashflows Portal as a partner, you have read-only access to the configuration pages of your outlet (merchant) customers. You can see each merchant’s account configuration and provide support when your customers have questions or need help with their integration into Cashflows.
To display configuration details:
Sign in to Cashflows Portal as a partner and select a context, depending on the configuration that you want to display. For more information, see How to choose a partner, business or merchant context.
- From the Cashflows Portal menu, select Configuration. The Configuration pages are displayed for the business or merchant that you selected. You can see how they have configured:
Emails for abandoned payments and order confirmations
The webpage addresses (return URLs) to use for redirecting customers after payment processing
Where to send payment status updates (notifications)
The payment methods that are enabled