Hosted Checkout Pages
Welcome to this guide about adding a Cashflows Hosted Checkout Pages to a website. This is an integration guide for website developers. This guide assumes some knowledge of programming and using API calls.
This guide is for you if you are a developer working on a website for an online business. It may also be useful if you are a business owner who:
Uses Cashflows services for processing online card payments.
Wants to add a page to your website that looks and feels just like your other webpages but is hosted by us.
Note
The tasks described in this guide involve our Gateway API. Our API accepts calls in JavaScript Object Notation (JSON). Therefore, the examples throughout this guide are in JSON. You can use different programming languages to create the JSON.
To provide a seamless shopper experience, we offer the option to add a secure payment webpage that looks and feels like part of your website but is created and hosted by us. We call this a Hosted Checkout Pages.
Our Hosted Checkout Pages is a secure webpage that you can incorporate into a website. By connecting our Hosted Checkout Pages to your website, you are integrating with the Cashflows Gateway and all of the functionality that comes with it for processing online payments. You direct shoppers to our Hosted Checkout Pages where they check out and pay. We take care of the processing, including security aspects and many of the technical complexities. Then when we have finished the payment processing, we redirect the shopper back to your website.
Key features
Our Hosted Checkout Pages offers:
Secure storage - Cards are securely stored in a way that a shopper’s card details are never revealed at any stage of the payment process. For a smooth payment experience, our Hosted Checkout Pages presents previously stored cards to shoppers making it a fast and convenient way for your regular customers to pay.
PCI compliance - Shoppers can safely enter their card details and pay with confidence. When we have finished processing a payment, the shopper can be redirected back to your site.
3D Secure - 3D Secure services (up to version 2.2) from Visa (Verified by Visa) and Mastercard (SecureCode) are included.
Mobile device optimised - Our Hosted Checkout Pages is mobile ready. You don’t need to change it or write any extra code.
Full customisation - You can use the default Hosted Checkout Pages as we provide it or you can customise the look and feel to match the other pages of your website. For example, you can add your logo, apply your branding, font, and colours.
For more information about how to customise a Hosted Checkout Pages, see How to customise a Hosted Checkout Pages.
The benefits of using a Hosted Checkout Pages
If you’re the owner of an online business, this means:
No need to pay for security certification
Payment Card Industry Data Security Standards (PCI DSS) require that webpages that accept credit card information must have SSLv3 128-bit minimum certificates. Our Hosted Checkout Pages has a 128-bit to 256-bit certificate that provides functionality that the PCI Security Standard Council recommends as best practice for providing extra shopper confidence and awareness. This includes displaying a padlock icon or green address bar.
Reduced compliance costs
PCI DSS also states that any website that accepts card information must never store the security code. If a website does store card details, it must be 256-bit AES encrypted. Most web servers log traffic to and from them which may include card numbers. To ensure that card numbers are not being stored, these logs would need to be audited on a continual basis. If you use our Hosted Checkout Pages, we take care of this for you.
If you use our Hosted Checkout Pages, you can avoid capturing card details on your website altogether. This relieves you of the associated compliance and security responsibilities. We take on this burden instead as we capture the card data directly. Our Hosted Checkout Pages is a great solution if you don’t want to host card data yourself but still want an easy and smooth checkout experience on your website.
For more information about PCI DSS and the security requirements that you need to be aware of, visit the PCI Security Standards Council website.
Modern integration
Our Cashflows Gateway uses the latest integration practices to provide security and flexibility. If you need help, contact the our Technical Support team or your account manager.
How it works
This section illustrates how a Hosted Checkout Pages fits into the payment flow when a shopper pays for their purchase. This all happens in about one second.
The first diagram shows the high-level payment flow in terms of a shopping experience. The diagram that follows shows more detail with API calls that you’ll be using to make this happen.
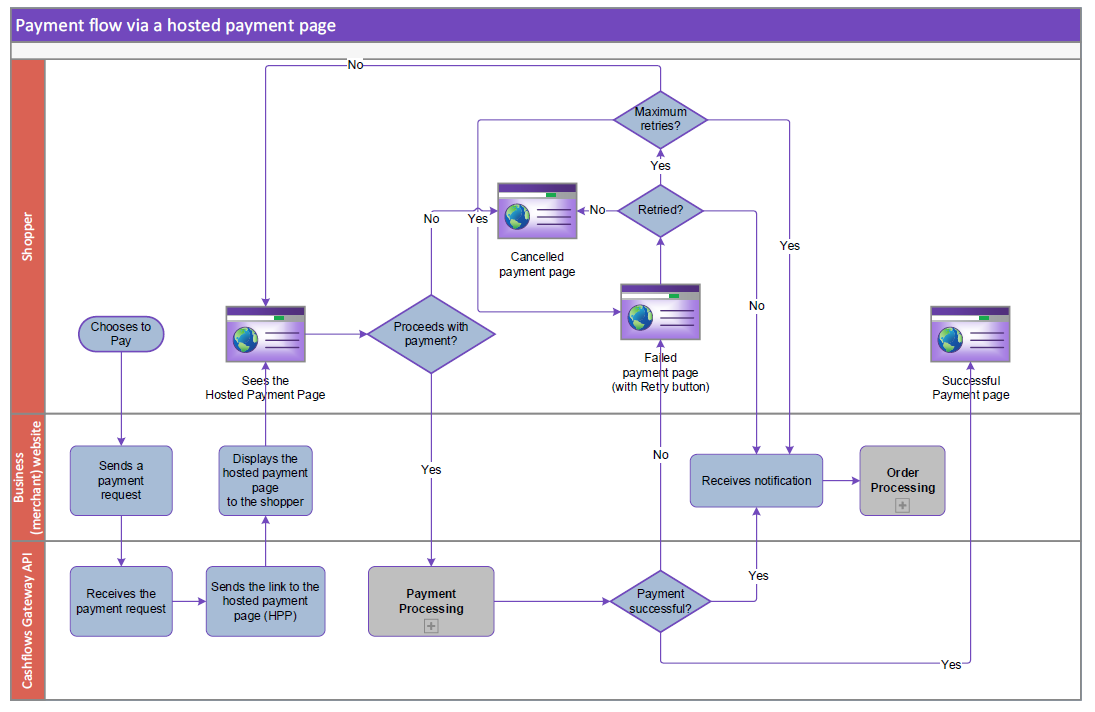
A shopper starts the checkout process on your website when they choose to pay.
Your website sends a payment request to our online payment servers to initiate the transaction.
We display the Hosted Checkout Pages to the shopper. This is the payment page that we host for you.
The shopper securely enters their card details.
We process the payment as soon as we have the details that we need.
We notify you about the status of the payment (whether it was successful, or if it failed, or if the shopper cancelled).
We redirect the shopper back to your website.
You receive the status notification that we’ve sent you and advise the shopper accordingly via a corresponding web page.
You update the shopper’s order and arrange delivery.
Note
For security reasons, we recommend that you update an order only when you receive the payment status notification from us. A notification from our Cashflows Gateway assures you that a payment request has not been intercepted during transfer.
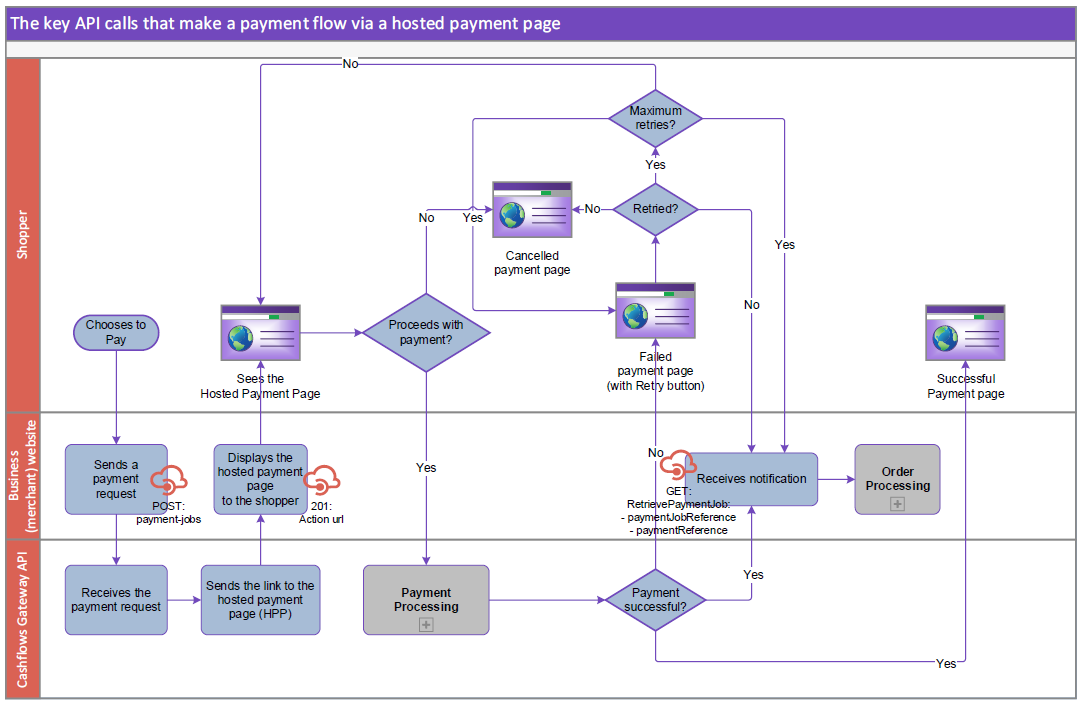
Here is a diagram to show the payment flow with the key API calls. This guide explains the API calls to use at each stage of the process with example code for you to use:
Note
Some banks require an extra layer of security known as 3-D Secure (although different card schemes use different names, for example Verified by Visa, SecureCode or Identify Check). 3-D Secure settings are set on the Cashflows Gateway at the business (or merchant) level. This means that you are responsible for enabling 3-D Secure settings. If 3-D Secure is enabled, the Hosted Checkout Pages redirects a shopper to their banking website, collects the 3-D Secure data and automatically adds it to the payment details that we receive from your website. For more information about 3-D Secure, visit:
Getting started
So that you can make the most of using our Hosted Checkout Pages and we can process payments in a way that gives shoppers a seamless experience, there are a few things that you need to tell us. This section explains how to provide many of the details that we need. This section also explains how to collect the details that you need to be able to use our Cashflows Gateway API.
Before you start
You need access to Cashflows Portal. Cashflows Portal is your online account with Cashflows. It gives you access to all your transaction data, payment tools and notifications. This is where you can:
Find the configuration details that you need to integrate our Hosted Checkout Pages into your website using our API.
Tell us the addresses of the webpages (return URLs) to use to redirect a shopper back to your website after we have processed their payment.
Customise the Hosted Checkout Pages, if you choose not to use the default page as we provide it.
When you first sign up with us, we send you a welcome email that includes the details that you need to sign into Cashflows Portal. If you don’t know how to sign in, see the Cashflows Portal guide.
If you need an integration account for testing purposes, please email techsupport@cashflows.com.
Important
You need different credentials for the integration and production environments.
Before you can connect to our production environment for going live, you need:
A production account
Sign-in credentials
We provide these when your account has been approved. If you have not received these, email techsupport@cashflows.com.
Depending on your IP and Geolocation settings, you may need to whitelist Ireland and these IPs:
Integration Environment:
54.75.5.171and54.73.83.234Production Environment:
54.74.58.255and52.215.48.101
To collect your API configuration details from Cashflows Portal
Before you can use our API, you need to collect your API configuration details from Cashflows Portal. This is where you can find:
Configuration ID - This is the unique identifier of the business account (also referred to as the merchant account). You need to include this in API messages so that we can recognise the business and match transactions to it.
Current API key - This is the key to use for encrypting API messages that you send us.
New API key - You can always generate a new API key, for example if a previous key becomes compromised.
Sign into Cashflows Portal. If you don’t know how to sign in, see the Cashflows Portal guide.
From the Cashflows Portal menu, select Configuration, then Select the API Data page to display your API configuration details.
Include the Configuration ID in any messages that you send to our API.
Use the Current API key to encrypt the API messages that you send us.
Generate your signature
As with all API calls you will need to send a request signature with any requests.
To ensure server to server messages have been issued by valid users, request messages must be signed. The hash field is a SHA2-512 hash calculated by concatenating your API key with a string of the request object. If you don’t have your API key please contact your Implementation Manager.
If the signature is incorrect, an error will be returned. Repeated failures will lock your account, if this happens, please contact your Implementation Manager.
SHA2-512 hash of your request. To generate your hash, concatenate the message body of your request to the API key to give one long string.
Warning
Whitespace and new lines in the request object are included in the hash calculation. We use CR-LF for line breaks, however Unix systems often use just LF, and this can affect calculations. If you can’t match signatures but have the correct hash, remove unnecessary whitespace from your Request nodes.
After applying a SHA2-512 hash, the concatenated string would look like:
3CDF192F6AC67E3A491EF2B60EA9A03C6B408056CE19C3BBC307EB06A4CE1F4081B8D 021B1E9760E7CC18EED479EDBAFF926DADC2953B5F8B25717B8D5CB7609
Finally, add the generated key as the Hash value in your request:
{
    "ConfigurationId": "YOUR_CONFIGURATION_ID",
    "Hash": "YOUR_SIGNATURE_HASH",
    "Request": {
        "type": "Payment",
        "paymentMethodsToUse": ["creditcard"],
        "parameters": {
            "cardNumber":"4000000000000002",
            "cardCvc": "123",
            "cardExpiryMonth": "05",
            "cardExpiryYear": "23"
        },
        "order": {
            "orderNumber": "Payment ref D1"
        },
        "currency": "GBP",
        "amountToCollect": "10.00"
    },
}
How do you want your Hosted Checkout Pages to look?
You can use the default Hosted Checkout Pages as it is or you can customise how it looks so that it matches the other pages of your website. You can find all of the customisation options in Cashflows Portal.
To find out how to sign in, see the Cashflows Portal guide.
For more information about what you can customise and how to do it, see How to customise a Hosted Checkout Pages.
Where should we redirect shoppers after payment processing?
After we finish processing their payments, shoppers are redirected back to your website. We direct them to a webpage according to the status of their payment (successful, failed or cancelled). When you use our Hosted Checkout Pages, we provide default pages that you can use as they are. Alternatively, you can choose to display your own webpages. You just need to set the addresses (return URLs) of the pages that you want us to display instead. This section explains how to set the default return URLs in Cashflows Portal.
Sometimes you might not want to use our default pages or your own. For example, if your business has more than one website for selling different things, you can override the default page. The shopper then returns to your website via a webpage that relates to their purchase rather than the default page. For more information, see How to override a default return URL.
Note
For recurring payments, you don’t need to set up any return URLs.
You can specify a different page for each of the following scenarios:
- Success: A shopper completes a successful transaction and needs to pay. You can display a Thank You page and explain what happens next, when they can expect their delivery and so on.
Note
For security reasons, we recommend that you update an order only when you receive the payment status notification from us. A notification from our Cashflows Gateway assures you that a payment request has not been intercepted during transfer.
Failed: A shopper fails to complete the payment process, for example because we (or their bank) did not approve it (the payment was declined). You can display a page to explain what might have happened and give the shopper the opportunity to try a different card.
Cancelled: A shopper cancels their transaction If the shopper cancels the transaction, you can display a confirmation page to tell them what happened and/or provide any additional transaction information such as order ID.
To tell us which pages to display:
Sign into Cashflows Portal. If you don’t know how to sign in, see the Cashflows Portal guide.
From the Cashflows Portal menu, select Configuration, then Select the API Data page to display your API configuration details.
Select Edit API Data.
Add the address (URL) for each page that you would like to display :
Select Save.
Where should we send payment status updates?
When we have processed a payment and the status changes, for example from Pending to Paid, we need to communicate this to your website. We use webhooks for this. A webhook is a way for one application to provide data to other applications as it happens (in real-time). This means that you receive data immediately. You don’t need to check for changes in payment status. Instead, we can notify you, as long as you tell us where to send the notification webhooks.
To tell us where to send notification webhooks:
Sign into Cashflows Portal. If you don’t know how to sign in, see the Cashflows Portal guide.
From the Cashflows Portal menu, select Configuration, then Select the API Data page to display your API configuration details.
Select Edit API Data.
In the Notification section, add the Notification URL. This is the address where you would like us to send the notifications (webhooks).
In the Notification section, add the Notification email address. This is the email address where you would like us to send emails if we need to tell you about any notifications (webhooks) that we couldn’t deliver or if anything needs to be configured differently. These emails are for whoever maintains the website. These are not customer-facing emails. Therefore, this should be a business email address, for example the email address of the business owner or person responsible for managing the website.
Note
You can do things in any order but while you are signed into Cashflows Portal, you may like to tell us the addresses of the webpages (return URLs) to use to direct shoppers back to your website when we have finished processing their payments. For more information, see Where should we redirect shoppers after payment processing?
How to send us the details of a payment
So that we can process an online payment via the Hosted Checkout Pages, your website needs to send an API payment request to our online payment servers to initiate the transaction.
You send us the payment transaction details in an API message. The message needs to submit a payment request to create a payment job with the details of the transaction.
We then send you the address of the Hosted Checkout Pages to display to the shopper. This page is where the shopper securely enters their card details or selects an alternative payment method such as PayPal. We can process the payment as soon as the details are submitted to us.
The payment request needs to be in the form of a HTTPS POST to either our integration or production environment:
Integration/test - https://gateway-int.cashflows.com
Production - https://gateway.cashflows.com
Tip
We recommend that you use UTF-8 for encoding before you submit.
If you need an integration account, please contact our Technical Support team.
You must encrypt the message with the API key that you collected from Cashflows Portal. For more information, see To collect your API configuration details from Cashflows Portal.
You must use the same hashing technique that we do so that we can match our hash with yours. The hash assures message consistency and protects the payment request from being tampered with during transfer to our Cashflows gateway (a man-in-the-middle attack).
Your message needs to have the following headers:
ConfigurationId: xxxxx
Hash:ExampleExampleExampleExampleExampleExampleExampleExampleExample
The process for submitting a payment request involves the following steps. These steps are described in the sections that follow:
Create a payment job. A payment job is a server-to-server call from your server to ours. It contains the details that are required to initiate a payment request. After you have submitted the payment job, the Cashflows Gateway API returns a 201 response
Payment job created successfully(assuming that the request was successful). For more information, see Create a payment job.Receive the payment job details in the response. The API returns specific payment and order information and link to our Hosted Checkout Pages. For more information, see Receive a response to a payment request and direct a shopper to the Hosted Checkout Pages.
Use the link to direct the shopper to our Hosted Checkout Pages where they can securely enter their card details and submit them for authorisation. For more information, see Receive a response to a payment request and direct a shopper to the Hosted Checkout Pages.
Note
If 3-D Secure is enabled, the Hosted Checkout Pages redirects the shopper to the 3-D Secure page on their bank’s website before submitting the payment.
Create a payment job
To create a payment job, you must provide a payment job request that contains at least the mandatory parameters. To help you track payments, we recommend that you provide more than the mandatory details in the payment job. As a minimum, consider including:
Payment amount
Currency
Locale
Order reference (the reference that you generate)
Customer name
Customer email
Tip
As a starting point to establish and test connectivity, it’s good enough to provide only the mandatory information. You can then add details as required to build out the payment job request. To make it easier for you to identify a payment, we recommend that you include as much information as possible. Our API includes many more details including billing/shipping details, order line details and more. For a full list of mandatory and optional parameters, please contact our Technical Support team.
To create a payment job:
- In the request header, provide your configuration ID and a hash.
Your configuration ID identifies your application to the gateway and is available in Cashflows Portal. For more information, see To collect your API configuration details from Cashflows Portal.
- Concatenate the message body to the API key to give one long string.
For example, to use an example API key like this:
845c51f6-1cd5-4338-a586-df752e65d690To submit to the Cashflows API the following parameters and values:amountToCollect": "10.00", "currency": "GBP", "locale": "en_GB"You would concatenate with the API key to give:845c51f6-1cd5-4338-a586-df752e65d690{"amountToCollect": "10.00", "currency": "GBP", "locale": "en_GB"}
- Hash the concatenated string to give, for example:
3CDF192F6AC67E3A491EF2B60EA9A03C6B408056CE19C3BBC307EB06A4CE1F4081B8D021B1E9760E7CC18EED479EDBAFF926DADC2953B5F8B25717B8D5CB7609Important
Every parameter and value that you send, and every parenthesis, must be included in the hash.
The resulting headers must match the format of this example:
ConfigurationId:201226100000131072Hash:3CDF192F6AC67E3A491EF2B60EA9A03C6B408056CE19C3BBC307EB06A4CE1F4081B8D021B1E9760E7CC18EED479EDBAFF926DADC2953B5F8B25717B8D5CB7609
Example: Create a new payment job
{
    "amountToCollect": "10.00",
    "currency": "GBP",
    "locale": "en_GB",
    "order": {
        "orderNumber":"Your ref",
        "billingAddress" : {
            "firstName" : "Alex",
            "lastName" : "Smith"
        },
        "billingIdentity": {
            "emailAddress": "alex@test.com"
        }
    }
}
Mandatory parameters
Parameter |
Description |
|---|---|
string (header) |
Your configuration ID. |
string (header) |
A hexadecimal SHA512 hash of your Gateway API Configuration API Key |
|
Matches the account as reported by the issuer |
|
No match, participating BIN/ issuer |
string (query) |
Determines the language that the Hosted Checkout Pages, and any related messages, is displayed in. For example, to set the language to English, use the locale en-GB. Other options are:
If your language is not available, please choose the most appropriate language for your shoppers. |
Optional parameters
Parameter |
Description |
|---|---|
|
The reference number that you generate to identify an order. |
|
The name of the shopper. |
|
The email address of the shopper. |
Tip
Including optional cardholder and delivery details in your payment request enables us to display this information in the gateway portal transaction search and reports. This can make it easier for you to locate payments and assist with reconciliation. The extra detail can also help our customer support team to find a payment it ever needs investigating.
Direct shopper to Hosted Checkout Pages
The API receives the payment request and responds with:
A response code (to confirm success or otherwise) and
A link that points to the Hosted Checkout Pages where you should direct the shopper.
If the request is successful, you’ll receive a 201 response. For a list of other response codes, see Response codes below.
To receive the response:
Extract the link (action URL) and use it to take you to the integration environment simulation page.
Tip
You can simulate a successful or a failed payment or use the test cards in the simulated live environment. For more information about testing and to find some the test card details that you can use, see Testing your integration.
Response codes
After you have submitted a request to create a payment job, the Cashflows Gateway API responds with a code. Ideally the response is a success code but can be any of the following.
Response Indicator |
Description |
|---|---|
|
Payment job created successfully. |
|
Request contains errors. |
|
Invalid token. |
|
Insufficient permissions. |
|
Configuration not found. |
|
Bad response |
Example response
When you send a request to create a payment job in our integration environment, you receive back a response that includes a link (action URL) to the Hosted Checkout Pages. This is the link that you need to use to redirect the shopper so that they enter their card details or select an alternative payment method on the payment page that we are hosting for you. As soon as we have the details that we need, we can process the payment. For more information, see Processing a payment.
{
    "amountToCollect": "10.00",
    "currency": "GBP",
    "locale": "en_GB",
    "order": {
        "orderNumber":"Your ref",
        "billingAddress" : {
            "firstName" : "Alex",
            "lastName" : "Smith"
        },
        "billingIdentity": {
            "emailAddress": "alex@test.com"
        }
    }
}
Here is an example of the full response with the success response code included:
{
    "data": {
        "reference": "210121017238589452",
        "createDateTimeUtc": "2021-01-14T10:32:50.506892Z",
        "type": "Payment",
        "traceReference": "210120117364553808",
        "configurationId": "200426117314086912",
        "domain": "cashflows.com",
        "locale": "en_GB",
        "timeZone": "Europe/London",
        "order": {
            "orderNumber": "Your ref",
            "createDateTimeUtc": "2021-01-14T10:32:50.506894Z",
            "billingAddress": {
                "firstName": "Alex",
                "lastName": "Smith"
            },
            "billingIdentity": {
                "emailAddress": "alex@test.com"
            },
            "orderLines": []
            },
            "orderHistory": [],
            "paymentMethodsToUse": [
                "Card"
            ],
            "currency": "GBP",
            "amountToCollect": "10.00",
            "expirationDateTimeUtc": "2021-07-14T10:32:50.5068906Z",
            "lastUpdateTimeUtc": "2021-01-14T10:32:50.5068934Z",
            "lastProcessedTimeUtc": "2021-01-14T10:32:50.5068927Z",
            "flags": {},
            "attributes": {},
            "paymentStatus": "Pending",
            "payments": [
                {
                    "reference": "210121117372807180",
                    "createDateTimeUtc": "2021-01-14T10:32:50.6776922Z",
                    "paymentMethods": [
                        "Card"
                    ],
                    "status": "Pending",
                    "amountToCollect": "10.00",
                    "steps": [
                        {
                            "reference": "210121217372942352",
                            "createDateTimeUtc": "2021-01-14T10:32:50.7307589Z",
                            "action": "DisplayHostedPage",
                            "paymentMethods": [
                                "Card"
                            ],
                            "status": "Pending",
                            "amountToCollect": "10.00"
                        }
                    ],
                    "flags": {},
                    "attributes": {
                        "returnUrlSuccess": "https://www.mywebshop.com/?paymentjobref=210121017238589452&paymentref=210121117372807180&ordernumber=Your+ref",
                        "returnUrlFailed": "https://www.mywebshop.com/?paymentjobref=210121017238589452&paymentref=210121117372807180&ordernumber=Your+ref",
                        "returnUrlCancelled": "https://www.mywebshop.com?paymentjobref=210121017238589452&paymentref=210121117372807180&ordernumber=Your+ref&status=cancelled"
                    },
                    "refunds": [],
                    "captures": []
                }
            ]
        },
    "links": {
        "data": {
            "url": "https://gateway-int.cashflows.com/api/gateway/payment-jobs/210121017238589452",
            "type": "application/json"
        },
        "action": {
            "url": "https://gateway-int.cashflows.com/payment?ref=4ab07d818100e4880130c8e35d25ea1be6b35b94bf1416b2fda63815e83d9fbe68f1a4769d1abc9cf0e57616aa70a8b327f0354f1611fd216383cdd28d5d5580",
            "type": "text/html"
        },
        "documentation": {
            "url": "https://gateway-int.cashflows.com/payment-gateway-api/documentation/index.html",
            "type": "text/html"
        }
    }
}
Processing a payment
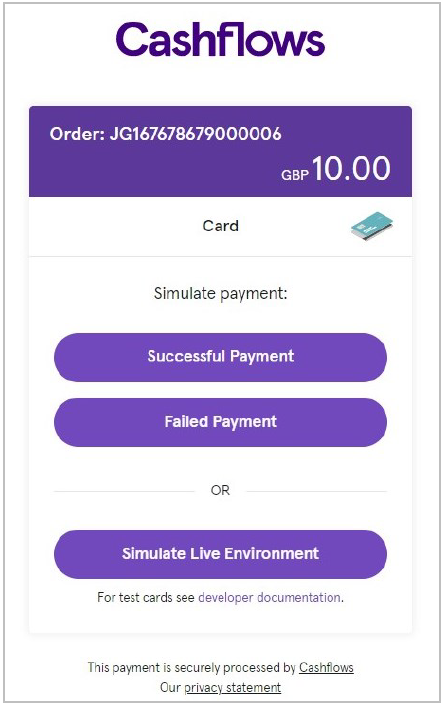
When you use the Simulate Live Environment option in our integration environment, the payment page is displayed where you can enter some test card details or select an alternative payment method. For more information, see Testing your integration.
When you simulate a successful or failed payment in our integration environment, we send you back a webhook to notify you about the payment status, for example when the payment changes from Pending to Paid. If you haven’t already done so, you need to tell us where to send these notification webhooks. For more information, see Where should we send payment status updates?
You can then use the paymentJobReference and paymentReference from the notification webhook to check the status of the order, update your system or database and continue with your own business processes for arranging fulfilment.
Tip
For security reasons, we recommend that you update an order only when you receive the payment status notification from us. A notification from our Cashflows Gateway assures you that a payment request has not been intercepted during transfer.
When we direct shoppers back to your website after we finish processing their payments, we direct them back to the confirmation webpage that corresponds to the status of their payment (successful, failed or cancelled). By default, we use the addresses of the pages (return URLs) that you set up in Cashflows Portal. For more information, see Where should we redirect shoppers after payment processing?
If your business has more than one website for selling different things, you can override the default address and tell us to use a different one that you specify in the payment job request.
How to override a default return URL
When you use our Hosted Checkout Pages, we provide default pages to display when we direct a shopper back to your website after a successful, failed or cancelled payment. You can use these default pages, or you can display your own. You just need to set the addresses (return URLs) of the pages that you want us to display instead. You do this in Cashflows Portal. For more information, see Where should we redirect shoppers after payment processing?
Sometimes you might not want to use our default pages or yours. For example, if your business has more than one website for selling different things, you can override the default page. You can use an individual payment job request to tell us where to direct the shopper. The shopper then returns to your website via a webpage that relates to their purchase rather than the default page. For recurring payments, you may not want to specify a return URL at all.
To override a default return URL:
Include the return URL, for example https://www.mywebshop.com?status=success, in the create payment job request.
Example
{
    "amountToCollect": "10.00",
    "currency": "GBP",
    "locale": "en_GB",
    "order": {
        "orderNumber":"Your ref1",
        "billingAddress" : {
            "firstName" : "Alex",
            "lastName" : "Smith"
        },
        "billingIdentity": {
            "emailAddress": "alex@test.com"
        }
    },
    "parameters": {
        "returnUrlSuccess": "https://www.mywebshop.com?status=success",
        "returnUrlCancelled": "https://www.mywebshop.com?status=cancelled",
        "returnUrlFailed": "https://www.mywebshop.com?status=failed"
    }
}
How to handle payment status updates
To notify you about a payment status update, for example when the payment changes from Pending to Paid, we send you back a webhook. The body of the notification webhook includes the paymentJobReference and paymentReference. For example:
{
    "notifyType": "PaymentStatusChange",
    "paymentJobReference": "ExamplePaymentJobReference",
    "paymentReference": "ExamplePaymentReference"
}
When you receive a webhook, you need to extract these details and include them in a RetrievePaymentJob API call to get the payment status.
When the payment status has been confirmed, your business systems can be updated to match. For example, if the payment status is Paid, you can store this in your database and proceed with your shipping process.
Tip
For security reasons, we recommend that you update an order only when you receive the notification webhook from us. A notification from our Cashflows Gateway assures you that a payment request has not been intercepted during transfer.
Receive a notification webhook
We recommend that when you receive a notification webhook from us, you use it to confirm the status of the payment before you update an order.
To receive the payment status:
Extract the
paymentJobReferenceandpaymentReferencefrom the notification webhook.Include them in a RetrievePaymentJob API call.
Depending on your IP and Geolocation settings, you may need to whitelist Ireland and these IPs:
Integration Environment:
54.75.5.171and54.73.83.234Production Environment:
54.74.58.255and52.215.48.101
Example RetrievePaymentJob
GET https://gateway-int.cashflows.com/api/gateway/payment-jobs/{paymentJobReference}/payments/{paymentReference}
Example response with the payment status and amount
"status": "Paid",
"amountToCollect": "10.00"
Mandatory parameters
Parameter |
Description |
|---|---|
string (header) |
Your configuration ID. |
string (header) |
A hexadecimal SHA512 hash of your Gateway API Configuration API Key. |
integer($int64) (path) |
The reference of the payment job to retrieve. |
integer($int64) (path) |
The reference of the payment to retrieve. |
Optional parameters
Parameter |
Description |
|---|---|
string (query) |
Determines the language that the Hosted Checkout Pages, and any related messages, is displayed in. For example, to set the language to English, use the locale en-GB. Other options
If your language is not available, please choose the most appropriate language for your shoppers. |
Response codes
Response Indicator |
Description |
|---|---|
|
Payment retrieved successfully. |
|
Request contains errors. |
|
Invalid token. |
|
Insufficient permissions. |
|
Configuration, payment job or payment not found. |
Handling retry attempts
If a payment fails, our Cashflows Gateway offers the shopper an opportunity to try again, for example with a different payment card. The gateway keeps trying until either the payment is successful or the number of retries is exceeded.
The shopper can select the Retry button and enter different card details. If they try too many times, the shopper sees a page to tell them that they have exceeded the number of attempts.
How we direct shoppers back to your website
You set the addresses (return URLs) for the pages where you would like us to redirect shoppers after payment processing is complete. These are the default return URLs that you provide in Cashflows Portal. For more information, see Where should we redirect shoppers after payment processing?
If you want to use a different URL, for example a different website depending on what the shopper is buying, you can override any of the default return URLs that you told us about in Cashflows Portal. For more information, see How to override a default return URL.
If you would like to display the same page and therefore use the same address (return URL) for all payment scenarios (success, failed and cancelled), you can use a RetrievePaymentJob API call to get the payment status and show the customer the order status.
To get the status payment of a payment:
Extract the
paymentJobReferenceandpaymentReferencefrom the notification webhook.Include them in a RetrievePaymentJob API call.
Example RetrievePaymentJob
GET https://gateway-int.cashflows.com/api/gateway/payment-jobs/{paymentJobReference}/payments/{paymentReference}
Example response with the payment status and amount
"status": "Paid",
"amountToCollect": "10.00"
Cancelling payments
If you need to cancel a payment, you can do this in Cashflows Portal, as long as the payment has not been settled (which means that the funds have not been transferred yet). If you cancel a payment, you must cancel the full amount.
When you cancel a payment, you are deleting the request for the funds (the capture request). No funds are ever taken from the card. These requests for funds are batched up and submitted at midnight. Therefore, you can cancel a payment on the same day any time up until midnight. If you need to cancel a payment after midnight (not the same day), the funds will have been transferred and you need to refund the payment instead. For more information, see Refunding a payment.
Cancelling a payment and cancelling a payment job are not the same thing. If you cancel a payment but not the payment job, you can still use the payment job for submitting more payments in the future.
How to cancel a payment
As long as a payment has not been settled, you can usually cancel the payment on the same day when the transaction occurred.
You can only cancel a payment job for payments that have not been settled. If a payment has been settled, the only way to reverse it is with a refund. For more information, see Refunding a payment.
Example request to cancel a payment
The cancel payment has no message body. You just need to include the paymentJobReference and paymentReference in the URL, for example:
https://gateway-int.cashflows.com/api/gateway/payment-jobs/210221017196777472/payments/210221117230331904/cancel
Example response
{
    "data": {
        "reference": "210221117230331904",
        "createDateTimeUtc": "2021-02-01T10:53:12.219Z",
        "paymentMethods": [ "Card" ],
        "status": "Cancelled",
        "amountToCollect": "10.00",
        "surchargeAmount": "0",
        "paidAmount": "10.00",
        "steps": [
            {
                "reference": "210221200008388612",
                "createDateTimeUtc": "2021-02-01T10:53:12.244Z",
                "action": "DisplayHostedPage",
                "paymentMethods": [ "Card" ],
                "status": "Pending",
                "amountToCollect": "10.00"
            },
            {
                "reference": "210221200041943044",
                "createDateTimeUtc": "2021-02-01T10:53:55.106Z",
                "action": "Start",
                "paymentMethods": [ "Card" ],
                "status": "Pending",
                "amountToCollect": "10.00"
            },
            {
                "reference": "210221217188257796",
                "createDateTimeUtc": "2021-02-01T10:53:58.762Z",
                "action": "Process",
                "paymentMethods": [ "Card" ],
                "status": "Paid",
                "amountToCollect": "10.00"
            },
            {
                "reference": "210221200193069060",
                "createDateTimeUtc": "2021-02-01T16:11:38.4133059Z",
                "action": "Cancel",
                "paymentMethods": [ "Card" ],
                "status": "Cancelled",
                "amountToCollect": "10.00"
            }
        ],
        "flags": {},
        "attributes":
            {
                "returnUrlSuccess": "https://www.mywebshop.com/?paymentjobref=210221017196777472&paymentref=210221117230331904&ordernumber=JGCRTREFE1xx",
                "returnUrlFailed": "https://www.mywebshop.com/?paymentjobref=210221017196777472&paymentref=210221117230331904&ordernumber=JGCRTREFE1xx",
                "returnUrlCancelled": "https://www.mywebshop.com?paymentjobref=210221017196777472&paymentref=210221117230331904&ordernumber=JGCRTREFE1xx&status=cancelled",
                "originatingIpAddress": "188.39.78.45, 95.100.156.174, 95.101.129.166",
                "userAgent": "Mozilla/5.0 (Windows NT 10.0; Win64; x64) AppleWebKit/537.36 (KHTML, like Gecko) Chrome/88.0.4324.104 Safari/537.36",
                "cashFlowsAcquiringDetails": "{\"ThreeDSecureVersion\":\"1.0.2\",\"ThreeDSecureVersionReason\":\"3-D Secure v2 not enabled for this merchant.\",\"AuthenticationStatus\":\"Y\",\"Xid\":\"5CkDJWQ8AIaudttodC3EP3WwQ53=\",\"Cavv\":\"LfdvqUL5kUu5axt8wgLH2DbRrdd=\",\"Eci\":\"05\",\"AuthCode\":\"AUTHOK\",\"Arn\":\"74501871032010015429602\",\"Message\":\"Authorised\",\"Status\":\"Successful\",\"IssuerResponseCode\":\"00\",\"CvvAvsResult\":\"222\",\"AcquirerResponseCode\":\"A\",\"TruncatedCardNumber\":\"400000******0002\"}",
                "originHeader": "https://integration.cashflows.com",
                "paymentMethodTransactionId": "01S00D90ED1",
                "paymentMethodVoidTransactionId": "01V00D91512"
            },
        "refunds": [],
        "captures": []
    }
}
How to cancel a payment job
A payment job can remain on the Cashflows Gateway for six months before it expires so it’s good housekeeping to cancel any payment jobs that are no longer in use.
Tip
If you want a payment job to expire sooner than six months, you can set an expiry date when you create the payment job. Here’s an example that includes an expiration date and time:
{
    "amountToCollect": "10.00",
    "currency": "GBP",
    "locale": "en_GB",
    "expirationDateTimeUtc": "2021-01-20T16:50:01",
    "order": {
        "orderNumber": "Your reference...",
        "billingAddress" : {
                "firstName" : "Alex",
                "lastName" : "Smith"
        },
        "billingIdentity": {
            "emailAddress": "alex@test.com"
        }
    }
}
It’s also good practice to cancel a payment job to prevent misuse and ensure that that it can’t be used for any other tasks. When you can cancel a payment job, it will not be possible to submit any more payments using the same payment job.
Note
Cancelling a payment job does not cancel completed payments.
Example request to cancel a payment job
PATCH https://gateway-int.cashflows.com/api/gateway/payment-jobs/{paymentJobReference}/cancel
Example response
{
    "data": {
        "reference": "210121017238589452",
        "createDateTimeUtc": "2021-01-14T10:32:50.506Z",
        "type": "Payment",
        "traceReference": "210120117364553808",
        "configurationId": "200426117314086912",
        "domain": "cashflows.com",
        "locale": "en_GB",
        "timeZone": "Europe/London",
        "order": {
            "orderNumber": "Your ref",
            "createDateTimeUtc": "2021-01-14T10:32:50.506Z",
            "billingAddress": {
                "firstName": "Alex",
                "lastName": "Smith"
            },
            "billingIdentity": {
                "emailAddress": "alex@test.com"
            },
            "orderLines": []
        },
        "orderHistory": [],
        "paymentMethodsToUse": ["Card"],
        "currency": "GBP",
        "amountToCollect": "10.00",
        "expirationDateTimeUtc": "2021-07-14T10:32:50.506Z",
        "lastUpdateTimeUtc": "2021-01-14T15:10:59.0720383Z",
        "lastProcessedTimeUtc": "2021-01-14T10:32:50.506Z",
        "flags": {
            "createdOnMapi": true
        },
        "attributes": {},
        "paymentStatus": "Cancelled",
        "payments": [ {
            "reference": "210121117372807180",
            "createDateTimeUtc": "2021-01-14T10:32:50.677Z",
            "paymentMethods": ["Card"],
            "status": "Cancelled",
            "amountToCollect": "10.00",
            "steps": [ {
                "reference": "210121217372942352",
                "createDateTimeUtc": "2021-01-14T10:32:50.73Z",
                "action": "DisplayHostedPage",
                "paymentMethods": [ "Card" ],
                "status": "Pending",
                "amountToCollect": "10.00"
            },
            {
                "reference": "210121217339387924",
                "createDateTimeUtc": "2021-01-14T15:10:59.0479346Z",
                "action": "Cancel",
                "paymentMethods": [ "Card" ],
                "status": "Cancelled",
                "amountToCollect": "10.00"
            } ],
            "flags": {},
            "attributes": {
                "returnUrlSuccess": "https://www.mywebshop.com/?paymentjobref=210121017238589452&paymentref=210121117372807180&ordernumber=Your+ref",
                "returnUrlFailed": "https://www.mywebshop.com/?paymentjobref=210121017238589452&paymentref=210121117372807180&ordernumber=Your+ref",
                "returnUrlCancelled": "https://www.mywebshop.com?paymentjobref=210121017238589452&paymentref=210121117372807180&ordernumber=Your+ref&status=cancelled"
            },
            "refunds": [],
            "captures": []
        } ]
    }
}
Mandatory parameters
Parameter |
Description |
|---|---|
string (header) |
Your configuration ID. |
string (header) |
A hexadecimal SHA512 hash of your Gateway API Configuration API Key. |
integer($int64) (path) |
The reference of the payment job to retrieve. |
integer($int64) (path) |
The reference of the payment to retrieve. |
Optional parameters
Parameter |
Description |
|---|---|
string (query) |
Determines the language that the Hosted Checkout Pages, and any related messages, is displayed in. For example, to set the language to English, use the locale en-GB. Other options
If your language is not available, please choose the most appropriate language for your shoppers. |
Response codes
Response Indicator |
Description |
|---|---|
|
Payment or payment job successfully cancelled. |
|
Request contains errors. |
|
Invalid token. |
|
Insufficient permissions. |
|
Configuration, payment job or payment not found. |
|
Bad response. |
Managing capture requests for card payments
The payment process for any transaction involves the following stages:
Authorisation - This is when a shopper’s payment is validated to ensure that they can pay the requested amount. The payment is reserved for you (the business owner) but the funds are not actually taken from the shopper’s account.
Capture - The bank receives a capture request from you. This indicates to the bank that you are ready to ship goods or provide your services to the shopper. The bank then charges the shopper’s payment card for the goods or services that they are buying. If the bank does not receive a capture request, the bank releases the reserved funds typically after five to seven days.
Our Cashflows Gateway takes care of the capture stage. By default, funds are automatically captured for the payments that we process for you. This includes payments via our Hosted Checkout Pages. Cashflows Portal has an option called Auto Capture. When this option is enabled, we send both an authorisation (to reserve the funds on the card) and a capture request (for the funds to be transferred) to the shopper’s bank. By default, Auto Capture is enabled but you can disable it at any time.
Depending on the nature of the business, it might be necessary for you to defer the capture of the funds until the shopper is ready to pay for the service. For example, if the business offers services that shoppers book ahead and pay for later when or after they receive the service. Examples of such transactions are hotel reservations or car hire bookings.
To defer the capture stage, you need to:
Disable Auto Capture in Cashflows Portal.
Create a capture request with an API call within seven days. For more information, see How to create a capture request.
How to disable automatic capture
Note
The steps that follow apply to all transactions. If you want to defer capture for an individual payment, you need to use create a capture request with an API call.
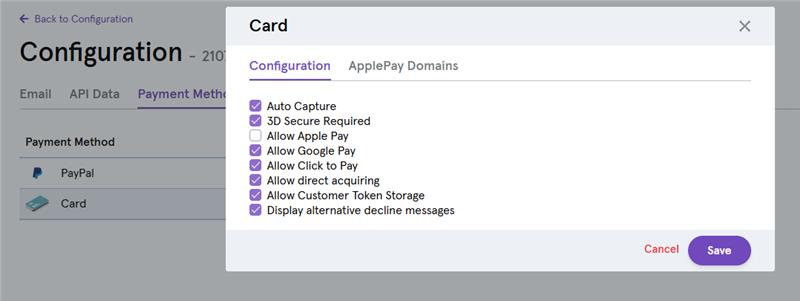
To disable Auto Capture:
Sign into Cashflows Portal. If you don’t know how to sign in, see the Cashflows Portal guide.
From the Cashflows Portal menu, select Configuration.
Select Payment Methods.
Select Enabled to display the card settings.
Clear the Auto Capture check box.
Select Save.
From now on, only an authorisation request will be sent. This will reserve funds on the card, but the payment will not be completed. To complete the payment, you need to issue a separate capture request within seven days using an API call via the Cashflows Gateway.
How to create a capture request
If you disable Auto Capture, we send an authorisation request to reserve funds on the card but the payment will not be completed. To complete the payment, you need to issue a separate capture request within seven days using an API call via the Cashflows Gateway.
Example request
POST https://gateway-int.cashflows.com/api/gateway/payment-jobs/{paymentJobReference}/payments/{paymentReference}/captures
{
    "amountToCapture": "10",
    "isFinalCapture": "true"
}
Example response
{
    "data": {
        "reference": "210123500033554432",
        "createDateTimeUtc": "2021-01-14T15:18:27.1360974Z",
        "status": "Completed",
        "amountToCapture": "10",
        "isFinalCapture": true,
        "attributes": {
            "paymentMethodTransactionId": "01S00D76D1A"
        }
    }
}
Mandatory parameters
Parameter |
Description |
|---|---|
string (header) |
Your configuration ID. |
string (header) |
A hexadecimal SHA512 hash of your Gateway API Configuration API Key. |
integer($int64) (path) |
The reference of the payment job to retrieve. |
integer($int64) (path) |
The reference of the payment to retrieve. |
Optional parameters
Parameter |
Description |
|---|---|
string (query) |
Determines the language that the Hosted Checkout Pages, and any related messages, is displayed in. For example, to set the language to English, use the locale en-GB. Other options
If your language is not available, please choose the most appropriate language for your shoppers. |
Response codes
Response Indicator |
Description |
|---|---|
|
Payment or payment job successfully captured. |
|
Request contains errors. |
|
Invalid token. |
|
Insufficient permissions. |
|
Configuration, payment job or payment not found. |
|
Bad response. |
Refunding a payment
Occasionally it might be necessary to refund a payment, for example if a shopper returns an item. You can make a refund via Cashflows Portal. For more information, refer to the Cashflows Portal Guide. Alternatively, you can use an API call to the Cashflows Gateway.
How to refund a payment To refund a payment, you need the paymentJobReference and paymentReference of the payment from the paymentJob that was used to make the original payment.
Note
Although a payment job can include multiple payments, you cannot refund in one call more than the amount that was paid using the paymentMethod that is specified by the paymentReference.
Example request
POST https://gateway-int.cashflows.com/api/gateway/payment-jobs/{paymentJobReference}/payments/{paymentReference}/refunds
{
    "amountToRefund": "10.00",
    "refundNumber" : "Your refund reference"
}
Example response
{
    "data": {
        "reference": "210123000142606340",
        "createDateTimeUtc": "2021-01-14T15:21:56.9346867Z",
        "refundNumber": "Your refund reference",
        "status": "Completed",
        "amountToRefund": "10.00",
        "steps": [ {
            "reference": "210123100142606340",
            "createDateTimeUtc": "2021-01-14T15:21:57.6097637Z",
            "action": "Start",
            "status": "Completed",
            "resultAttributes": {}
        } ],
        "attributes": {
            "cashFlowsAcquiringDetails": "{\"ThreeDSecureVersion\":\"1.0.2\",\"ThreeDSecureVersionReason\":\"3-D Secure v2 not enabled for this merchant.\",\"AuthenticationStatus\":\"Y\",\"Xid\":\"l7TnAA8FZXc4eYiMEvUE1CauPul=\",\"Cavv\":\"jqvNMAuNmkZJdA878z9A7PsPvTR=\",\"Eci\":\"05\",\"AuthCode\":\"116\",\"Arn\":\"\",\"Message\":\"Authorised\",\"Status\":\"Successful\",\"IssuerResponseCode\":\"\",\"CvvAvsResult\":\"222\",\"AcquirerResponseCode\":\"A\",\"TruncatedCardNumber\":\"400000******0002\"}",
            "paymentMethodTransactionId": "01R00D76D2C"
        }
    }
}
Mandatory parameters
Parameter |
Description |
|---|---|
string (header) |
Your configuration ID. |
string (header) |
A hexadecimal SHA512 hash of your Gateway API Configuration API Key. |
integer($int64) (path) |
The reference of the payment job to retrieve. |
integer($int64) (path) |
The reference of the payment to retrieve. |
Optional parameters
Parameter |
Description |
|---|---|
string (query) |
Determines the language that the Hosted Checkout Pages, and any related messages, is displayed in. For example, to set the language to English, use the locale en-GB. Other options
If your language is not available, please choose the most appropriate language for your shoppers. |
Response codes
Response Indicator |
Description |
|---|---|
|
Refund created successfully. |
|
Request contains errors. |
|
Invalid token. |
|
Insufficient permissions. |
|
Configuration, payment job or payment not found. |
|
Bad response. |
Enabling a shopper to register a card for an online account
For a website that lets shoppers register a card for an account so that they can pay for goods or services in future, you need to submit the card details for authorisation but without taking a payment. In payment processing terms, this is known as zero value authorisation. Nothing is charged to the card until the shopper buys something and needs to pay.
Tip
Zero value authorisation helps to protect against card fraud as the authorisation includes 3-D Secure checks.
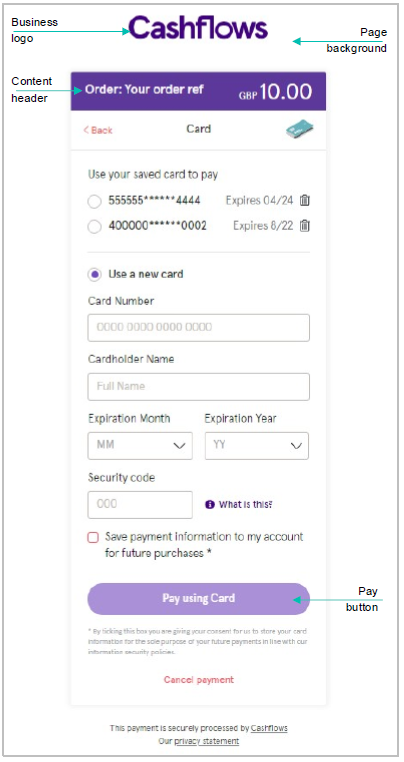
Enabling shoppers to securely save card details
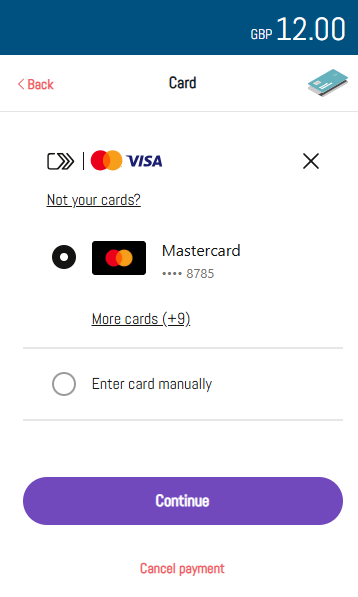
Our Hosted Checkout Pages is an ideal way to enable shoppers to securely save their card details for future purchases, if they want to. When they return to your website to buy something, they can use one of several stored cards for a faster checkout. Here is an example that a shopper might see:

If the shopper chooses the option to Save payment information …, they are provided with the option to use (one of) their previously stored card(s) without having to re-enter all of the credit card details. If a shopper has saved any cards, they can delete one or all of them at any time.
The card details are securely stored in the Cashflows Gateway with a Customer Reference. We send you the Customer Reference to use for future transactions that use details of stored cards. For subsequent payments by the same shopper, you send us the Customer Reference and not their stored card details.
Note
A single Customer Reference can store up to five cards.
To enable a shopper to save their card details via the Hosted Checkout Pages, you need to:
Enable the option Allow Customer Token Storage in Cashflows Portal.
Use API calls to ask us to process the payment and offer the shopper the options for saving card details.
Note
If you have Click to Pay enabled, Click to Pay will be prioritised unless a customer already has stored card details.
How to enable storage of shopper’s card details
Sign into Cashflows Portal. If you don’t know how to sign in, see the Cashflows Portal guide.
From the Cashflows Portal menu, select Configuration.
Select Payment Methods.
Select Enabled to display the card settings.
Select the check box to Allow Customer Token Storage.
Select Save.
Next you need to ask us to process the payment and offer the shopper the options for saving one or more cards via the Hosted Checkout Pages.
How to present a shopper with options to save card details
After you have enabled the option to all Allow Customer Token Storage, you need to create a payment job that includes an instruction to storeCustomerInformation so that our gateway generates a customer record. We then send you a customerReference which you can use to refer to the same customer when you send requests to create payment jobs for future payments. For more information about creating a payment job, see Create a payment job.
Example of how to give the shopper the option to save a card
{
    "amountToCollect": "10.00",
    "currency": "GBP",
    "locale": "en_GB",
    "options": ["StoreCustomerInformation"],
    "order": {
        "orderNumber":"Crt_ref3",
        "billingAddress" : {
            "firstName" : "Peter",
            "lastName" : "Doe",
            "AddressLine1" : "14th Teststreet",
            "ZipCode": "12345"
        },
        "billingIdentity": {
            "emailAddress": "john@example.com"
        }
    }
}
This call returns a customerReference and a link (action URL) that takes the customer to the Hosted Checkout Pages. The shopper then sees options on the Hosted Checkout Pages that enable them to store the card details on our Cashflows servers.
Note
To save customer information, you need to provide First name, Last name, Address line1 and Postcode.
Example of how to use the customer reference
For subsequent payments by a shopper who is using a stored card, you need to include the customerReference that we’ve sent you. This is so that we can match the customerReference with the customer and use the correct card.
"configurationId": "12345",
"domain": "cashflows.com",
"amountToCollect": "114.95",
"currency": "GBP",
"locale": "en_GB",
"parameters": {},
"order": {
    "customerReference": "200729000192937984"
},
    "paymentMethodsToUse": ["card"]
}
Using the customerReference adds the stored customer information (stored customer details as well as the card details) to the payment job. Then when the shopper is redirected to the Hosted Checkout Pages from the new action URL, the shopper sees a list of their stored cards.
Click to Pay
Click to Pay allows cardholders to easily and securely use a single sign-in to complete purchases on the web, iOS, or Android devices. When a shopper goes through a checkout process without signing in they will be presented with the Click to Pay payment option by your Hosted Checkout Pages. Click to Pay works across payment providers, so if your customer has details stored from another provider, they will still appear.
Click to Pay is only available for Visa and Mastercard.
Note
If you’re using the Allow Customer Token Storage flag, any customers with card details already stored will be unable to see the Click to Pay option.
How to enable Click to Pay
Sign into Cashflows Portal. If you don’t know how to sign in, see the Cashflows Portal guide.
From the Cashflows Portal menu, select Configuration.
Select Payment Methods.
Select Enabled to display the card settings.
Select the check box to Allow Click to Pay:
Select Save.
Recurring payments
For more information about submitting recurring payments via our Hosted Checkout Pages, please contact our Technical Support team. They can send you a separate document about recurring payments.
Multi-currency
Our Cashflows Gateway supports a range of currencies as well as Pound Sterling - GBP. For the full list of supported currencies, visit our website.
Note
We need to configure your business account to use other currencies. Please contact our Technical Support team or your account manager
Testing your integration
To enable you to test your Hosted Checkout Pages before going live, we have an integration environment where you can simulate different payment scenarios. We also provide some test cards that you can use.
If you need an integration account for testing purposes, please email techsupport@cashflows.com.
Important
You need different credentials for the integration and production environments.
The Cashflows integration environment
To simulate a card payment:
Choose a simulation option:
To test your integration to our payment page, you need to send some payment requests to the integration environment (https://secure-int.cashflows.com/gateway/standard) using a valid card number. Here are some test card numbers that you can use you to test your integration:
|
Card Type |
CVC |
Expiry date |
|---|---|---|---|
|
Visa - Credit |
123 |
Any future date within 10 years |
|
Visa - Credit |
123 |
Any future date within 10 years |
|
Visa - Credit |
123 |
Any future date within 10 years |
|
Visa - Credit |
123 |
Any future date within 10 years |
|
Visa - Credit |
123 |
Any future date within 10 years |
|
Visa - Debit |
123 |
Any future date within 10 years |
|
Visa - Debit |
123 |
Any future date within 10 years |
|
Mastercard - Credit |
123 |
Any future date within 10 years |
|
Mastercard - Credit |
123 |
Any future date within 10 years |
|
Mastercard - Credit |
123 |
Any future date within 10 years |
|
Mastercard - Debit |
123 |
Any future date within 10 years |
|
Mastercard - Debit |
123 |
Any future date within 10 years |
|
American Express - Credit |
1234 |
Any future date within 10 years |
If you enter some test card details and select Pay with card …, you’ll see our 3-D Secure simulation page.
Using our 3-D Secure simulator
Our 3-D Secure simulator provides options for you to simulate different scenarios so that you can test, for example, whether a transaction passes or fails 3-D Secure checks.
Authentication successful
This option simulates a payment that has successfully passed all 3-D Secure checks. The payment will proceed to the authorisation stage of payment processing.
Authentication failed
This option simulates the scenario where a shopper does not correctly complete 3-D Secure checks. For example, a shopper might have entered the wrong authentication details. The payment will be declined by the gateway and will not proceed to the authorisation stage of payment processing.
Authentication unavailable
This option simulates the scenario where a card issuer’s system is not available. The response depends on how the gateway is configured in Cashflows Portal where there is a setting called 3D Secure Required.

If this option is disabled, the payment will proceed to the authorisation stage of payment processing.
If this option is enabled, the payment will be declined by the gateway. It will not proceed to the authorisation stage of payment processing.
Note
You or the business owner can choose to reject a payment if 3-D Secure is unavailable.
Authentication attempted
This option simulates the scenario where the 3-D Secure system is available, but the card has not been enrolled for 3-D Secure. The payment will proceed to the authorisation stage of payment processing.
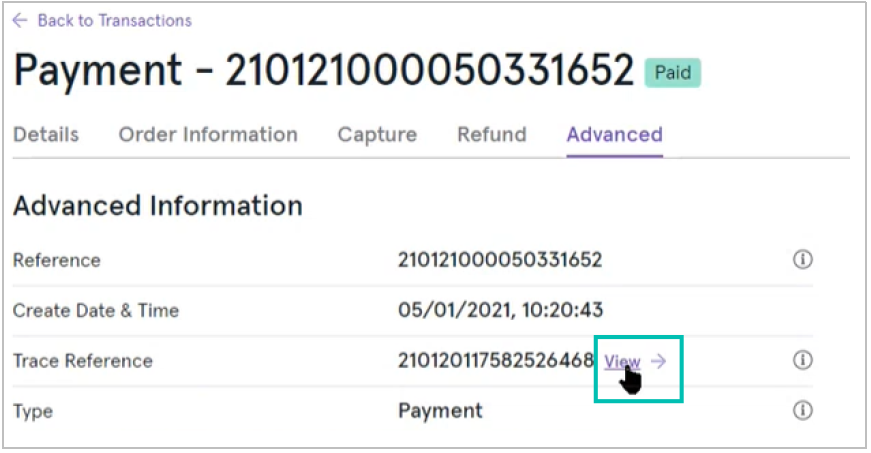
Cashflows Portal includes a useful option for investigating problems with transactions. If you have Owner permissions, you can identify a transaction that needs troubleshooting, select it and drill down to find out more. For more information about user permissions in Cashflows Portal, see the Cashflows Portal guide.
Sign into Cashflows Portal. If you don’t know how to sign in, see the Cashflows Portal guide.
From the Cashflows Portal menu, select Transactions.
Select a Transaction to investigate.
Select the Advanced tab.
Next to the Trace reference, select View:
You can see a snapshot that show all of the actions that took place during the processing of the selected payment. You can view the payment actions in diagram format or as a table. Here is an example of the same transaction in each view format.
Diagram format
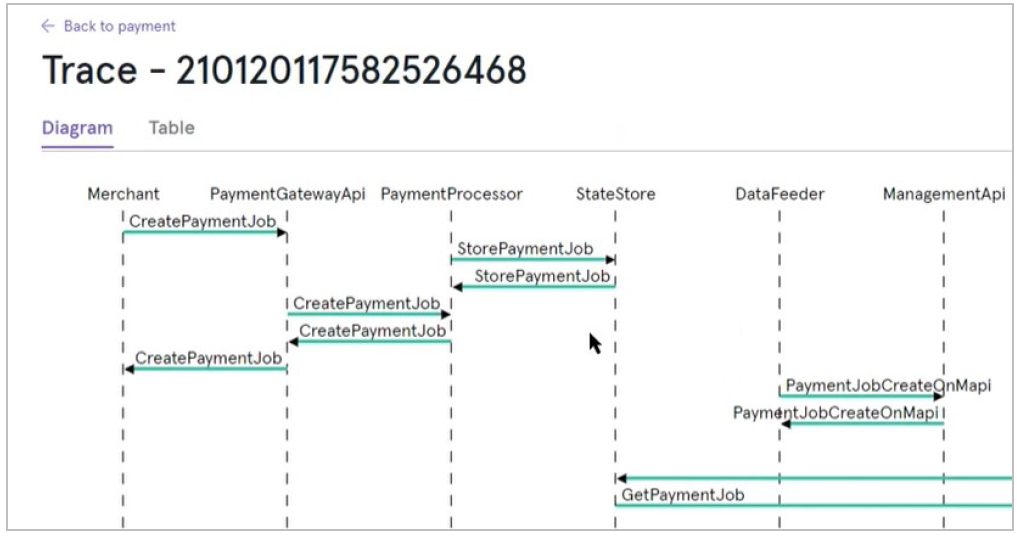
Table format
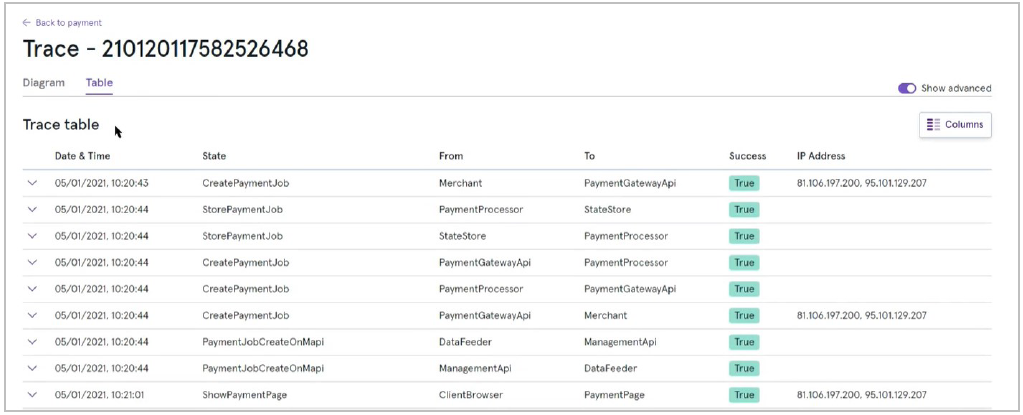
If an action that needs investigating, the Success column says False and is displayed in red. You can select the transaction to display the underlying code.
Going live
Before you can connect to our production environment for going live, you need:
A production account
Sign-in credentials
We provide these when your account has been approved. If you have not received these, email techsupport@cashflows.com.
Important
You need different credentials for the production environment. You can’t use your integration account credentials.
When you are satisfied that your integration is complete and working you can start processing live transactions by switching from the integration environment to the production environment).
You need to change your:
Configuration ID.
API key.
The URLs that point to the environments where you send your API messages. This means that you need to change the integration (test) URL from https://gateway-int.cashflows.com to https://gateway.cashflows.com for the production environment.
Important
Gateway notifications are sent from these two IP address: 54.74.58.255 and 52.215.48.101. Depending on your firewall settings, you may wish to whitelist them, as well as Ireland in your Geolocation settings.
How to customise a Hosted Checkout Pages
To strengthen your brand when your shoppers are making payments, you can display a Hosted Checkout Pages that carries your business branding and logo. Then when a shopper heads to check out, they are redirected to a page that has the same look and feel as the rest of your website.
You can use the default Hosted Checkout Pages as we provide it or you can use the customisation options in Cashflows Portal. Although you can customise many elements of a page, it doesn’t mean that you have to customise all of them. One of the great benefits of using our Hosted Checkout Pages is that it has already been designed with web standards in mind so that you don’t have to think about these things.
You can choose what to change and what to leave as it is. We recommend that you consider changing the following elements as a minimum:
Business logo
Colour of the text and background of the content header bar
Page background colour or add an image
Pay button
Further customisations that you can make include:
The font.
The colour of the Back button and the border around the payment methods.
Some aspects of the payment method details area including text colour, border colour and thickness and more.
The look of notifications.
The colour of the text and links on the Disclosure page.
Draft and Active pages
Draft and active pages are clearly marked in the Hosted Checkout Pages editor:
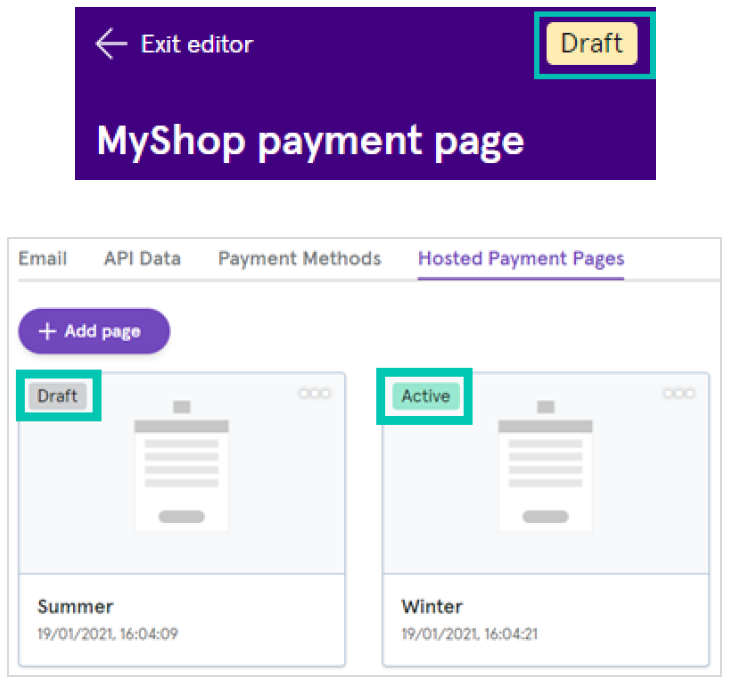
When you have finished customising your page and it’s ready to publish, you need to activate it. For more information, see How to activate a page.
To start customising your Hosted Checkout Pages
Sign into Cashflows Portal. If you don’t know how to sign in, see the Cashflows Portal guide.
From the Cashflows Portal menu, select Configuration.
Select Hosted Checkout Page.
Select the page that you want to customise.
You can create multiple Hosted Checkout Pages, for example you can create different drafts to see how things look for a new campaign. Then when your page is ready, you Activate it. However, only one Hosted Checkout Pages can be active at a time.
Important
If you are using the Integration (Test) and Production environments, you need to make the same changes in both environments. For security, it is not possible to copy between the Integration and Production environments.
The sections that follow explain how to make the minimum customisation that we recommend.
Tip
We think that you will find our Hosted Checkout Pages editor consistent and user friendly. The steps for changing the colour of any part of a Hosted Checkout Pages are the same so we don’t repeat them in every section of this guide. You can always refer back to this section. If you still need help, you can contact Customer Support.
How to change the business logo
The default Hosted Checkout Pages has our Cashflows logo but you can replace this with your business logo.
From the Customisation menu, select Logo.
Select Use Custom Logo.
Select Upload image. We recommend using a file in .PNG format. JPG is also acceptable.
Locate the logo file. The file must not be larger than 5 MB. The preview pane shows you how your logo will look if you save it, you can remove it if you decide not to keep it and want to choose a different file.
To use the chosen logo file, select Save changes, a message is displayed to confirm that the page has been updated.
Select Back to return to the Customisation menu where you can choose more customisation options or exit the Hosted Checkout Pages editor.
When you have finished customising your page and it’s ready to publish, you need to activate it. For more information, see How to activate a page.
How to change the content header
The content header is the area at the top of the content pane, just below the logo. You can change the colour of the text in the content header and the background colour.
Important
Be sure to consider web standards for legibility and accessibility.
To change the colour of the text:
From the Customisation menu, select Content Header.
If you know the colour values, you can type them in.
Otherwise, you can select the current colour and choose from the colour palette.
The preview pane shows you how the changes will look if you save them.
Tip
We think that our Hosted Checkout Pages editor is consistent and user friendly. The steps for changing the colour of any part of a Hosted Checkout Pages are the same so we don’t repeat them in every section of this guide. You can always refer back to this section. If you still need help, you can contact Customer Support.
The preview pane shows you how the changes will look if you save them. If you change something but decide not to keep it, you can always use the Back button to exit the editor and discard changes without saving.
When you have finished customising your page and it’s ready to publish, you need to activate it. For more information, see How to activate a page.
How to change the page background
You can change the background colour of your Hosted Checkout Pages or you can add an image.
Note
You can set either a background page colour or a background page image but not both.
To change the background colour:
From the Customisation menu, select Page Background.
If you know the colour values, you can type them in.
- Otherwise, you can select the current colour and choose from the colour palette.
The preview pane shows you how the changes will look if you save them. If you change something but decide not to keep it, you can always use the Back button to exit the editor and discard changes without saving.
- To keep your changes, select Save changes.
A message is displayed to confirm that the page has been updated.
Select Back to return to the Customisation menu where you can choose more customisation options or exit the Hosted Checkout Pages editor.
When you have finished customising your page and it’s ready to publish, you need to activate it. For more information, see How to activate a page.
To add a background image
The default Hosted Checkout Pages doesn’t have a background image but you can add one if you like.
Note
You can set either a background page colour or a background page image but not both.
From the Customisation menu, select Page Background.
Select Upload image. We recommend using a file in .PNG format. JPG is also acceptable.
- Locate the image file. The file must not be larger than 5 MB.
The preview pane shows you how your page will look if you save it. You can remove the image if you decide not to keep it and want to choose a different one.
- To keep your changes, select Save changes.
A message is displayed to confirm that the page has been updated.
Select Back to return to the Customisation menu where you can choose more customisation options or exit the Hosted Checkout Pages editor.
When you have finished customising your page and it’s ready to publish, you need to activate it. For more information, see How to activate a page.
How to change the Pay button
You can change the look and feel of the button that shoppers click when they come to pay via your Hosted Checkout Pages.
To change the Pay button:
From the Customisation menu, select Payment Method Details.
Scroll down until you reach the Pay button options.
The steps for changing the colour of any part of a Hosted Checkout Pages are the same so we don’t repeat them in every section of this guide.
To change the radius of the button border, increase or reduce the number of pixels.
The preview pane shows you how your page will look if you save it.
Select Save changes.
A message is displayed to confirm that the page has been updated.
When you have finished customising your page and it’s ready to publish, you need to activate it.
How to activate a page
When you have finished customising your page and it’s ready to publish, you need to activate it.
Note
Only one Hosted Checkout Pages can be active at a time. When you activate a page, a previously active page automatically switches back to Draft.
To activate a page:
Display the Hosted Checkout Pages page.
Point to the page that you want to activate.
Select the ellipsis (…) to display the Activate option.
Select Activate. A message is displayed to confirm that the page has been activated.
How to deactivate a page
If you want to delete an active page, you need to deactivate it first to return it to draft status.
To deactivate a page:
Display the Hosted Checkout Pages page.
Point to the page that you want to deactivate.
Select the ellipsis (…) to display the Deactivate option.
Select Deactivate. A message is displayed to confirm that the page has been deactivated.
How to delete a page
It’s good housekeeping practice to delete draft pages if you don’t intend to use them. Deleting unwanted pages saves storage space.
Note
You can’t delete an active page. You need to deactivate it first to return it to draft.
To delete a page:
Display the Hosted Checkout Pages page.
Point to the page that you want to delete.
Select the ellipsis (…) to display the Delete option.
Select Delete. A message is displayed to ask if you’re sure that you want to delete the selected page.
Select Delete again. The selected page is deleted.
How to rename a page
It can be useful to rename a page, for example if you are using the same page for a different purpose.
To rename a page:
Display the Hosted Checkout Pages page.
Select the page that you want to rename.
Select the ellipsis (…) to display the Rename option.
Select Rename.
Type the new name or title.
Select Update. A message is displayed to confirm that the page has been activated.
How to duplicate a page
For speed, it can be useful to duplicate a page instead of creating a new page. For example, if you have a page that is already how you want it, you can duplicate it and make one or two minor changes such as updating an image.
To duplicate a page:
Display the Hosted Checkout Pages page.
Point to the page that you want to duplicate.
Select the ellipsis (…) to display the Duplicate option. A duplicate page is created without a name.
Rename the duplicated page.
Code samples
The examples throughout this guide are in JSON but you can also send us your API messages in other languages including PHP, cURL, Java, or .NET. Here are some examples that show how to create a payment job in some popular languages.
Warning
These code samples are examples for illustration purposes only and are used at your own risk. Cashflows Europe Limited assumes no responsibility and shall have no liability, consequential or otherwise to you or any third party of any kind arising from your use of this material or any part thereof. Cashflows Europe Limited, makes no representations express or implied about the fitness for purpose or the safety and use of these code samples.
PHP
<?php

$curl = curl_init();
curl_setopt_array($curl, array(
    CURLOPT_URL => 'https://gateway-int.cashflows.com/api/gateway/payment-jobs',
    CURLOPT_RETURNTRANSFER => true,
    CURLOPT_ENCODING => '',
    CURLOPT_MAXREDIRS => 10,
    CURLOPT_TIMEOUT => 0,
    CURLOPT_FOLLOWLOCATION => true,
    CURLOPT_HTTP_VERSION => CURL_HTTP_VERSION_1_1,
    CURLOPT_CUSTOMREQUEST => 'POST',
    CURLOPT_POSTFIELDS =>'{"amountToCollect": "10.00", "currency": "GBP", "locale": "en_GB", "order": {"orderNumber":"Your ref", "billingAddress" : {"firstName" : "Alex", "lastName" : "Smith"}, "billingIdentity": {"emailAddress": "alex@test.com"}}}',
    CURLOPT_HTTPHEADER => array(
        'configurationId: 200000000000000000',
        'hash: AF8D697A823AB3356BDD816C2DBAB1FAB26346AE2599F6C7829940DD06D8E229B8361F30EC53581B9ECDEABD4840C206154B44440A1D5895D15CBD907B32D9E3',
        'Content-Type: application/json'
    ),
));

$response = curl_exec($curl);

curl_close($curl);

echo $response;
cURL
curl --location --request POST 'https://gateway-int.cashflows.com/api/gateway/payment-jobs' \
--header 'configurationId: 200000000000000000' \
--header 'hash: AF8D697A823AB3356BDD816C2DBAB1FAB26346AE2599F6C7829940DD06D8E229B8361F30EC53581B9ECDEABD4840C206154B44440A1D5895D15CBD907B32D9E3' \
--header 'Content-Type: application/json' \
--data-raw '{"amountToCollect": "10.00", "currency": "GBP", "locale": "en_GB", "order": {"orderNumber":"Your ref", "billingAddress" : {"firstName" : "Alex", "lastName" : "Smith"}, "billingIdentity": {"emailAddress": "alex@test.com"}}}'