Cashflows Portal guide
Welcome to the Cashflows Portal Guide. This document is designed to provide you details on how to use Cashflows Portal to manage your payment processing with Cashflows.
Cashflows delivers a range of services designed to help businesses manage their payments. These services are delivered through a payment gateway which is accessed via API or an online portal.
Accessing Cashflows Portal
New customers should receive a welcome email from Cashflows (noreply@Cashflows.com) informing you an account has been created for you and asking you to set a password, click on the link in the email to set your password (which expires after 24 hours). If you have not received this email, please check your Junk folder or contact your account manager, you can also trigger a new email by clicking the Forgotten Password? link on the login screen.
Password policy
A minimum length of at least eight characters.
Contain both numeric and alphabetic characters.
Passwords must be changed at least once every three months.
Passwords may not be accepted if:
They match a list of bad or weak passwords.
Have been used before by the user (last 10 passwords).
Failed authentication attempts are limited by:
Locking out the user ID after not more than six attempts.
Setting the lockout duration to a minimum of 30 minutes or until the user’s identity is confirmed.
Use your browser navigate to https://portal.cashflows.com and the Cashflows Portal login will be presented.
Each Cashflows Portal user has a user role assigned which controls the accounts they can access, the functions they can use and what actions they can perform. The initial user account will have a role of Owner, this user will be able to create other users, more details of this process can be found in the User Management section.
Use your browser navigate to https://portal.cashflows.com and the Cashflows Portal login will be presented.
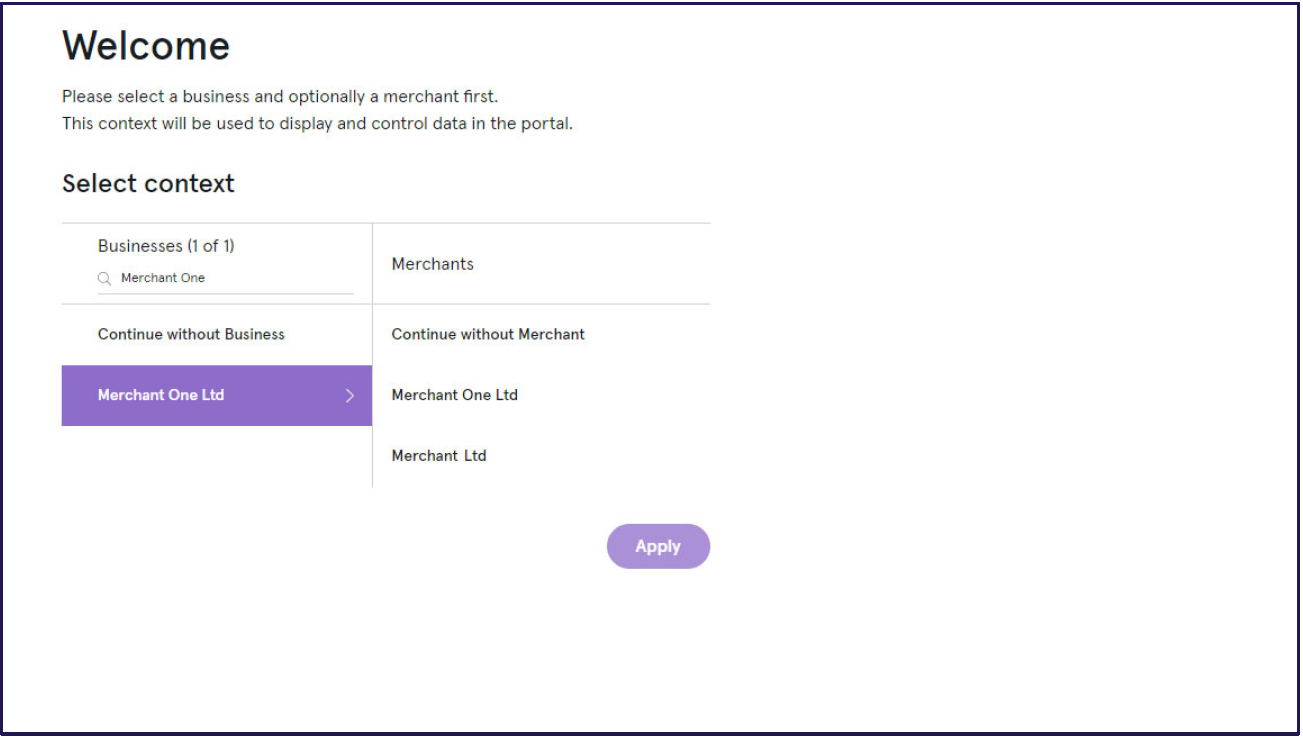
Context Selection
Some Cashflows customers have multiple businesses and a business can have multiple merchant accounts. The context selection enables the selection of a business and a merchant account, alternatively select Continue without merchant for a global view of the merchant accounts within a business. Once a selection has been made, click Apply and Cashflows Portal will be displayed.
If a customer has a single merchant account, this screen will not be shown.
The available options for new accounts will have been configured by Cashflows.
Navigation
Cashflows Portal has a menu bar on the left and side of the screen and is used to navigate to different functions which will be displayed in the main part of the screen. At the top of the menu bar will be your company name and at the bottom will be your username and the option to log out of Cashflows Portal.
The options for functions shown in the menu bar will be based on user permission, the initial view will be the transaction display.
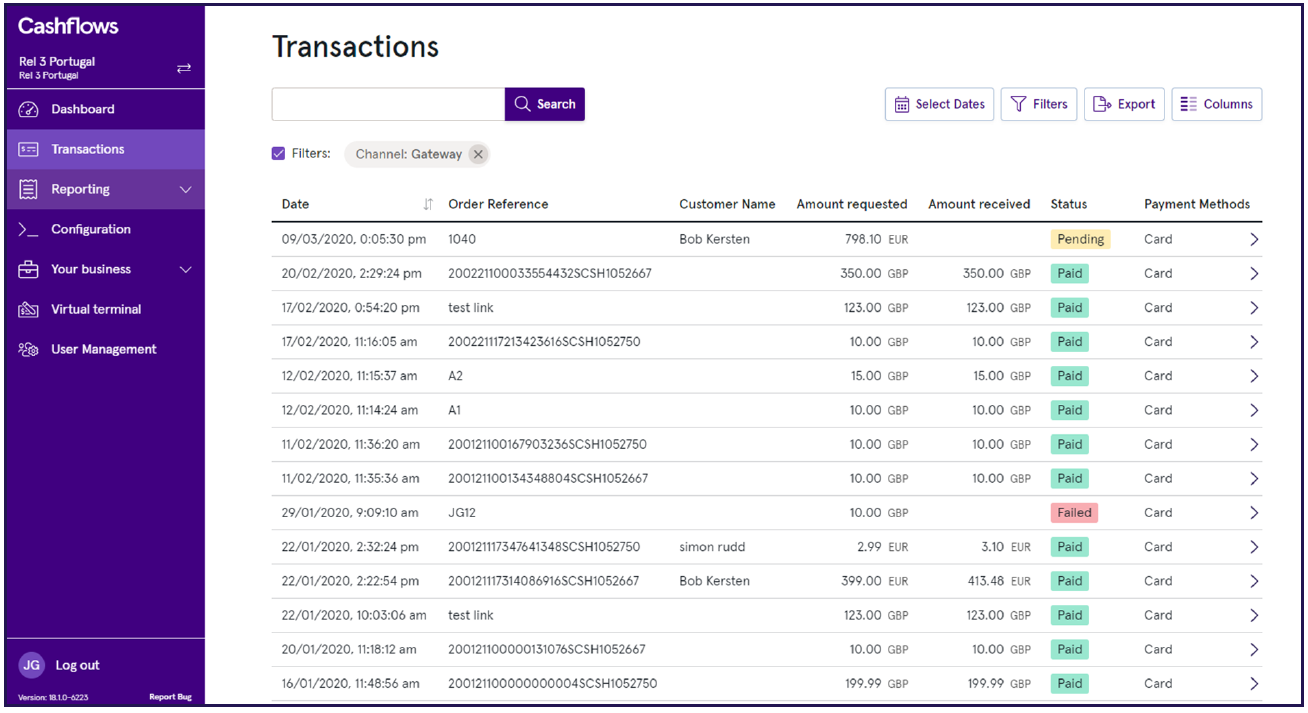
Cashflows Portal screens that show lists will have an option to customise the columns shown, to include or exclude columns from the list, click on Columns.
My Profile
At the bottom of the menu bar there is an option for My Profile:
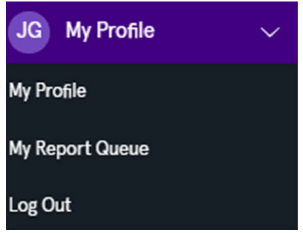
There is an option to Log Out of Cashflows Portal and to access your Report Queue.
If you take the My Profile option, you are presented with account management options:
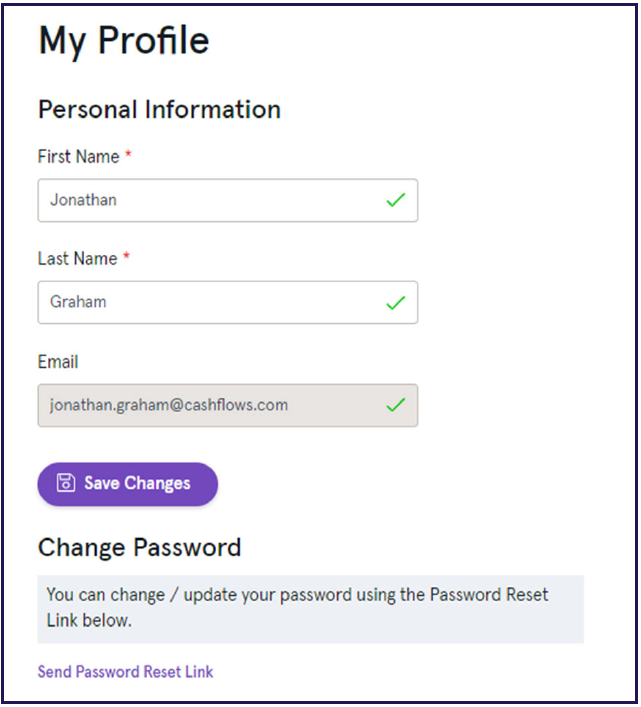
You are able to edit your name and you can also request a link is sent for you to change your password (you can also request a password change link on the login screen).
Important
For security reasons Cashflows Portal will return to the login screen after 15 minutes of activity.
User management
A user with Owner permissions will be setup by Cashflows and this user will able to create other users and assign them a permissions role.
Role |
Description |
|---|---|
Owner |
Full access. Create and delete users, password management / reset. Export data. Configure Hosted Checkout Pages, enable / disable payment methods. |
Sales |
Sales users can create payments, do refunds and view transactions. |
Finance |
Access to reports and the Dashboard. |
Virtual Terminal |
Access to the Virtual Terminal. |
Authorised users will see an option for User Management in the menu bar, selecting this option will present the User Management screen which shows a list of current users and an option to create new users.
To create a new user, click on the New User option at the top right of the screen.
The new user screen will require first and last names, email address:
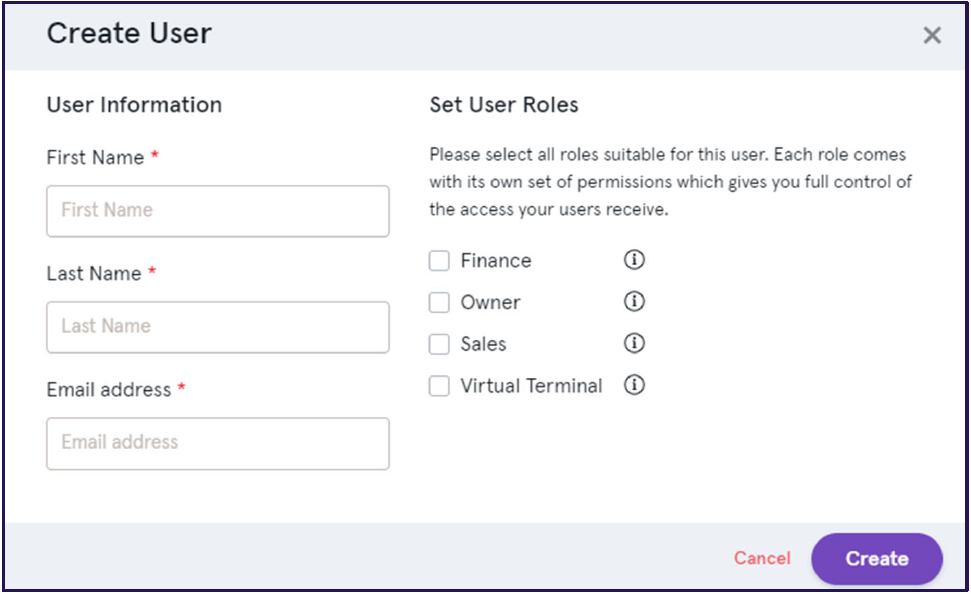
Once the create option is taken the contents are validated and if there are no errors the user will be created and an email will be sent to the email address asking the user to click a link to set their password.
Configuration
This option shows the gateway settings for the currently selected application. There are some options that can be modified by users who have the necessary permissions.
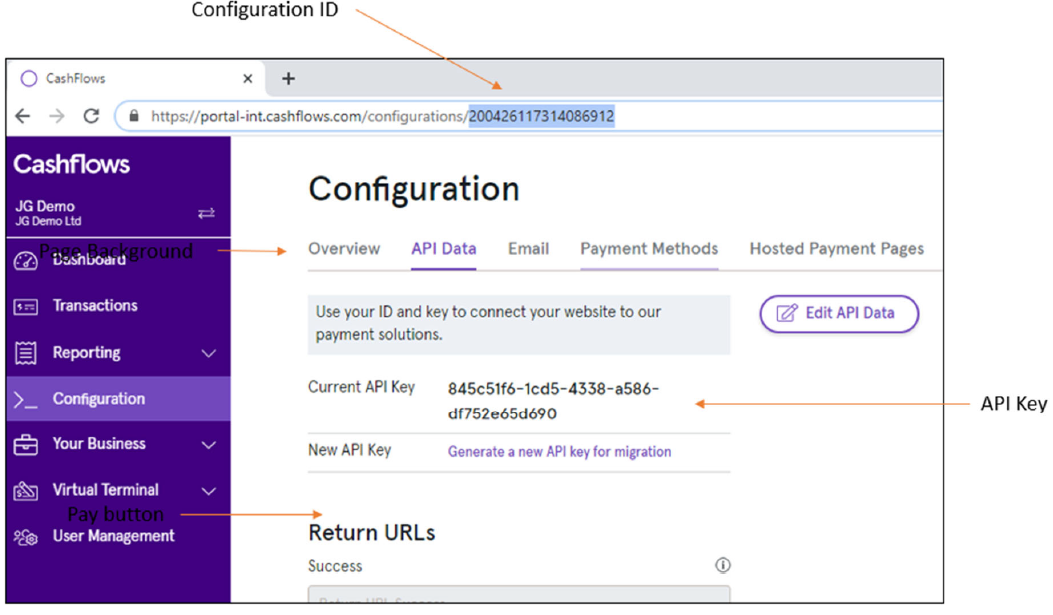
Configuration ID
For some integration methods you will need to know the configuration ID for your account, this is shown in the URL once you have taken the Configuration option from main menu:
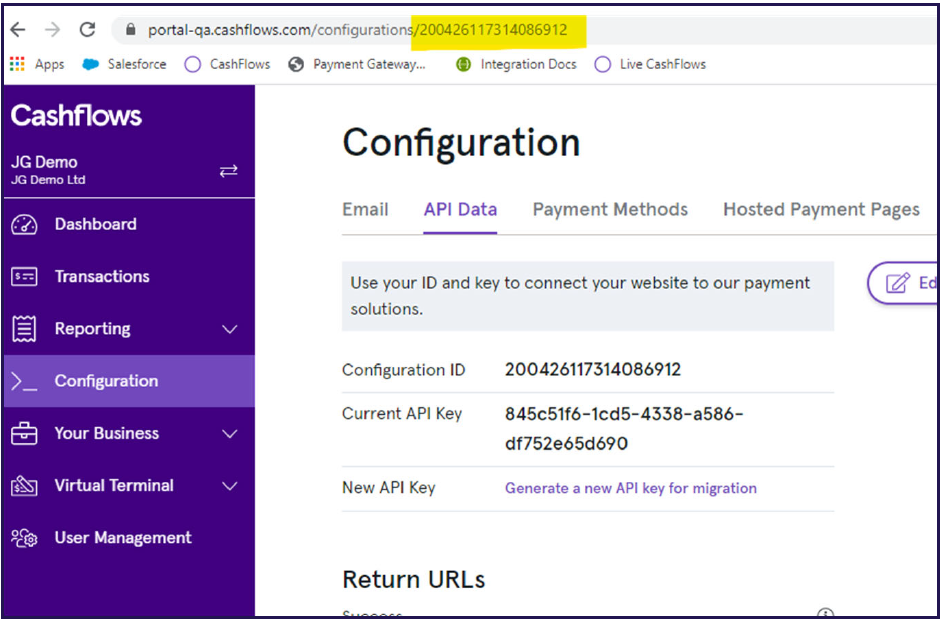
API Data
The API keys are shown here, merchants use these keys as credentials for their API transactions.
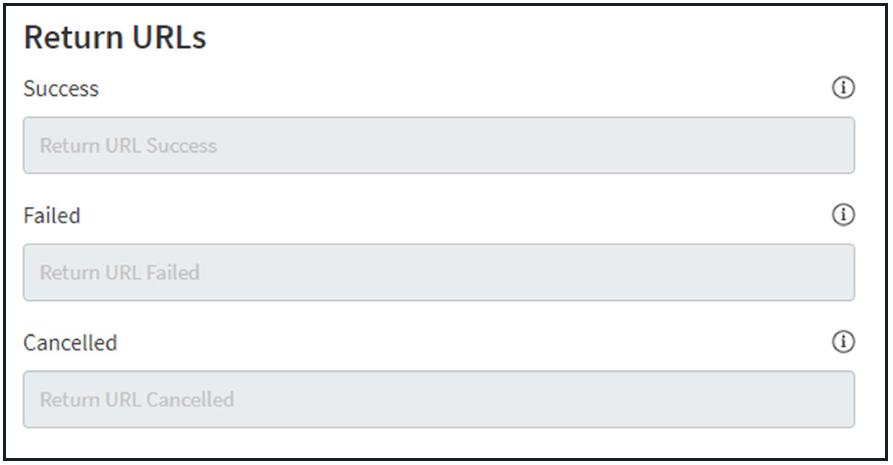
This section also enables the Merchant to enter the URLs a shopper is returned to after a Hosted Checkout Pages transaction is completed.
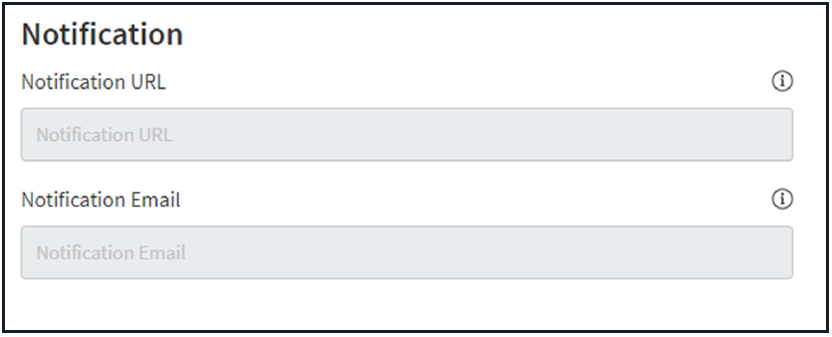
The Notification section is where the gateway will send notifications using webhooks to send information to a merchant URL. If there is an error sending a webhook notification, the notification email address will only be used to alert the you that the Notification URL is not configured correctly.
Email Settings
To edit email settings, click on the Edit Email settings option.
Email Logo - A logo image can be uploaded and displayed on emails sent from the Cashflows system.
Payment Abandonment - If a gateway payment has been created but not completed, for example a payment page has been displayed to the shopper but the shopper has not submitted any payment details, the gateway can send an email to the shopper to prompt them to complete the payment. This feature is only possible if an email has been supplied with the payment job, typically an email address is captured as part of the checkout process.
To enable this option, check the option to Payment Abandonment Email enabled and choose a time period the gateway will wait before sending a reminder (up to 60 minutes).
Order Confirmation Emails - The gateway can automatically send order confirmation emails to your customers whenever they make a successful payment, or when a payment is refunded. Each email contains your unique order reference that can be useful when looking up payment information. Emails are only sent when a successful payment has been made - no email is sent if the payment fails or is declined. When a payment is refunded, an email is automatically sent to the same email address that was provided in the original transaction.
To enable this feature, check the option Enable Order Confirmation Emails.
Note
If an email address is not captured during the payment, the system cannot send confirmation emails.
Payment Methods
Payment Methods will be added by Cashflows and will be listed in this section at present ‘Card’ payments will be the only option, the settings can be adjusted.
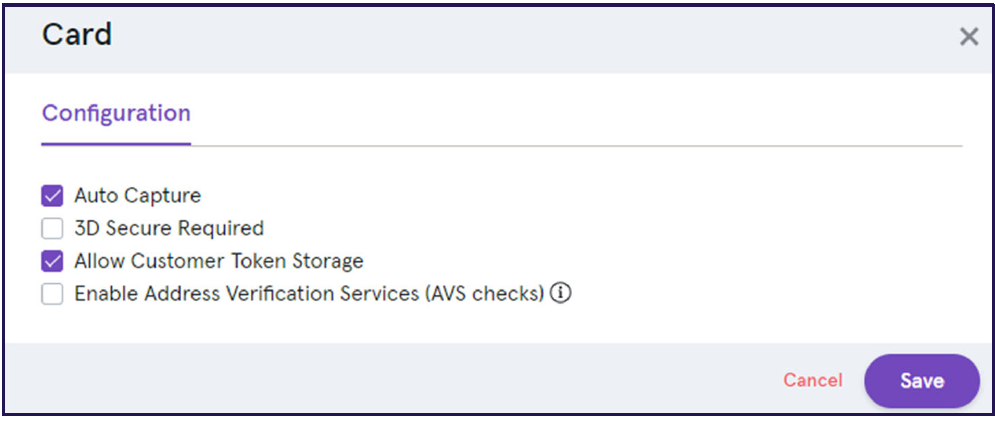
The settings for Cards are as follows:
Setting |
Description |
|---|---|
Auto Capture |
When this option is enabled, both an authorisation (reserve funds on card) and a capture (request funds to be transferred) will be sent to the bank. If this option is not enabled, only a authorisation request will be sent, this will reserve funds on the card but the payment will not be completed, to complete the payment a separate capture request will be required which can be performed in the gateway portal or by API. If the capture request is not sent,the reserved funds will be released by the bank, typically after 5-7 days. |
3D Secure Required |
When this option is enabled, transactions submitted without 3D Secure will be declined by the Gateway. |
Allow Apple Pay |
Select this option to use Apple Pay. Note, if using our Embedded Checkout JavaScript Library you will need to also complete the “Apple Pay Domains” section. |
Allow Google Pay |
Select this option to use Google Pay. |
Allow Customer Token Storage |
This setting enables tokenisation, card details will be securely stored in the Cashflows platform and the merchant will be returned a token to submit in place of card details for subsequent payments letting them show returning customers their stored cards. |
Enable Address Verification Services (AVS checks) |
Enabling AVS will check the billing address supplied by the card holder matches the address held by their bank. |
If you are using Apple Pay via our Embedded Checkout JavaScript Library you will need to complete the section below.
Setting |
Description |
|---|---|
Domain |
This is the domain that you want the Apple Pay button to appear on. |
Status |
Once the domain is added we will send this to Apple, Apple will return a response within a couple of hours and the response of “Registered” or “Failed” will show here. |
Registered |
This is the date the domain was registered with Apple. |
Hosted Checkout Pages
In this section there is a Hosted Checkout Pages (HCP) editor that gives the option to create multiple HCPs. Although multiple HCPs can be created, only one can be active at any time.
To strengthen your brand when your customers are making their payment, you can customise your Hosted Checkout Pages to include your logo and match your site’s colour scheme. Then when your customer heads to check out, they will be redirected to a page that has the same feel as your webshop. By using the HCP, where PCI compliance is provided by Cashflows, your customer will safely enter their card details and submit their payment. When the payment processing has completed, they will be redirected back to your site.
The payment page is highly customisable. We recommend at a minimum that you review the following elements for customisation, shown here on an unmodified page:

Using the HCP Editor
Please note if you are using both the Integration (Test) and Production environments, changes will be required in each environment; for your security, there is not a copy facility between the Integration and Production environments.
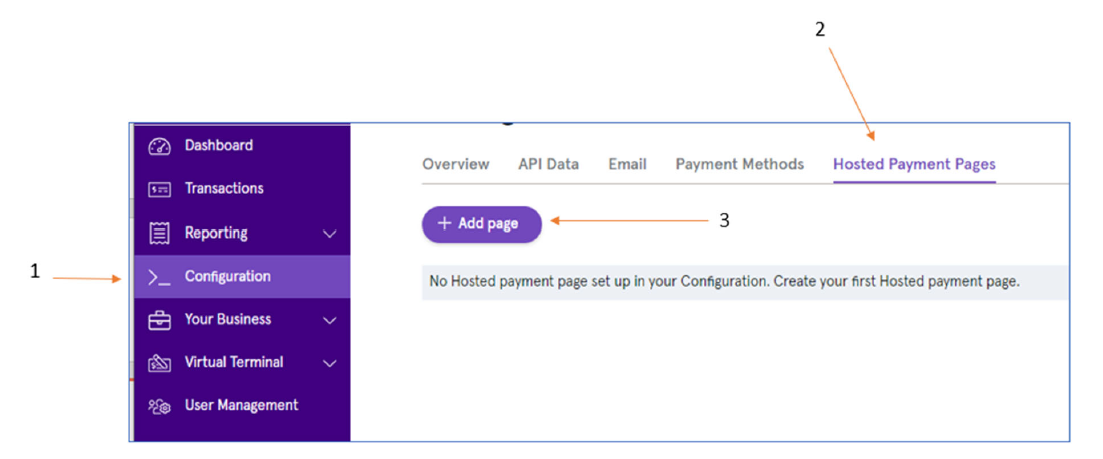
Once you have logged into Cashflows Portal, click on Configuration (1) in the left menu, select the Hosted Checkout Pages (2), then press Add page (3)
Give the page a name and click create to present the editor.
Select your formatting element from the left menu, this will present the options for that element; for example, to change the colour of header bar (from purple), select content header.
Change the Content Header
For the Content Header element, you can modify the text and background colour. When you know the colour values, you can type in the colour number, or alternatively can choose a colour from the colour palette provided.
Once you are pleased with your choice, click on Save changes (at the bottom of the screen). You can abandon changes by skipping this process and just using the Back option.
When you are finished, click Back (top left on the screen) to return to the main panel.
Change Logo
To upload your company logo, click on the Logo option in the editor main menu bar to present the settings.
Click on Upload Image to add your logo. Once the image appears, you need to check the Use custom logo box, and save the changes.
Page Background
When you select Page Background from the editor main menu, you will be presented with options to:
Set a colour for the background.
Upload an image to be displayed in the background.
Once you are pleased with your choice, click on Save changes (at the bottom of the screen).
Payment button
To change the colour of your payment button, go to the Payment Method Details option in the editor main menu, scroll through the options until you get to Pay Button Background color where you can set the colour. Save your changes.
In order to activate your newly created customised Hosted Checkout Pages:
Click Back to return to the main editor page.
Then click Exit Editor (top left of the screen).
- The final step is to Active your payment page:
Press the ellipsis (…)
Select Activate (3rd option)
Plugins
Configuration of a plugin will be performed in your ecommerce application (e.g. Magento, WooCommerce) the information that the ecommerce application will require is displayed in the configuration in the API section:
API Key
Configuration
Cashflows provide step by step installation guides for supported plugins.
Dashboard
The Cashflows Portal Dashboard shows payment information in a graphical form with options to customise the data displayed.
The Dashboard has two tabs, Transactions and Balance.
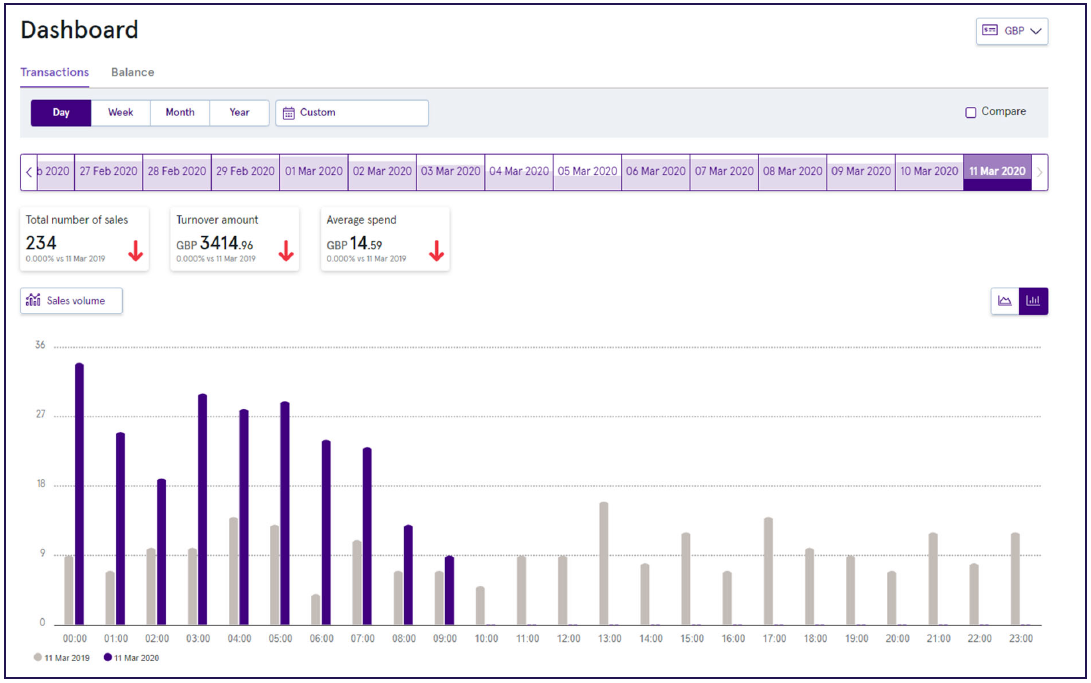
Transactions
This screen shows graphs depicting either sales volumes (number of transactions) or sales revenue (monetary value).
At the top of the screen a currency can be selected, to show the transactions for this currency. Another option at the top of the screen is the time period to be displayed, there are options for day, week, month year and a custom time period.
The bar graph will show the transactions for the given time period in the darker colour, the lighter colour bars show data for another time period, which can be specified by clicking on the Compare option.
At the top of the bar graph there is are options to switch between Sales Revenue and Sales Volume and to switch between the Bar graph and the Line graph.
If you hover over a bar in the graph you will see a summary of the transaction data, for example 23transactions on 5th June. If you click on the bar the transaction search will be presented showing only the transactions relating to this bar in the graph.
The default setting for the dashboard is to show successful transactions. Unsuccessful transaction data can be displayed by using the selection box above the graph.
Balance
The balance tab shows a summary of the merchant account balances.
Transactions
Transactions originating from the Virtual Terminal and other channels can be viewed in the transaction search. It enables you to search, review, refund and report on all your transactions in real-time.
In the menu bar there is an option for transaction search, taking this option will provide a list of the latest transactions:
Search
At the top of the transaction display screen is a search facility, full or partial search criteria can be entered for Order references, Refund references, Transaction references, Customer name and Order ID.
Filters
To locate a particular transaction there are a range of options at the top of the screen:
Option |
Description |
|---|---|
Search |
Use the search feature to search for an order reference or customer name. |
Select Dates |
Use this function to specify a date or date range to search. |
Filters – Payment Status |
A range of payment statuses can be used to filter transactions:
|
Filters – Amount |
A minimum or maximum (or both) transaction amount. |
Filters – Currency |
The transaction currency. |
Filters – Payment Method |
The payment used for the transaction, for example Card, Direct Debit. |
Filters – Channel |
The source of the transaction, for example Gateway, Card Present transaction. |
Once a filter has been enabled, is will be displayed at the top of the screen, individual filter can be removed by click on the X next to it. Unchecking the filters option will remove all filters.
Detail Views
Clicking on a transaction in the transaction list provides the detail view:
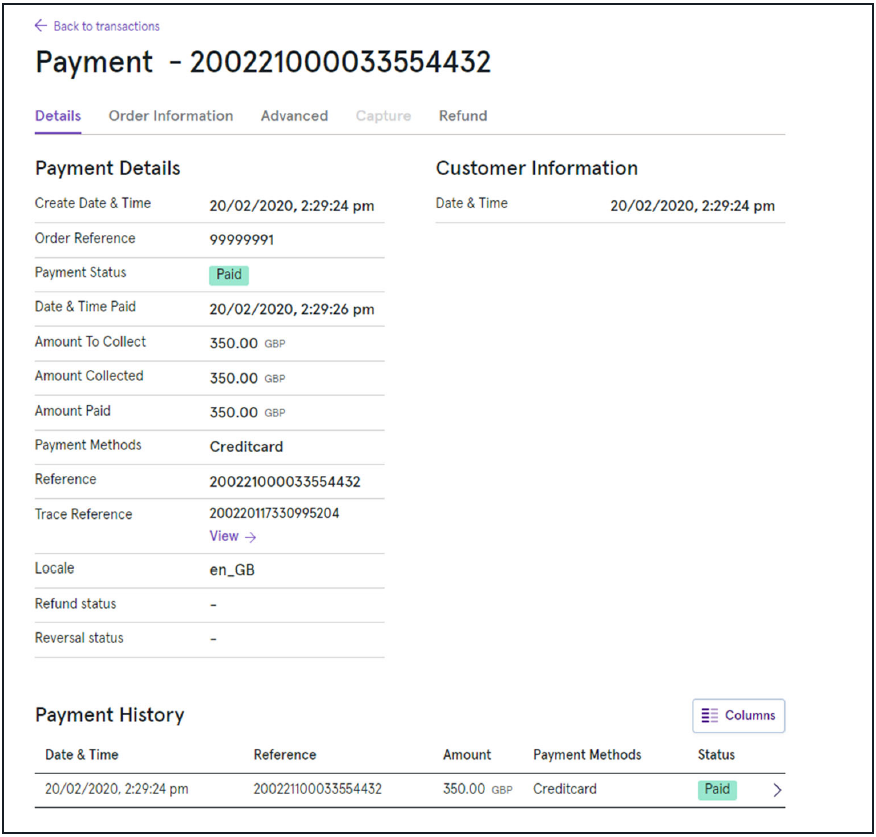
The amount of information displayed will depend on how the transaction was captured with some methods, for example a website, may capture more details than a Virtual Terminal.
At the top of the screen are series of tabs that can provide additional transaction information and refund processing. There is a Back to Transactions link at the top of the page that will return you to the list of transactions.
Channel
The payment channel column shows the origin of the transaction:
All - Transactions from all sources
Acquiring - A transaction sent to the acquirer that has not used the payment gateway or portal such as a direct integration or a third‐party gateway.
Gateway - A transaction sent using the Gateway Hosted Checkout Pages, Gateway API or Cashflows Portal Virtual Terminal
Card Holder Present - A transaction where the cardholder presented their physical card such as an instore Chip and Pin transaction
Refunds
To perform a refund, locate the required transaction in the transaction search and click on it to display the detail view. From the detail view click the refund tab at the top of the screen, if this tab is not visible, the transaction is not eligible for refunding, this could be due to the current transaction status.
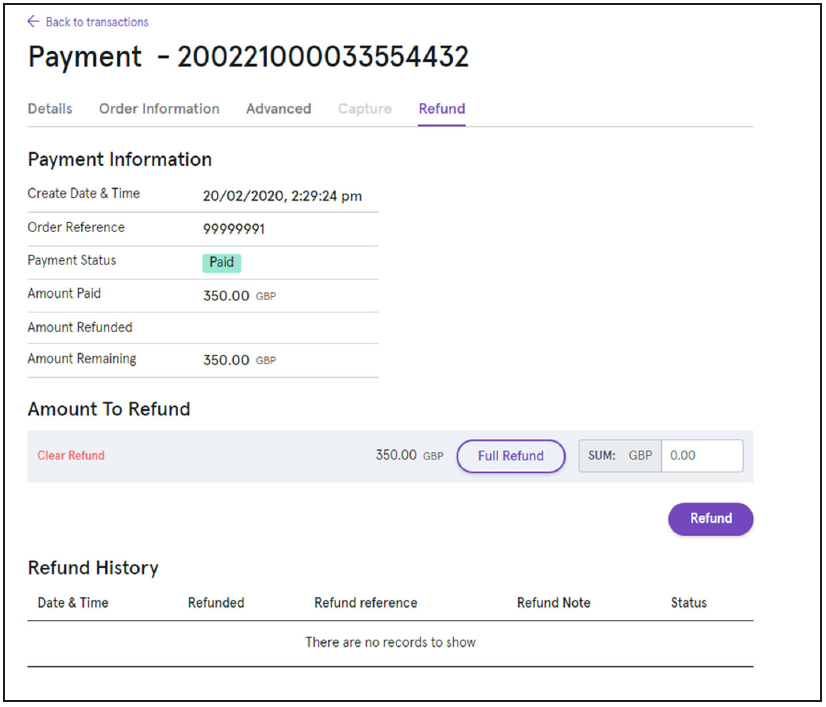
If the refund screen you can select the amount to refund, if order lines were captured during the payment it is possible to enter refunds at this level. Refunds can only be made to the original payment method.
Clicking the Refund button displays the Refund Confirmation screen where a Credit Number (or reference) must be added, an optional note can also be added.
Refunds will appear in the transaction search and also in the history of the transaction (displayed in the refund view).
A refund is only possible once the transaction has been settled, typically this is from the day after the transaction is processed, if the transaction is not eligible for a refund the option will not appear in Cashflows Portal. If you want to take action before a transaction refund is possible you can cancel the transaction, this option is available in the Capture tab.
Export
The contents of the transaction search can be exported if a date range has been specified. To export the content, click on the Export button and select a format for the download (PDF, XLS or CSV), this will start the download to your computer.
The content of the report can be customised by using filters and column selection before the export.
Virtual Terminal
Our Virtual Terminal is a browser-based option for accepting payments. With our Virtual Terminal you don’t need to pay for a physical card machine (also referred to as a payment terminal or card reader). As well as reducing expenses, our Virtual Terminal provides your business with a secure, simple, and convenient payment processing option.
With our Virtual Terminal you can:
Take virtual payments by mail order or over the telephone (MOTO payments).
Send a customer a link so that they can pay at their own convenience, wherever they are.
Important
When you sign up with us, you can choose either or both of these options and we enable them for you to use. If we know that you want to use payment links, we set up your account as an eCommerce (ecomm) account rather than a Virtual Terminal only account. You can leave that to us. However, if we set you up as a Virtual Terminal user and you later decide that you would like to use payment links, you need to send a request to support@cashflows.com. Our Risk team reviews your request. If they approve, we can then enable the Payment Links option for you.
You can use the Virtual Terminal on a computer in your office, salon, clinic or other place of work. You can take our Virtual Terminal with you and use it on your laptop or mobile device. Since Virtual Terminal is available via an internet browser, it means that you can take payments from wherever there is an internet connection. This could be a client site or even a customer’s home.
Our Virtual Terminal supports multiple users simultaneously on any single account. It’s an ideal solution for a health centre or a central call centre.
How it works
A customer or shopper is ready to pay over the phone or in person.
You, or anyone in your business,Sign into Cashflows Portal and select the Virtual Terminal option.
You enter their card details on the screen.
The secure webpage connects to our payment processing system.
- The customer waits a few seconds while:
We check the card number and customer’s details with the issuing bank
We authorise the payment
You see a notification on screen when the transaction has been authorised
We process the payment.
You inform the customer, that the transaction has been authorised and is complete.
For mail orders, you can send a reply or confirmation message. If the payment is for goods, you can arrange for despatch.
How it looks
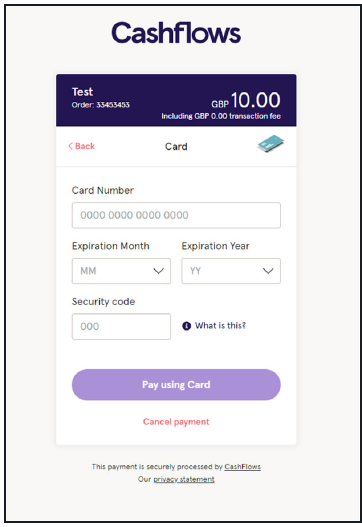
When you use the Virtual Terminal from Cashflows Portal, you see a webpage where you enter the payment card details:
Virtual Terminal is customisable. The fields displayed on the screen depend on how Virtual Terminal is set up for your business.
If you’re the business owner, you can keep it simple and only capture the minimum details required for a payment. Alternatively, you can add extra fields to fill in and capture useful information to create a better customer experience for customers who intend to return. For example, you can ask a customer for their email address and keep them informed of special offers. If you’re a business owner, you can decide which details are mandatory or optional, as preferred. An asterisk (*) indicates that a detail is required. For more information about extra details that you can add, see How to customise Virtual Terminal for your business.
Depending on the nature of your business, some fields are required for regulatory purposes. For example, if you offer a financial service, you are required to capture extra information about transactions where a person is receiving the service. Therefore, you need to tell us a few extra details if a person is receiving any funds. For more information, see Additional information required for financial institutions.
Getting started
This section explains how to get up and running with Virtual Terminal.
What you need
To use Virtual Terminal you need:
An internet connection
A browser
A Cashflows Portal account
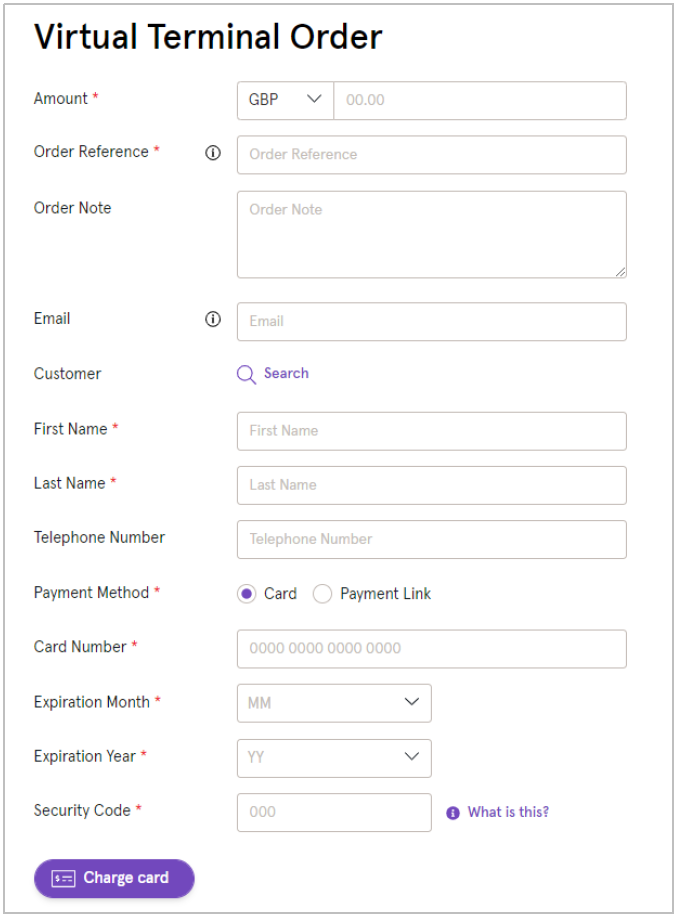
How to take a payment over the phone
This section describes how to take a payment over the phone via Cashflows Portal instead of with a card machine.
To take a payment:
Sign into Cashflows Portal.
From the Cashflows Portal menu, select Virtual Terminal.
- Select Virtual Terminal Order.
Note
The fields that you see on the screen depend on how the Virtual Terminal is set up for you or your business. For more information, see How to customise Virtual Terminal for your business
Select the currency that the product or service is priced in.
Enter the amount to be debited from the card.
Enter a unique order reference. This gives you and your customer a way to refer to this payment, for example the order number.
- It can be useful to add some additional information as an order note, for example colour or size preference. This is optional.
Tip
To enlarge the Order Note box, you can drag the lower-right corner.
- If you have stored this customer’s details from a previous payment, you can search for them by name.
Note
You can store customer or shopper details during their first payment. For more information, see How to store a customer’s details for future payments.
- For a new customer, enter their first and last names.
The default Payment Method is Card. Therefore, you need to complete the following mandatory details.
Enter the card number. This is the long number on the front of the card.
Select the month when the card is due to expire.
Select the year when the card is due to expire.
Enter the security code. This is the three-digit CVV/CVC number, usually on the back of the card. For American Express this is a four-digit number on the front of the card.
Select Charge card. A confirmation is displayed on the screen to show you the payment details. A status of Paid indicates a successful payment that we have authorised.
To take another payment, select Create New virtual terminal order and repeat the steps in this section.
Additional information required for financial institutions
If your business is a financial institution (classified as an MCC 6012 debt repayment merchant), some extra details are required to comply with financial regulations. We set these up for you when you sign up with us. Therefore, your Virtual Terminal might be set up with the following extra fields to fill in about the customer who is receiving the funds or service:
Important
For MCC 6012 payments, we advise that you check the card type because credit cards are not accepted.
Field |
Description |
|---|---|
Date of Birth |
The cardholder’s full date of birth |
Post Code |
The postal code of the cardholder’s billing address |
Primary Account Number |
Account or reference number where funds are being disbursed or applied. This number must be in a valid format which is between 1 and 32 alpha numeric characters which can include ‘/’ and ‘-’, but no spaces |
How to store a customer’s details for future payments
It’s possible to save and store details about a customer and their payment card so that you can search for and re-use them for future payments. This saves you from having to re-enter the details again. With the customer’s permission, you can save additional details such as an email address so that you can keep in touch, for example, with special offers. This can contribute to a good customer experience and encourage clients to return in future.
To save and store customer details:
From the Cashflows Portal menu, select Virtual Terminal.
Select Virtual Terminal Order.
Select the Customer Search option.
Select + New Customer to display a form where you can enter the customer’s details.
After you enter the details, choose Select. The customer’s details are saved and stored for you to use again in future.
- With the customer’s permission, you can also save their card details for future purchases.
Important
It’s a GDPR requirement that you alert a customer if you are storing any of their personal details. As a business owner, you are responsible for GDPR compliance.
Enter the card details and select the Save payment information … option.
Select Charge card.
When this customer returns, you can search for their details. The same stored details are also available if you want to send the customer a payment link. For more information about using payment links, see the payment links section.
How to search for stored customer details
If a customer’s details have been saved and stored in the Virtual Terminal, you can search for them. This saves you from having to re-enter their details.
Sign into Cashflows Portal.
From the Cashflows Portal menu, select Virtual Terminal.
Select Virtual Terminal Order.
- Select the Customer Search option.
Tip
If the list is long, you can focus your search by Quick Search.
Search for a detail that you know about the customer you’re looking for/
You can also select Columns and choose the columns that you want to display and hide any that you don’t need to see.
In the list, click anywhere in the row of the customer that you’re looking for
The details that have been saved for the selected customer are displayed.
Click Select. The Virtual Terminal Order page is re-displayed with the details of the customer already filled in.
If any card details have been stored, you can select Charge card to take the payment. Otherwise, you can enter the card details that the customer provides and then select Charge card just as you would for any virtual payment. For more information, see How to take a payment over the phone.
How to update stored customer details
You can update the stored details the next time the customer pays. For example, if the customer contact details change or they want to pay with a different card.
Sign into Cashflows Portal.
From the Cashflows Portal menu, select Virtual Terminal.
Select Virtual Terminal Order.
Search for the customer whose details you want to update. For more information, see How to store a customer’s details for future payments.
With the customer details displayed, enter the details of the payment as you would for any other payment. For more information, see How to take a payment over the phone.
Make the necessary changes. For example, you could add or change their email address or telephone number.
If their card details have changed, enter the new card details.
Select the Update customer information option.
Select Charge card. A confirmation is displayed to show you the payment details. A status of Paid indicates a successful payment that we have authorised.
To take another payment, select Create New virtual terminal order and repeat the steps in this section or in How to take a payment over the phone.
How to customise Virtual Terminal for your business
If you are the business owner with the Owner and Virtual Terminal roles, you can customise Virtual Terminal to capture additional information, such as address and contact details. These extra details can then be stored with the transaction and used, for example, for staying in touch with customers, as long as they agree. You can choose to make the extra details mandatory, optional, or inactive (not displayed).
Important
It’s a GDPR requirement that you alert a customer if you are storing any of their personal details. As a business owner, you are responsible for GDPR compliance.
How to customise Virtual Terminal
Sign into Cashflows Portal with Owner and Virtual Terminal permissions.
From the Cashflows Portal menu, select Virtual Terminal.
Select Virtual Terminal Settings. A list of extra details is displayed.
- For each extra detail that you want to display on your Virtual Terminal page, select:
Mandatory: The extra detail must be provided to complete the transaction
Optional: A field for the extra detail is displayed but adding the information is not compulsory
If you don’t want to use a field, leave it as Inactive and it will not be displayed.
Select Save. Your changes are applied immediately and the updated Virtual Terminal page is ready to use.
Payment Links
To send payment links, you need to use our Cashflows Portal Virtual Terminal. With our Virtual Terminal you don’t need to pay for a physical card machine (also referred to as a payment terminal). As well as reducing expenses, our Virtual Terminal provides your business with secure, simple, and convenient payment processing options for:
Taking payments over the phone For more information, see the Virtual Terminal section.
Sending payment links so that customers can pay at their own convenience, wherever they are (including over the phone).
Important
When you sign up with us, you can choose either or both of these options and we enable them for you to use. If we know that you want to use payment links, we set up your account as an eCommerce (ecomm) account rather than a Virtual Terminal only account. You can leave that to us. However, if we set you up as a Virtual Terminal user and you later decide that you would like to use payment links, you need to send a request to support@cashflows.com. Our Risk team reviews your request. If they approve, we can then enable the Payment Links option for you.
You can use Virtual Terminal to send payment links from a computer in your office, salon, clinic or other place of work. You can take our Virtual Terminal with you wherever you take your laptop or mobile device. Since Virtual Terminal is available via an internet browser, it means that you can send payment links from wherever there is an internet connection.
What is a payment link?
A payment link is an easy way to get paid. A payment link is a web address (also referred to as a URL) that you can send to a customer to take them to a secure online payment page. You can use our online portal, Cashflows Portal, to create and send payment links. For more information, see How to send a payment link.
You can send a payment link via text message, email, chat message, app or social media. The customer selects the link and is taken to your checkout page where they can enter their card details and pay.
Features of our payment links
Payment links work with a range of payment methods including Apple Pay, Google Pay and PayPal.
You can choose to receive a notification after every successful payment made via a payment link. This enables you to stay on top of incoming payments.
Our payment links are for one time use. The same link may not be used for multiple customers.
You can embed payment links into emails, electronic invoices, text messages and chats, for example to request a deposit, complete a booking, send a quotation or send a reminder to chase up a payment. If you embed a payment link into an email, you can customise the email to include your own logo and text together with a ‘Pay Now’ button.
Benefits of using payment links
You don’t need an online store, card machine or other payment system
If you send a payment link to a customer, they can follow the link and pay at their convenience via a mobile device wherever they are
A payment link is useful for spontaneous sales on the phone although typically we would recommend using the features of our Virtual Terminal for taking payments over the phone. For more information, see the Virtual Terminal section.
Sending a payment link is more secure than taking a payment (MOTO transaction) over the phone because a payment link uses Strong Customer Authentication (SCA)
How it works
A customer has ordered goods or services from you and you would like them to pay you.
You, or anyone in your business, can sign into Cashflows Portal and select the Virtual Terminal option.
You enter their card details on the screen.
You select the Payment Link option.
We create a link to a secure webpage that connects to our payment processing system.
We present the payment link to you.
You copy the link and send it to the customer or use our payment link email capability. For more information, see How to send a payment link.
The customer follows the link to the secure web page where they enter their card details.
- We take care of the payment processing:
We check the card number and customer’s details with the issuing bank.
We authorise the payment.
We process the payment.
Our Cashflows Gateway API offers ways to extend the capabilities of using payment links. For example, with knowledge of using API calls you or a developer can:
Convert a payment link to a QR code
Send a payment link to a mobile number
Chase up a payment that hasn’t been made
How it looks
When you use Payment links from Cashflows Portal, you see a webpage where you enter the customer’s card details:

Getting started
To send payment links you need:
An internet connection
A browser
A Cashflows Portal account with Virtual Terminal permissions
How to send a payment link with Virtual Terminal
To take a payment over the phone you and the customer both need to be available at the same time. Busy schedules can make it difficult to find a mutually convenient time. With a payment link, you can send the customer a link to follow so that they can pay at their convenience. They can pay in their own time via a mobile device wherever they are.
To send a customer a link:
Sign into Cashflows Portal.
From the Cashflows Portal menu, select Virtual Terminal.
Select Virtual Terminal Order.
Note
The fields that you see on the screen depend on the how the Virtual Terminal is set up for you or your business. For more information, see the Virtual Terminal section.
Select the currency that the product or service is priced in.
Enter the amount to be debited from the card.
Enter a unique order reference. This gives you and your customer a way to refer to this payment, for example the order number.
- It can be useful to add some additional information as an order note, for example colour or size preference. This is optional.
Tip
To enlarge the Order Note box, you can drag the lower-right corner.
If you have stored this customer’s details from a previous payment, you can search for them by name.
For a new customer, enter their first and last names.
The default Payment Method is Card. To send a payment link, select the Payment Link option. The card-related fields are no longer displayed. The customer enters their card details when they receive the payment link.
Select Create payment link. A link is created for you to copy and share in a secure way with the customer.
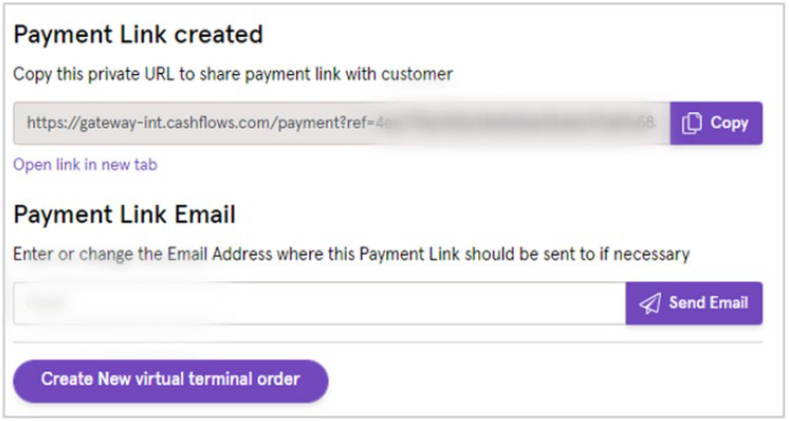
You can either:
Use the Copy option to copy this link from Cashflows Portal into your own email system, an invoice or text message and send it to the customer
Send the link in an email directly from Cashflows. The email is sent from no-reply@cashflows.com
If an email address is already stored for the customer, it’s filled in for you. If not, enter the email address to use for securely sending the payment link to the customer.
Select Send Email. The customer receives an email with details of the purchase and a button to select to make the payment and complete their purchase.
Tip
It’s possible to configure the Cashflows Portal settings to include your business logo in these order confirmation and payment emails.
When the customer selects the link in the email, a payment page is displayed. The order details are already filled in. The customer only needs to enter their card details and pay.
Important
Payment links are valid for six months. If a customer tries to pay but is unsuccessful, they have 15 minutes to retry, for example with a different payment method.
How to store customer details for future payments
It’s possible to save and store details about a customer you can search for and re-use them for future payments. This saves you from having to re-enter the details again. With the customer’s permission, you can save details such as an email address so that you can send payment links in future or simply keep in touch, for example with special offers. This can contribute to a good customer experience and encourage clients to return in future.
To save and store customer details:
From the Cashflows Portal menu, select Virtual Terminal.
Select Virtual Terminal Order.
Select the Customer Search option.
Select + New Customer to display a form where you can enter the customer’s details.
After you enter the details, choose Select. The customer’s details are saved and stored for you to use again in future.
- With the customer’s permission, you can also save their card details for future purchases.
Important
It’s a GDPR requirement that you alert a customer if you are storing any of their personal details. As a business owner, you are responsible for GDPR compliance.
Enter the card details and select the Save payment information … option.
Select Charge card. When this customer returns, you can search for their details.
How to set a time limit for a customer to pay
By default a payment link is valid for 6 months. You cannot change this but you can determine how long the associated payment job lasts, for example if you want to, encourage a customer to pay sooner. For more information about payment jobs, see the Cashflows Gateway guide.
To set a time limit for a customer to pay:
Sign in to sign into Cashflows Portal with Owner permissions.
From the Cashflows Portal menu, select Configuration.
Select the API Data page.
Select Edit API Data.
Scroll down to Default Expiration Period.
From the Default Expiration Period list, select the length of time after which you would like all associated payment jobs to expire, for example 7 days. The option that you choose applies to all payment jobs that you send.
Select Save.
How to keep track of payments
So that you can keep track of payments, you can choose to receive a notification after every successful payment, including payments via a payment link. You can do this by either:
Telling us which page to display after a successful (or failed) payment.
Using our webhook notification service for payment status updates.
Note
Both of these features are optional. You may not need to do these things or may choose not to if you don’t have an API developer available.
How to receive a notification after every successful payment made
After we finish processing their payments, we direct customers back to your website.
We direct customers to a webpage according to the status of their payment (successful or failed). Alternatively, you can choose to display your own webpages. You just need to set the addresses (return URLs) of the pages that you want us to display instead. This section explains how to set the default return URLs in Cashflows Portal.
You can specify a different page for each of the following scenarios:
- Success - A customer completes a successful transaction. You can display a Thank You page and explain what happens next, when they can expect their delivery and so on.
Tip
For security reasons, we recommend that you update an order only when you receive the payment status notification from us. A notification from our Cashflows Gateway assures you that a payment request has not been intercepted during transfer.
Failed - A customer fails to complete the payment process, for example because we (or their bank) did not approve it (the payment was declined). You can display a page to explain what might have happened and give the customer the opportunity to try again with a different payment method.
To tell us which pages to display:
Sign into Cashflows Portal.
From the Cashflows Portal menu, select Configuration.
Select the API Data page.
Select Edit API Data.
Add the address (URL) for each page that you would like to display for example.
Select Save.
Tell us where to send payment status updates
When we have processed a payment and the status changes, for example from Pending to Paid, we need to communicate this to your website. We use webhooks for this. A webhook is a way for one application to provide data to other applications as it happens (in real-time). This means that you receive data immediately. You don’t need to check for changes in payment status. Instead, we can notify you, as long as you tell us where to send the notification webhooks.
Gateway webhook notifications are sent from these two IP address: 54.74.58.255 and 52.215.48.101. Depending on your firewall settings, you may wish to whitelist them.
There are two places you can set as notification locations:
Notification URL - this is the address where you would like us to send the notifications (webhooks).
Notification email address - this is the email address where you would like us to send emails if we need to tell you about any notifications (webhooks) that we couldn’t deliver or if anything needs to be configured differently. These emails are for whoever maintains the website. These are not customer-facing emails. Therefore, this should be a business email address, for example the email address of the business owner or person responsible for managing the website.
To tell us where to send notification webhooks:
Sign into Cashflows Portal.
From the Cashflows Portal menu, select Configuration.
Select the API Data page.
Select Edit API Data.
In the Notification section, add the Notification URL.
In the Notification section, add the Notification email address.
Hosted Checkout Pages
The Hosted Checkout Pages integration method provides web developers a quick integration to the payment gateway providing functionality for processing online card payments from a merchant website.
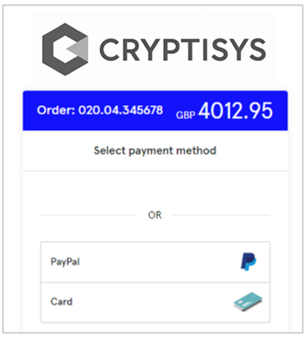
To process an online payment using the Hosted Checkout Pages, your website store will need to send an API message to the payment gateway to create a payment job with the details of the transaction and the API will return a URL you should redirect the shopper. We then display a compliant payment page to the shopper where they securely enter their card details. We immediately process the payment when the details are submitted to us. The shopper will then be returned to your website URL that you specified in the gateway configuration section.
Please refer to the Configuration section of this document for more details of how to specify the return URLs and how to customise the appearance of the Hosted Checkout Pages.
This covers all technical aspects including setting up your environment, signing API calls, response codes and endpoints.
Submitting a payment request
The first step is to create a payment job, this must contain at least:
Payment amount
Currency
Locale (e.g. en-GB)
It is recommended that more than the mandatory fields are supplied in the payment job to help you track payments, consider including:
Order reference (generated by you)
Customer name
Customer email
If you wish to include more information the API has fields for many more items including billing/shipping details and order line details.
Response
The response will provide a redirect link where you should redirect the shopper. The shopper will be presented with the payment page where they enter their card details and submit the payment, if 3D Secure is enabled the payment page will redirect them to the bank 3D secure page before submitted the payment. Once the payment has been submitted and processed, the shopper will be redirect to the appropriate URL configured for this merchant.
Return URLs
The URLs that the shopper will be redirected to after the payment has completed are specified in the configuration section, URL values can be entered for:
Successful payment
Failed Payment
Cancelled Payment (by the shopper)
If the same URL is specified in all sections, you can use a Retrieve Payment Job API call to get the payment status to update your web shop.
Webhooks
It is important for a smooth and safe operation of a payment application to implement web hooks. A web hook is an API endpoint you create on your server implementation. This endpoint will be called from the gateway software on status changes of your payment job. This way you avoid having to poll for a payment status changes, instead you will be notified of payment jobs from which the status has changed. When the payment job information is received via the webhook, you can retrieve the payment job and update your system with the payment status.
3D Secure
3D Secure settings are at a merchant level, if 3D Secure is enabled, the Hosted Checkout Pages will perform the redirect to the bank URL and collect the 3D Secure data and add it to the payment request automatically.
Tokenisation
The Hosted Checkout Pages is an ideal way to tokenise cards, it can also present tokens as stored cards to the shopper.
In order to be able to use tokens, a customer reference should be provided when creating a payment job. The customer can then choose to store their card as a token by checking the corresponding check box on the credit card payment page.
If the customer places another order, they will be provided with the option to use (one of) their previously stored card(s) without having to re-enter all of the credit card details.
Payment Page example
The following example has been branded as Cashflows:
Enabling Apple Pay and Google Pay
Cashflows handles most of the work for Apple Pay and Google Pay behind the scenes, to enable them in Embedded Checkout you need to:
Login to Cashflows Portal, then navigate to Configuration.
Select Payment Methods, then select Card.
Enable Allow Apple Pay and Allow Google Pay in the configuration section:

For more detail on integrating Apple Pay and Google Pay, see the Embedded Checkout guide.
PayPal
To process PayPal payments, you first need to email support@cashflows.com to have PayPal enabled on your account. You also need a PayPal business account linked to your Cashflows account.
To link your PayPal business account to your Cashflows account:
Sign in to Cashflows Portal.
Important
You must be signed in as an Owner to make configuration changes within the Cashflows portal.
Log in and select Configuration.
Select Payment Methods.
Select PayPal.
Select Connect PayPal account, follow the instructions if you don’t have a PayPal business account.
Important
Be sure to activate your account by confirming the email address used to create your PayPal account.
Sign in to PayPal with your PayPal username and password.
When you return to Cashflows Portal, you will see the merchant ID that PayPal has assigned:
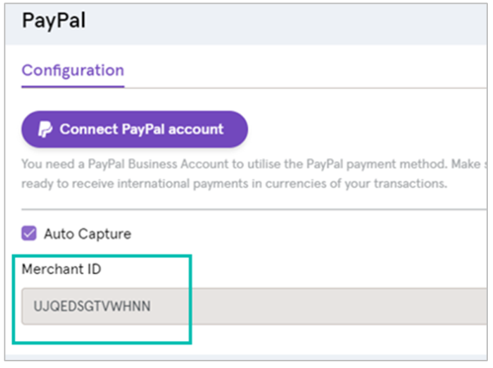
Select Save.
To preview how PayPal appears on your payment page, you can either:
Use the Virtual Terminal to generate a payment link and open it in your browser, see the Virtual Terminal section for more information.
Or
Use Cashflows Portal and go to Configuration, then Hosted Checkouts, and click on any existing templates.
Important
Your account needs to be enabled for sending Payment Links.
Reporting
Cashflows Portal provides a range of reports to provide information on payments and assist with reconciliation, which can be accessed from the Menu bar.
Clicking on a report will load it into the main display with the latest data:
This options at the top of the screen, date selection, columns and filters can be applied to customise the report.
If a date range has been applied, the report can be exported using the Export option where the download formant can be chosen (PDF, XLS, CSV).
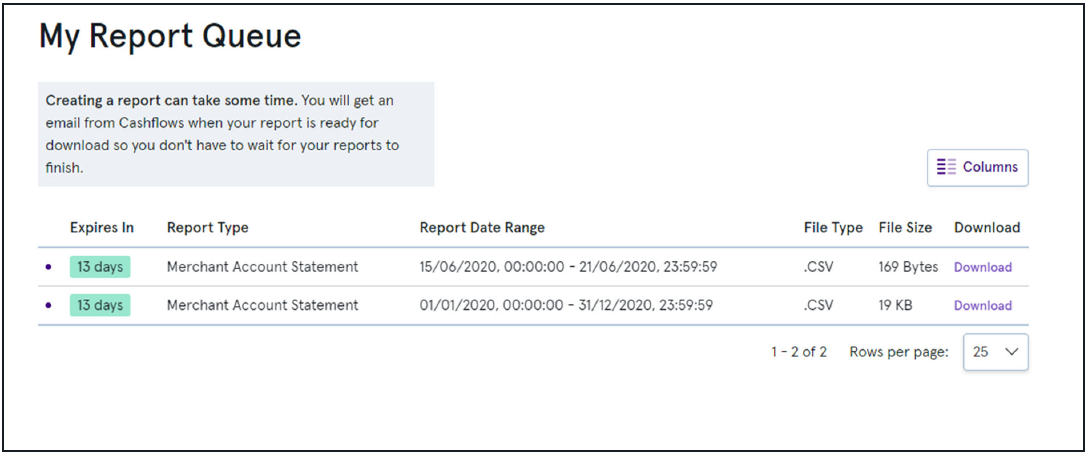
Report Queues
Creating a report can take some time if a large amount of data is involved, therefore reports are added to a queue. You will get an email from Cashflows when your report is ready for download so you don’t have to wait for your reports to finish. You will see an option to view the report in the queue.
Your report queue can also be view from the My Profile option in the main menu.
The report queue shows reports and the option to download completed reports:
Your business
This section provides a read-only view of your business, merchant details and pricing plan as setup by Cashflows and the facility to setup a remittance for pay funds to your external bank account.
Beneficiaries and Remittances
These features enable you to manage when payments are made from your Cashflows Merchant Accounts and to which external banks these payments are made.
The Remittance option lets you select which beneficiary is being paid and when that payment will be made, the Beneficiary option will let you add details of who the payment is being paid to.
Beneficiaries
A Beneficiary will contain the bank and address details of the individual or company who will receive the funds from your merchant account.
If no Beneficiaries have been setup, you will see an option to create one. Click on Add Beneficiary to add a beneficiary:
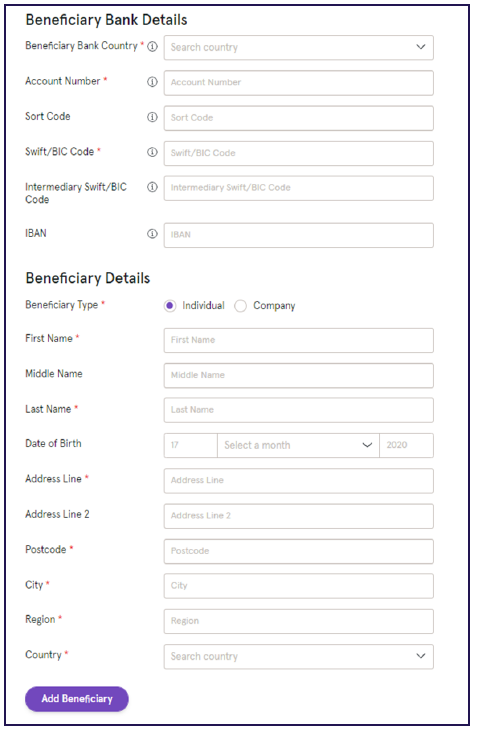
The field marked with * are mandatory and you can select whether the Beneficiary is an individual or a company. Once the details have been entered, click the Add Beneficiary option at the bottom of the page.
If at least one Beneficiary exists, it will be shown in a list and the option to add further Beneficiaries will be at the top of the screen:
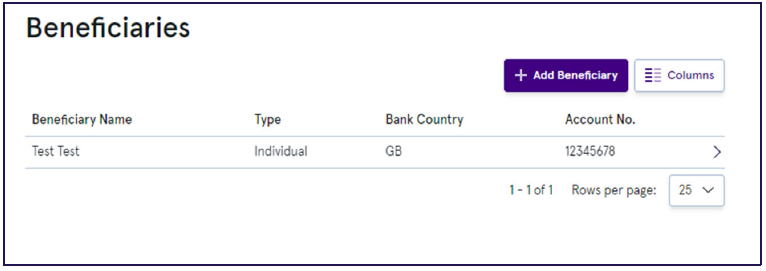
As Beneficiaries are subject to PEPs and Sanctions checks, it is not possible to edit them, if any details change you can a new Beneficiary.
Remittances
A Remittance can be assigned to each of your Cashflows Business Accounts which are usually created per currency (one Business Account for each currency). When creating or changing a remittance you can do the following:
Assign a beneficiary to a Business Account.
Set the monetary threshold for when a payment is made.
Enter a payment reference.
if no remittances exist, an add option to Add Remittance will be available to add a remittance:
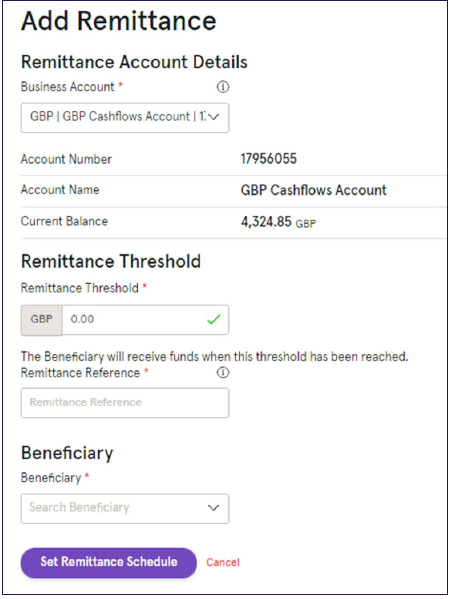
The fields are:
Business Account – If you have more than one Business Account, they will be listed in the selection box, select the Business Account you want to create or change the remittance for.
Remittance Threshold – When the balance in your Business account reaches this monetary value a payment will be made to the assigned Beneficiary. For example, make a payment to your external bank account when the merchant account balance reaches £1000.
Beneficiary – A list of the Beneficiaries that have been setup will be listed in the selection box, select the required Beneficiary.
Click on Set Remittance Schedule to save the changes.