Shopify Quick Start
This section is for Cashflows customers who are using our Gateway and want to integrate with Shopify. Shopify is an all-in-one e-commerce platform used by businesses to build, run, and manage online stores to sell products and services. It explains how to add Cashflows to a checkout by installing our plug-in for Shopify.
The integration is app-based and uses the official Cashflows (Boodil) Shopify plug-in. Once the plug-in is installed and configured you can immediately start accepting card payments with Hosted Checkout Pages.
If you need further support with this guide, please email implementations@cashflows.com with your:
MID
Business Name
Section stuck
Any Additional Details
Getting Started
Although not required, we recommend you install the plug-in and test in a non-production environment before using it for live transactions.
To support your testing, we have a dedicated integration environment: https://secure-int.cashflows.com/gateway/.
You need different credentials for the integration and production environments, to create an integration account for testing purposes contact implementations@cashflows.com.
API credentials
To integrate with Cashflows you’ll first need to collect your API credentials:
Configuration ID - unique identifier for your account included in API messages
Current API key - the key for encrypting API messages sent to us
To retrieve your credentials:
Sign into Cashflows Portal and select Configuration from the menu.
Select the API Data tab, the API Data page displays your API configuration details:

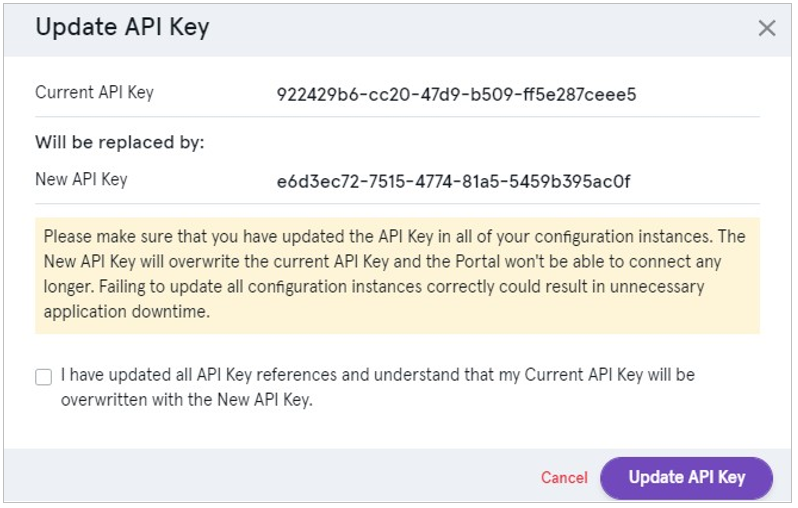
If you need to generate a new API key this can be done from the API Data tab:
Select Generate a new API key to generate a new key.
Wherever your integration uses the API key, replace the old key with the new one.
When you have successfully updated all API key references, check the confirmation box and select Update API Key:
Installing the Shopify Plug-in
To insall the Shopify plug-in:
Open the following URL in your browser: https://shop-app.boodil.com/install .
Enter your Shopify store domain (for example: your-store.myshopify.com).
Click Install app and follow the Shopify authorization steps.
Configuring Cashflows Credentials
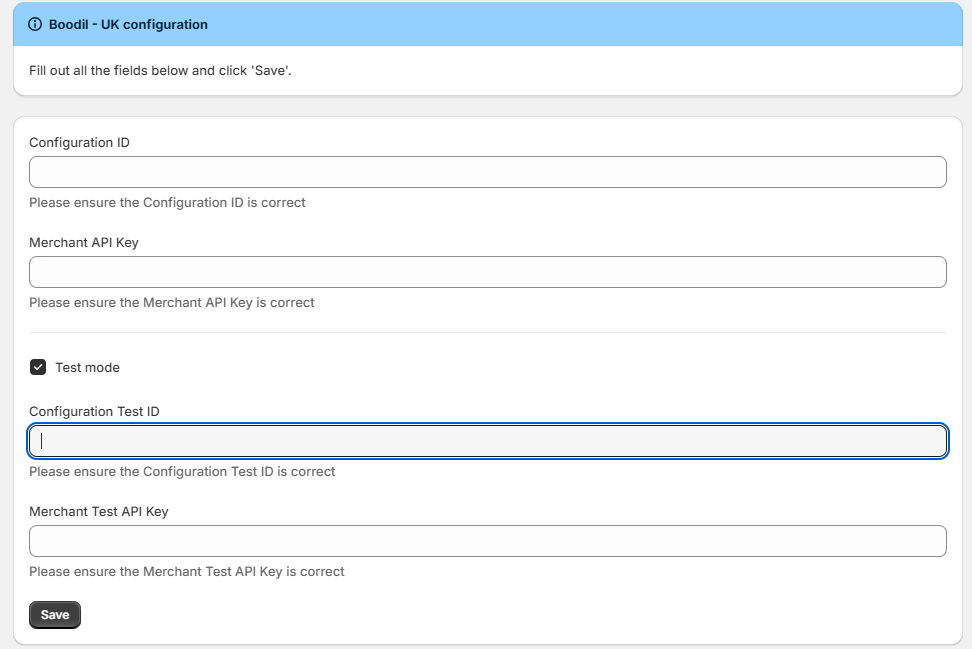
After installation, you will be redirected to the configuration screen to enter your:
Configuration ID
API Key
See the API credentials section if you don’t have these credentials.
Testing your integration
To test the integration:
Enable Test mode.
Enter your Configuration Test ID and Merchant Test API Key.
Click Save.
On the next screen:
Enable Boodil.
Click Save.

Webhook Configuration
To ensure payment status updates are correctly received by Shopify, webhook notifications must be configured in the Cashflows portal:
Sign into Cashflows Portal and select Configuration from the menu.
Select API Data, then Notification.
In the Notification URL field, enter:
https://shop-app-uk.boodil.com/api/v1/payments/webhook.Click Save.
Payment Response Handling
Once the plug-in is installed and the correctly configured the Cashflows API will automatically communicate with the Shopify plug-in. Payment responses and status updates will be handled by the configured webhook with no additional setup or manual integration needed.