Network Tokens
This page will cover the basics of integrating with the Network Tokens. Currently you can use Network Tokens with Hosted Checkout Pages or Remote Authentication.
Network Tokens increase security of transactions by replacing sensitive payment information with dynamically generated tokens to mitigate the risk of data breaches and fraud. The tokens are used to substitute a cardholder’s Primary Account Number (PAN) with a unique identifier. This process also simplifies payment management as well as increasing security as tokens can be updated without changing the underlying payment information.
Setup
Sensitive data and PCI-DSS
The storage of Sensitive Authentication Data (track data and/or CVV2) post-authorisation is prohibited by Visa and Mastercard, as well as Requirement 3 of the Payment Card Industry Data Security Standard (PCI-DSS).
If you handle card data you need to demonstrate your systems handle this data securely and that you take full responsibility for your PCI compliance. This includes, but is not limited to, providing your current Attestation of Compliance certificate and evidence of a recent clean vulnerability scan.
A list of approved Security Assessors can be found at: https://www.pcisecuritystandards.org/assessors_and_solutions/qualified_security_assessors.
Prerequisites
To use Network Tokens you must be using Remote Authentication or Hosted Checkout Pages and be enrolled in the service. If you are not enrolled please contact techsupport@cashflows.com.
You need access to Cashflows Portal. Cashflows Portal is your online account with Cashflows. It gives you access to all your transaction data, payment tools and notifications. This is where you can:
Find the configuration details that you need to integrate our Hosted Checkout Pages into your website using our API.
Tell us the addresses of the webpages (return URLs) to use to redirect a shopper back to your website after we have processed their payment.
Customise the Hosted Checkout Pages, if you choose not to use the default page as we provide it.
When you first sign up with us, we send you a welcome email that includes the details that you need to sign into Cashflows Portal. If you don’t know how to sign in, see the Cashflows Portal guide.
If you need an integration account for testing purposes, please email techsupport@cashflows.com.
Important
You need different credentials for the integration and production environments.
Before you can connect to our production environment for going live, you need:
A production account
Sign-in credentials
We provide these when your account has been approved. If you have not received these, email techsupport@cashflows.com.
Important
Gateway webhook notifications are sent from these two IP address: 54.74.58.255 and 52.215.48.101. Depending on your firewall settings, you may wish to whitelist them, as well as Ireland in your Geolocation settings.
User permissions
Before integrating you need to have access to Cashflows Portal. You’ll need the Owner or External Developer user role to access the required pages. If you don’t have access to any of the pages mentioned below, contact your administrator to check your user permissions. If you have not yet set up a Cashflows account, contact us now.
API credentials
To integrate with Cashflows you’ll first need to collect your API credentials:
Configuration ID - unique identifier for your account included in API messages
Current API key - the key for encrypting API messages sent to us
To retrieve your credentials:
Sign into Cashflows Portal and select Configuration from the menu.
Select the API Data tab, the API Data page displays your API configuration details:

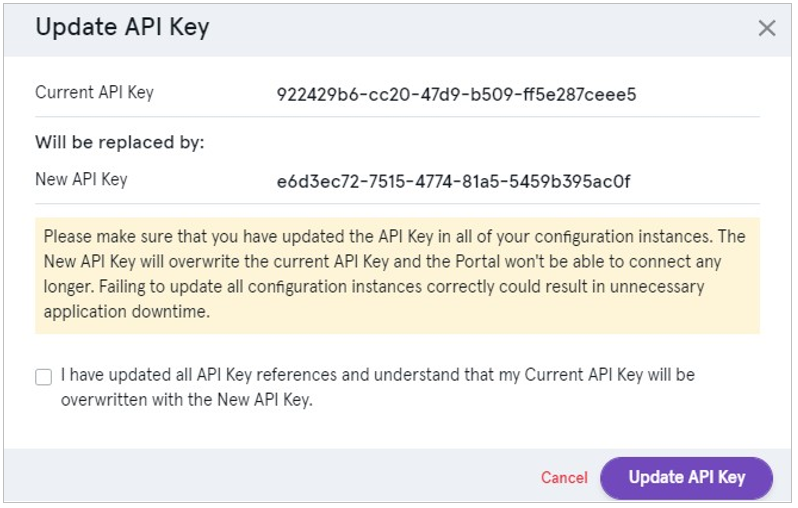
If you need to generate a new API key this can be done from the API Data tab:
Select Generate a new API key to generate a new key.
Wherever your integration uses the API key, replace the old key with the new one.
When you have successfully updated all API key references, check the confirmation box and select Update API Key:
Generate your signature
As with all API calls you will need to send a request signature with any requests.
To ensure server to server messages have been issued by valid users, request messages must be signed. The hash field is a SHA2-512 hash calculated by concatenating your API key with a string of the request object. If you don’t have your API key please contact your Implementation Manager.
If the signature is incorrect, an error will be returned. Repeated failures will lock your account, if this happens, please contact your Implementation Manager.
SHA2-512 hash of your request. To generate your hash, concatenate the message body of your request to the API key to give one long string.
Warning
Whitespace and new lines in the request object are included in the hash calculation. We use CR-LF for line breaks, however Unix systems often use just LF, and this can affect calculations. If you can’t match signatures but have the correct hash, remove unnecessary whitespace from your Request nodes.
After applying a SHA2-512 hash, the concatenated string would look like:
3CDF192F6AC67E3A491EF2B60EA9A03C6B408056CE19C3BBC307EB06A4CE1F4081B8D 021B1E9760E7CC18EED479EDBAFF926DADC2953B5F8B25717B8D5CB7609
Finally, add the generated key as the Hash value in your request:
{
    "ConfigurationId": "YOUR_CONFIGURATION_ID",
    "Hash": "YOUR_SIGNATURE_HASH",
    "Request": {
        "type": "Payment",
        "paymentMethodsToUse": ["creditcard"],
        "parameters": {
            "cardNumber":"4000000000000002",
            "cardCvc": "123",
            "cardExpiryMonth": "05",
            "cardExpiryYear": "23"
        },
        "order": {
            "orderNumber": "Payment ref D1"
        },
        "currency": "GBP",
        "amountToCollect": "10.00"
    },
}
Using Hosted Checkout Pages
Cashflows Hosted Checkout Pages (HCP) offers a secure, PCI-compliant way to integrate card payments into your site. It’s fully hosted by Cashflows, includes 3D Secure support, is mobile-optimised, and can be branded to match your site.
Hosted Checkout Pages are a secure webpage incorporated into your website. Shoppers are direct to our Hosted Checkout Pages when they check out and pay. Cashflows takes care of the processing, including security aspects and many of the technical complexities. When the payment processing is finished, we redirect the shopper back to your website.
Enabling Token Storage
Sign into Cashflows Portal. If you don’t know how to sign in, see the Cashflows Portal guide.
From the Cashflows Portal menu, select Configuration.
Select Payment Methods.
Select Enabled to display the card settings.
Check the Allow Token Storage check box.
Select Save.
For more information about Hosted Checkout Pages see the Hosted Checkout Pages Guide.
Create a payment job
To create a payment job, you must make a request containing the mandatory parameters as well as your ConfigurationId and Hash discussed above.
To help you track payments, we recommend you provide more than the mandatory details in the payment job.
As a minimum, consider including:
Payment amount
Currency
Locale
Order reference (the reference that you generate)
Customer name
Customer email
When starting integration, it’s good enough to provide only the mandatory information to establish and test connectivity quickly. You can then add details as required to build out the payment job request.
Mandatory parameters
Parameter |
Description |
|---|---|
string (header) |
Your configuration ID. |
string (query) |
A hexadecimal SHA512 hash of your Gateway API Configuration API |
|
Matches the account as reported by the issuer |
|
No match, participating BIN/ issuer |
string (query) |
Determines the language that the Hosted Checkout Pages, and any related messages, is displayed in. For example, to set the language to English, use the locale en-GB. Other options are:
If your language is not available, please choose the most appropriate language for your shoppers. |
Optional parameters
Parameter |
Description |
|---|---|
|
The reference number that you generate to identify an order. |
|
The name of the shopper. |
|
The email address of the shopper. |
Tip
Including optional cardholder and delivery details in your payment request enables us to display this information in the gateway portal transaction search and reports. This can make it easier for you to locate payments and assist with reconciliation. The extra detail can also help our customer support team to find a payment it ever needs investigating.
Example: Create a new payment job
import requests
import json

# Define the API endpoint
url = "https://gateway-inta.cashflows.com/api/gateway/payment-jobs"

# Define the payload (data to send with the request)
payload = json.dumps({
    "amountToCollect": "15.50",
    "currency": "GBP"
})

# Define the headers
headers = {
    'Hash': 'YOUR_SIGNATURE_HASH',
    'ConfigurationId': 'YOUR_CONFIGURATION_ID',
    'Content-Type': 'application/json'
}

# Send the POST request to the API
response = requests.post(url, headers=headers, data=payload)

# Print the response text (or handle it as needed)
if response.status_code == 200:
    print("Request was successful!")
    print("Response: ", response.json())  # Assuming the server returns JSON data
else:
    print(f"Request failed with status code {response.status_code}")
    print("Response Text: ", response.text)
import java.net.URI;
import java.net.http.HttpClient;
import java.net.http.HttpRequest;
import java.net.http.HttpResponse;
import java.net.http.HttpHeaders;
import java.util.HashMap;
import java.util.Map;

public class Main {
    public static void main(String[] args) throws Exception {
        String url = "https://gateway-inta.cashflows.com/api/gateway/payment-jobs";

        String payload = "{ \"amountToCollect\": \"15.50\", \"currency\": \"GBP\" }";

        // Setting the headers
        Map<String, String> headers = new HashMap<>();
        headers.put("Hash", "YOUR_SIGNATURE_HASH");
        headers.put("ConfigurationId", "YOUR_CONFIGURATION_ID");
        headers.put("Content-Type", "application/json");

        // Create HTTP client
        HttpClient client = HttpClient.newHttpClient();

        // Build the HTTP request
        HttpRequest request = HttpRequest.newBuilder()
            .uri(URI.create(url))
            .header("Hash", headers.get("Hash"))
            .header("ConfigurationId", headers.get("ConfigurationId"))
            .header("Content-Type", headers.get("Content-Type"))
            .POST(HttpRequest.BodyPublishers.ofString(payload))
            .build();

        // Send the request and get the response
        HttpResponse<String> response = client.send(request, HttpResponse.BodyHandlers.ofString());

        // Print the response
        System.out.println(response.body());
    }
}
using System;
using System.Net.Http;
using System.Text;
using System.Threading.Tasks;

class Program
{
    static async Task Main(string[] args)
    {
        var url = "https://gateway-inta.cashflows.com/api/gateway/payment-jobs";
        var payload = "{\"amountToCollect\": \"15.50\", \"currency\": \"GBP\"}";

        var client = new HttpClient();

        // Setting the headers
        client.DefaultRequestHeaders.Add("Hash", "YOUR_SIGNATURE_HASH");
        client.DefaultRequestHeaders.Add("ConfigurationId", "YOUR_CONFIGURATION_ID");

        var content = new StringContent(payload, Encoding.UTF8, "application/json");

        // Sending the POST request
        var response = await client.PostAsync(url, content);

        // Reading and printing the response
        var responseContent = await response.Content.ReadAsStringAsync();
        Console.WriteLine(responseContent);
    }
}
const axios = require('axios');

const url = 'https://gateway-inta.cashflows.com/api/gateway/payment-jobs';
const payload = {
amountToCollect: "15.50",
currency: "GBP"
};

const headers = {
'Hash': 'YOUR_SIGNATURE_HASH',
'ConfigurationId': 'YOUR_CONFIGURATION_ID',
'Content-Type': 'application/json'
};

axios.post(url, payload, { headers })
.then(response => {
    console.log(response.data);
})
.catch(error => {
    console.error('Error:', error.response ? error.response.data : error.message);
});
<?php

$url = 'https://gateway-inta.cashflows.com/api/gateway/payment-jobs';
$data = array(
    'amountToCollect' => '15.50',
    'currency' => 'GBP'
);

// Convert data array to JSON
$jsonData = json_encode($data);

// Set headers
$headers = array(
    'Hash: YOUR_SIGNATURE_HASH',
    'ConfigurationId: YOUR_CONFIGURATION_ID',
    'Content-Type: application/json'
);

// Initialize cURL session
$ch = curl_init($url);

// Set cURL options
curl_setopt($ch, CURLOPT_RETURNTRANSFER, true);
curl_setopt($ch, CURLOPT_HTTPHEADER, $headers);
curl_setopt($ch, CURLOPT_POST, true);
curl_setopt($ch, CURLOPT_POSTFIELDS, $jsonData);

// Execute the request
$response = curl_exec($ch);

// Check for errors
if(curl_errno($ch)) {
    echo 'cURL Error: ' . curl_error($ch);
} else {
    echo $response; // Print the response
}

// Close the cURL session
curl_close($ch);

?>
require 'net/http'
require 'json'
require 'uri'

# URL for the API endpoint
url = URI.parse('https://gateway-inta.cashflows.com/api/gateway/payment-jobs')

# Payload (data to be sent)
payload = {
amountToCollect: "15.50",
currency: "GBP"
}.to_json

# Headers
headers = {
'Hash' => 'YOUR_SIGNATURE_HASH',
'ConfigurationId' => 'YOUR_CONFIGURATION_ID',
'Content-Type' => 'application/json'
}

# Create a new HTTP request
http = Net::HTTP.new(url.host, url.port)
request = Net::HTTP::Post.new(url.path, headers)
request.body = payload

# Send the request and get the response
begin
response = http.request(request)

# Print the response body
puts response.body
rescue StandardError => e
# Print error message if request fails
puts "Error: #{e.message}"
end
Response codes
After you have submitted a request to create a payment job, the Cashflows Gateway API responds with a code. Ideally the response is a success code but can be any of the following.
Response Indicator |
Description |
|---|---|
|
Payment job created successfully. |
|
Request contains errors. |
|
Invalid token. |
|
Insufficient permissions. |
|
Configuration not found. |
|
Bad response |
Redirect the shopper
When you create a payment job, you receive a response including a link (action URL) to the Hosted Checkout Pages. This link redirects shoppers so they enter their card details, or select an alternative payment method, on the payment page we host for you.
Extract the link and use it to take shopper Hosted Checkout Pages, or to the integration environment simulation page when testing.
Example request
{
    "amountToCollect": "10.00",
    "currency": "GBP",
    "locale": "en_GB",
    "order": {
        "orderNumber":"Your ref",
        "billingAddress" : {
            "firstName" : "Alex",
            "lastName" : "Smith"
        },
        "billingIdentity": {
            "emailAddress": "alex@test.com"
        }
    }
}
Example of the full response with the success response code included
{
    "data": {
        "reference": "210121017238589452",
        "createDateTimeUtc": "2021-01-14T10:32:50.506892Z",
        "type": "Payment",
        "traceReference": "210120117364553808",
        "configurationId": "200426117314086912",
        "domain": "cashflows.com",
        "locale": "en_GB",
        "timeZone": "Europe/London",
        "order": {
            "orderNumber": "Your ref",
            "createDateTimeUtc": "2021-01-14T10:32:50.506894Z",
            "billingAddress": {
                "firstName": "Alex",
                "lastName": "Smith"
            },
            "billingIdentity": {
                "emailAddress": "alex@test.com"
            },
            "orderLines": []
            },
            "orderHistory": [],
            "paymentMethodsToUse": [
                "Card"
            ],
            "currency": "GBP",
            "amountToCollect": "10.00",
            "expirationDateTimeUtc": "2021-07-14T10:32:50.5068906Z",
            "lastUpdateTimeUtc": "2021-01-14T10:32:50.5068934Z",
            "lastProcessedTimeUtc": "2021-01-14T10:32:50.5068927Z",
            "flags": {},
            "attributes": {},
            "paymentStatus": "Pending",
            "payments": [
                {
                    "reference": "210121117372807180",
                    "createDateTimeUtc": "2021-01-14T10:32:50.6776922Z",
                    "paymentMethods": [
                        "Card"
                    ],
                    "status": "Pending",
                    "amountToCollect": "10.00",
                    "steps": [
                        {
                            "reference": "210121217372942352",
                            "createDateTimeUtc": "2021-01-14T10:32:50.7307589Z",
                            "action": "DisplayHostedPage",
                            "paymentMethods": [
                                "Card"
                            ],
                            "status": "Pending",
                            "amountToCollect": "10.00"
                        }
                    ],
                    "flags": {},
                    "attributes": {
                        "returnUrlSuccess": "https://www.mywebshop.com/?paymentjobref=210121017238589452&paymentref=210121117372807180&ordernumber=Your+ref",
                        "returnUrlFailed": "https://www.mywebshop.com/?paymentjobref=210121017238589452&paymentref=210121117372807180&ordernumber=Your+ref",
                        "returnUrlCancelled": "https://www.mywebshop.com?paymentjobref=210121017238589452&paymentref=210121117372807180&ordernumber=Your+ref&status=cancelled"
                    },
                    "refunds": [],
                    "captures": []
                }
            ]
        },
    "links": {
        "data": {
            "url": "https://gateway-int.cashflows.com/api/gateway/payment-jobs/210121017238589452",
            "type": "application/json"
        },
        "action": {
            "url": "https://gateway-int.cashflows.com/payment?ref=4ab07d818100e4880130c8e35d25ea1be6b35b94bf1416b2fda63815e83d9fbe68f1a4769d1abc9cf0e57616aa70a8b327f0354f1611fd216383cdd28d5d5580",
            "type": "text/html"
        },
        "documentation": {
            "url": "https://gateway-int.cashflows.com/payment-gateway-api/documentation/index.html",
            "type": "text/html"
        }
    }
}
Processing a payment
When you attempt to process a payment, we send you a webhook notifying you about the payment status, for example when the payment changes from Pending to Paid. If you haven’t already done so, you need to tell us where to send these notification webhooks.
You can then use the paymentJobReference and paymentReference from the notification webhook to check the status of the order to update your systems.
Tip
We recommend updating orders only when you receive the payment status notification. A notification from the Cashflows Gateway assures you that a payment request has not been intercepted during transfer.
When we direct shoppers back to your website, we direct them back to the confirmation webpage corresponding to the status of their payment (successful, failed or cancelled). Using the addresses of the pages (return URLs) that you set up in Cashflows Portal by default.
You can use the default pages provided by Cashflows, or you can display your own. IF you want to display your own, you need to set the addresses (return URLs) of the pages in the Cashflows Portal.
If your business has more than one website for selling different things, you can override the default address and tell us to use a different one that you specify in the payment job request.
How to override a default return URL
If you want your shopper to be sent somewhere other than our default pages or yours, you can use an individual payment job request to tell us. The shopper then returns to your website via a webpage that relates to their purchase rather than the default page.
To override a default return URL include the return URL in the create payment job request:
{
    "amountToCollect": "10.00",
    "currency": "GBP",
    "locale": "en_GB",
    "order": {
        "orderNumber":"Your ref1",
        "billingAddress" : {
            "firstName" : "Alex",
            "lastName" : "Smith"
        },
        "billingIdentity": {
            "emailAddress": "alex@test.com"
        }
    },
    "parameters": {
        "returnUrlSuccess": "https://www.mywebshop.com?status=success",
        "returnUrlCancelled": "https://www.mywebshop.com?status=cancelled",
        "returnUrlFailed": "https://www.mywebshop.com?status=failed"
    }
}
Payment status updates
We recommend that when you receive a notification webhook from us, you use it to confirm the status of the payment before you update an order.
To notify you about a payment status update we send you a webhook. The body of the notification webhook includes the paymentJobReference and paymentReference. For example:
{
    "notifyType": "PaymentStatusChange",
    "paymentJobReference": "ExamplePaymentJobReference",
    "paymentReference": "ExamplePaymentReference"
}
If you have any IP or Country Blocking this can stop the notifications going through leading to transactions not being updated correctly.
Please ensure that Ireland is a Whitelisted Country and these IPs are whitelisted:
Production:
54.74.58.255and52.215.48.101Integration:
54.75.5.171and54.73.83.234
When you receive a webhook, you need to extract these details and include them in a RetrievePaymentJob API call to get the payment status.
To receive the payment status:
Extract the
paymentJobReferenceandpaymentReferencefrom the notification webhook.Include them in a
RetrievePaymentJobAPI call.
When the payment status has been confirmed, your business systems can be updated to match.
Tip
For security reasons, we recommend that you update an order only when you receive the notification webhook from us.
Example RetrievePaymentJob
GET https://gateway-int.cashflows.com/api/gateway/payment-jobs/{paymentJobReference}/payments/{paymentReference}
Example response with the payment status and amount
"status": "Paid",
"amountToCollect": "10.00"
Mandatory parameters
Parameter |
Description |
|---|---|
string (header) |
Your configuration ID. |
string (header) |
A hexadecimal SHA512 hash of your Gateway API Configuration API Key. |
integer($int64) (path) |
The reference of the payment job to retrieve. |
integer($int64) (path) |
The reference of the payment to retrieve. |
Optional parameters
Parameter |
Description |
|---|---|
string (query) |
Determines the language that the Hosted Checkout Pages, and any related messages, is displayed in. For example, to set the language to English, use the locale en-GB. Other options
If your language is not available, please choose the most appropriate language for your shoppers. |
Response codes
Response Indicator |
Description |
|---|---|
|
Payment retrieved successfully. |
|
Request contains errors. |
|
Invalid token. |
|
Insufficient permissions. |
|
Configuration, payment job or payment not found. |
Testing Hosted Checkout Pages
To enable you to test your Hosted Checkout Pages before going live, we have an integration environment where you can simulate different payment scenarios. We also provide some test cards that you can use.
If you need an integration account for testing purposes, please email techsupport@cashflows.com.
Important
You need different credentials for the integration and production environments.
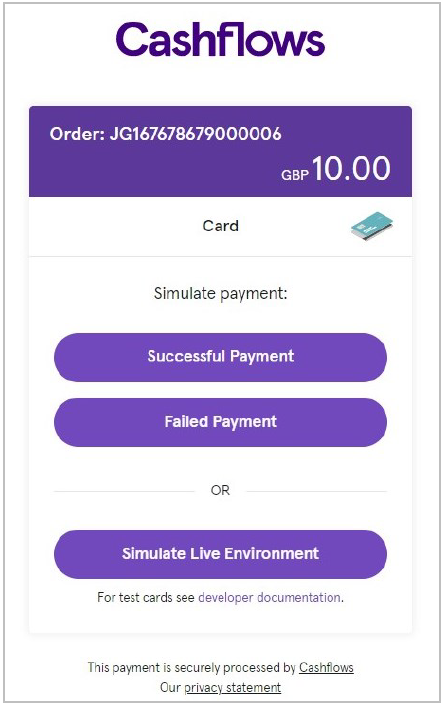
The Cashflows integration environment
To simulate a card payment:
Choose a simulation option:
To test your integration to our payment page, you need to send some payment requests to the integration environment (https://secure-int.cashflows.com/gateway/standard) using a valid card number. Here are some test card numbers that you can use you to test your integration:
|
Card Type |
CVC |
Expiry date |
|---|---|---|---|
|
Visa - Credit |
123 |
Any future date within 10 years |
|
Visa - Credit |
123 |
Any future date within 10 years |
|
Visa - Credit |
123 |
Any future date within 10 years |
|
Visa - Credit |
123 |
Any future date within 10 years |
|
Visa - Credit |
123 |
Any future date within 10 years |
|
Visa - Debit |
123 |
Any future date within 10 years |
|
Visa - Debit |
123 |
Any future date within 10 years |
|
Mastercard - Credit |
123 |
Any future date within 10 years |
|
Mastercard - Credit |
123 |
Any future date within 10 years |
|
Mastercard - Credit |
123 |
Any future date within 10 years |
|
Mastercard - Debit |
123 |
Any future date within 10 years |
|
Mastercard - Debit |
123 |
Any future date within 10 years |
|
American Express - Credit |
1234 |
Any future date within 10 years |
If you enter some test card details and select Pay with card …, you’ll see our 3-D Secure simulation page.
Using our 3D Secure simulator
Our 3D Secure simulator provides options for you to simulate different scenarios so that you can test, for example, whether a transaction passes or fails 3D Secure checks.
Authentication successful
Simulates a payment that has successfully passed all 3D Secure checks and will proceed to the authorisation stage of payment processing.
Authentication failed
Simulates the scenario where a shopper does not correctly complete 3D Secure checks. The payment will be declined by the gateway, and will not proceed to the authorisation stage of payment processing.
Authentication unavailable
Simulates the scenario where a card issuer’s system is not available. The response depends on how the gateway is configured in Cashflows Portal under the setting called 3D Secure Required.
If disabled, the payment will proceed to the authorisation stage of payment processing.
If enabled, the payment will be declined by the gateway. It will not proceed to the authorisation stage of payment processing.
Note
You or the business owner can choose to reject a payment if 3D Secure is unavailable.
Authentication attempted
Simulates the scenario where the 3D Secure system is available, but the card has not been enrolled for 3D Secure. The payment will proceed to the authorisation stage of payment processing.
Using Remote Authentication
To use Network Tokens you need to ensure you send the below parameters as part of your Remote Authentication request. For more information about Remote Authentication see the Remote Authentication Guide or API Reference.
Payment requests
To perform a Remote Authentication transaction, you need to:
Send an authentication request with the necessary cardholder and payment details
Process the response
Creating a authentication request
To create an authentication request you need to submit a UTF-8 encoded HTTPS POST request to:
Integration - https://secure-int.cashflows.com/gateway/remote_auth.
Production - https://secure.cashflows.com/gateway/remote_auth.
Note
Before you can send payment requests you need to send our Implementations team the IP addresses of your payment servers so that we can configure your profile.
Payment request fields
To submit a payment request you need to send a request with the mandatory parameters. There are also additional, optional parameters you can include, see the API Reference for more information.
The parameters are:
Parameter |
Description |
Mandatory/Optional |
|---|---|---|
|
Your Profile Id |
Mandatory |
|
Authentication password |
Mandatory |
|
Customer’s card number (Must be numeric only with no separators) |
Mandatory (if no card_token) |
|
Customer’s card token (Max of 50 characters) |
Mandatory (if no card_num) |
|
Card security code |
Mandatory |
|
Card expiry date, format is MMYY |
Mandatory |
|
Your transaction reference (e.g. cart ID) |
Mandatory |
|
Your transaction description (Max of 99 characters) |
Optional |
|
Transaction amount to 2 decimal places, e.g. 24.99 |
Mandatory |
|
Transaction currency (3-character code) |
Mandatory |
|
Transaction test mode = 0 |
Mandatory |
|
Transaction type = sale |
Mandatory |
|
Used to override default MID settings:
|
Optional |
|
Transaction class = ecom, moto, or cont |
Mandatory |
|
Indication of the number of retries attempts, 0 = initial attempt |
Optional |
|
Soft descriptor added to your company name on the cardholder’s statement (Max of 12 characters) |
Optional |
|
If true the card_token will be included in the response only when we have processed a successful transaction |
Optional |
|
Indication of why the transaction may be exempt from SCA, possible values:
|
Optional |
|
Customer’s name |
Optional |
|
Customer’s address (Multiple lines can be separated using the new line break character (ASCII code 10)) |
Optional |
|
Customer’s post/zip/area code |
Optional |
|
Customer’s country (ISO3166 2-character code) |
Optional |
|
Customer’s IP address (IPV4 Format only) |
Optional |
|
Customer’s email address |
Optional |
|
Customer’s telephone number |
Optional |
Important
Although optional, not submitting the additional cardholder information may negatively impact both your transactions and anti-fraud measures.
Network Tokens Cardholder Initiated Transactions
For transactions initiated by the cardholder, you need to provide:
Parameter |
Description |
Mandatory/Optional |
|---|---|---|
|
Boolean – True – If transaction uses Network Tokens |
Mandatory |
|
String – Customer’s virtual card number |
Mandatory |
|
Hex – Token authentication verification value |
Mandatory |
|
Int – Card security code |
Optional |
|
String or Int – EMVCo standard value used to link tokenised and PAN-based transactions without PAN as the linkage mechanism |
Optional |
Network Tokens Merchant Initiated Transactions
For transactions initiated by the merchant, you need to provide:
Parameter |
Description |
Mandatory/Optional |
|---|---|---|
|
Boolean – True – If transaction uses Network Tokens |
Mandatory |
|
String – Customer’s virtual card number |
Mandatory |
|
Hex – Token authentication verification value |
Optional |
|
String or Int – EMVCo standard value used to link tokenised and PAN-based transactions without PAN as the linkage mechanism |
Optional |
|
Verification ID or Sales ID (e.g. 05P00001724 or 06S00001724) |
Mandatory if
|
|
ID provided by Acquirers, if the original transaction was processed by another Acquirer, you will need to obtain the id from them |
Mandatory if
|
Example PHP payment request (with card number)
<?php
$PaymentUrl = "https://secure.cashflows.com/gateway/remote_auth";
$Post String = "auth_id=1234&auth_pass=Password&network_token=true&card_num=4000000000000002&card_tavv=AgEAAAkEuzpIuXwDqQA+gARQEAA=&card_cvv=123&card_expiry=0121&cust_n ame=Testing&cust_address=My%20house%0AMy%20street%0AMy%20Town&cust_postcode=CB22%205LD&cu st_country=GB&cust_ip=123.45.67.89&cust_email=test@test.com&tran_ref=abc123&tran_amount=9.99&tran_currency=GBP&tran_testmode=0&tran_type=sale&tran_class=ecom&acs_eci=5&acs_cavv=5dbc4a6a39b6730a360e42c3b5f4&acs_3dsversion=2.2.0&acs_dstransid=XXXXXXXXX-XXXX-XXXX-XXXX-XXXXXXXXXXXXX&return_scheme_transaction_id=true&card_payment_account_reference=111111";
$ch = curl_init($PaymentUrl); curl_setopt($ch, CURLOPT_POST,1);
curl_setopt($ch, CURLOPT_POSTFIELDS, $PostString); curl_setopt($ch, CURLOPT_FOLLOWLOCATION, 1); curl_setopt($ch, CURLOPT_HEADER, 0);
curl_setopt($ch, CURLOPT_RETURNTRANSFER, 1);
$result = curl_exec($ch); curl_close($ch);
?>
Processing the response
Once the authentication request is sent, we will return a response containing details of the transaction, including whether the authorization was successful or not. You’ll need to handle this response in your backend system, logging the transaction status and storing any relevant details for future reference.
The response consists of:
Authorisation status code
Transaction ID
CVV/AVS result
Authorisation code
Authorisation message
Acquirer Reference Number (ARN)
Example response
{
  "status": "approved",
  "transactionId": "TX1234567890",
  "authCode": "654321",
  "amount": {
    "value": "100.00",
    "currency": "GBP"
  },
  "responseCode": "00",
  "responseDescription": "Approved"
}
CVV/AVS check values
CVV checks are enabled by default, however AVS needs to be opted into. If you wish to use AVS, email support@cashflows.com or contact your relationship manager. If AVS is not enabled a response of 00 will be sent.
The CVV/AVS result is a 3-digit value, each digit representing a different check. The first value is the CVV check, the second is the address and the third is the postcode. The possible values for each digit are as follows:
Value |
Meaning |
|---|---|
|
Not Checked |
|
Check was not available |
|
Full match |
|
Partial match |
|
Not matched |
|
Error |
A partial match is only possible for the address or postcode data, not for CVV check. Not all acquirers or issuers support all checks, in which case the results will be either 0 or 1.
Example Response |
CVV |
Address |
Postcode |
|---|---|---|---|
232 |
Full match |
Partial match |
Full match |
400 |
Not matched |
Not checked |
Not checked |
Testing Remote Authentication
You can test your Remote Auth integration by setting your POST request to the Integration environment (https://secure-int.cashflows.com/gateway/remote_auth) and using test cards details.
Note
You need different credentials for the integration and production environments, to create an integration account for testing purposes contact implementations@cashflows.com.
Test cards
If you are testing card payments, you need to use a valid card number. Here are some test card numbers that you can use:
Click to show test cards
Test cards
|
Card Type |
CVC |
Expiry date |
|---|---|---|---|
|
Visa - Credit |
123 |
Any future date within 10 years |
|
Visa - Credit |
123 |
Any future date within 10 years |
|
Visa - Credit |
123 |
Any future date within 10 years |
|
Visa - Credit |
123 |
Any future date within 10 years |
|
Visa - Credit |
123 |
Any future date within 10 years |
|
Visa - Debit |
123 |
Any future date within 10 years |
|
Visa - Debit |
123 |
Any future date within 10 years |
|
Mastercard - Credit |
123 |
Any future date within 10 years |
|
Mastercard - Credit |
123 |
Any future date within 10 years |
|
Mastercard - Credit |
123 |
Any future date within 10 years |
|
Mastercard - Debit |
123 |
Any future date within 10 years |
|
Mastercard - Debit |
123 |
Any future date within 10 years |
|
American Express - Credit |
1234 |
Any future date within 10 years |
Cardholder name
You can use specific values as the cardHolderName to trigger specific results for the test transaction:
|
Response |
|---|---|
|
Success response |
|
Challenge response |
|
Decoupled challenge |
|
Not authenticated |
|
Not authenticated (with proof of authentication) |
|
Failed for technical reasons |
|
Rejected by issuer |
Left blank |
Failed response |
Going live
Before you can connect to our production environment for going live, you need:
A production account
Sign-in credentials
We provide these when your account has been approved. If you have not received these, email implementations@cashflows.com.
Important
You need different credentials for the production environment. You can’t use your integration account credentials.
When you are satisfied that your integration is complete and working you can start processing live transactions by switching from the integration environment to the production environment.
To make the switch, change your:
Configuration ID
API key
The URLs that point to the environments where you send your API messages
This means that you need to change the integration (test) URL from https://gateway-int.cashflows.com to https://gateway.cashflows.com for the production environment.
Additional resources
For additional information, see the:
Contact and Support
If you need additional support please contact one of the below teams. Phone lines are open Monday to Friday between 09:00 and 17:00 UTC.
Application and account setup
For information relating to your application or technical implementation, please use the contact details below:
application@cashflows.com - 0330 128 9855
implementations@cashflows.com - 0330 128 9855
Account support
To assist you in your day-to-day running of your account, please use the contact details below:
support@cashflows.com - 0330 128 9855
techsupport@cashflows.com - 0330 128 9855