Adding embedded frames to a website
Introduction
Embedded Frames blends your website and checkout pages, but crucially Cashflows still host the payment field. We call these Embedded Fields.
Embedded Fields are a set of iFrames connecting your website with the Cashflows Gateway. When your customers arrive at the final checkout page of your website, a series of secure payment fields are displayed. This gives the impression that your business is capturing their card data while we take care of the processing, including security aspects and many of the technical complexities.
Key features
Embedded Frames offer:
The potential to accept all major types of card payment including Visa, Mastercard and Amex.
Handling of zero value authorisations and verifications.
The latest version of 3D Secure services from Visa and Mastercard are built in.
A downloadable industry-standard JavaScript library for easy integration and instant updates.
Pages that use embedded frames are responsive and compatible with mobile devices.
Full customisation to match the look and feel of any website.
This means you can expect:
Fewer abandoned payments - Embedded frames can be customised to look and feel the same as any business website, encouraging customer confidence and reducing the number of abandoned payments.
More Speed - The longer a transaction takes and the more steps a customer needs to complete, the higher the chance a customer gives up and abandons a payment. With embedded frames, the customer journey is quick.
Complete Control - Complete control over the checkout and payment page user interface and user experience without any worries over handling or exposing card details.
PCI compliance - Customers can safely enter their card details and pay with confidence.
How it works
Embed each payment field within the checkout page as an embedded frame, each payment field will be injected with a frame by Cashflows.
The customer then enters their payment details directly on the checkout page.
After each field is completed, the data is sent directly to the Cashflows Gateway API where it is held securely in memory.
After all required fields are completed and the customer presses the pay or verify button, the Cashflows Gateway concatenates the supplied payment data into a payment job request.
The Cashflows Gateway sends this request either for authorisation or to the issuer’s bank to request the extra security checks in the form of Storing Customer Authentication (SCA).
A JavaScript method is called and can be used to either:
Display a success or failure message or
Redirect the customer back to a website or web page that you specify.
Important
Embedded Frames can only take the initial payment; further actions to a payment need to be made through the User Interface or with API calls.
Prerequisites
Before you start make sure you have:
Collected your API key from Cashflows Portal. For more information, see the Cashflows Gateway guide.
Collected your Configuration ID from Cashflows Portal. For more information, see the Cashflows Gateway Get Started guide.
Downloaded the JavaScript Library. For more information, see Downloading the JavaScript library and creating a Cashflows object.
Integrating Embedded Frames
Your backend server needs to send an API request to our online payment servers to initiate your intent to create a transaction. We then send you a PaymentJobReference and the token which are linked to each other. You need to create the payment fields and the payment form and then link these to the Cashflows JavaScript Library to create and complete the payment request using this token.
The key steps to integrate embedded frames are:
Note
If you want to accept Apple Pay or Google Pay you need to enable them first.
If you need an integration account, please email: implementations@cashflows.com.
We recommend that you use UTF-8 for encoding before you submit, and you must Hash the message with the API key that you collected from Cashflows Portal.
You must use the same hashing technique that we do so that we can match our hash with yours – we use SHA512. The hash assures message consistency and protects the payment request from being tampered with during transfer to our Cashflows gateway (a man-in-the-middle attack).
Important
Every parameter and value that you send, and every parenthesis, must be included in the hash.
Creating a payment intent
You first need to create a payment intent using an API call to the payment-intents endpoint:
Integration test environment: https://gateway-int.cashflows.com/api/gateway/payment-intents/
Production environment: https://gateway.cashflows.com/api/gateway/payment-intents/
If you need more information on payment intent calls see the Cashflows Gateway guide..
In your call you need to provide your API credentials (apiKey and configurationId) obtained from Cashflows Portal, as well as these mandatory fields.
Field |
Description |
|---|---|
amountToCollect |
The total value of the payment transaction. |
currency |
The transaction currency. |
paymentMethodsToUse |
The payment type for the transaction. |
You can also include address parameters, see Address and shipping data.
Example request:
{
    "amountToCollect": "10.00",
    "currency": "GBP",
    "locale": "en_GB",
    "paymentMethodsToUse": ["Card"]
}
Example response:
{
    "data": {
        "paymentJobReference": "Examplepaymentjobreference",
        "token": "yourpaymentintenttoken",
        "paymentStatus": "Pending"
    }
}
Address and shipping data
To help the authentication and authorisation process and reduce the number of declined transactions or related issues, we recommend that you supply as much cardholder data as possible. You can see a full list of accepted parameters in the API references.
Here is an example JSON payload showing billing and shipping address data. You should add this data to the parameters you hash and send when creating the Payment Intent.
"BillingAddress": {
    "Title": "Mr.",
    "FirstName": "Virgil",
    "MiddleName": "Van",
    "LastName": "Dijk",
    "CountryIso3166Alpha2": 826,
    "AddressLine1": "Business Centre Road",
    "AddressLine2": "Unit 7",
    "ZipCode": "XX12 1XX",
    "City": "TestCity",
    "StateProvince": null,
    "PhoneNumber1": "+44 9999 123456"
},
    "ShippingAddress": {
    "Title": "Mr.",
    "FirstName": "John",
    "MiddleName": null,
    "LastName": "Doe",
    "CountryIso3166Alpha2": 826,
    "AddressLine1": "Addressline1",
    "AddressLine2": "Addressline2",
    "ZipCode": "XX21 5XX",
    "City": "Cambridge",
    "StateProvince": null,
    "PhoneNumber1": "+44 9999 000000"
}
Adding the backend script
You need to include the backend script that creates and handles the Payment Intent within the header at the top of your checkout page. Here is an example to show how to create a HTML page using PHP:
<?php
include 'create_payment_intent_cashflows.php';
?>

<!DOCTYPE html>
<html>
...
Downloading the JavaScript library and creating a Cashflows object
To load the JavaScript library that creates the Cashflows object to your payment page you need to:
Download the relevant JavaScript (JS) library from GitHub.
Add the JS library to your Checkout Page where your payment fields will be rendered:
<script src = "JS library link path"></script>
Creating the payment fields and payment form
Next you need to create a form with the payment fields and payment button. You can use any names for these fields, but we suggest:
card-numbercard-namecard-expirationcard-cvc
Example
<div class = "form-group">
    <label class = "form label" for "card-number"> Card Number </label>
    <input id = "card-number" type = "tel" class = "form control required"/>
</div>
You can use the div class and input IDs to style the payment fields within the payment form using styles from a cascading style sheet (CSS).
Initialising the Cashflows object
The last step is to initialise the Cashflows object at the bottom of the checkout page with the token acquired when creating the payment intent. This instructs the library to use the payment fields you created.
var cashflows = new Cashflows('yourpaymentintenttoken', true);
var inits = [
cashflows.initCard('#card-number', '#card-name', '#card- expiration', '#card-cvc', '#pay-with-card'),
];
The second argument in the cashflows variable is the isIntegration flag, if set to true your page will use the test environment.
Note
If you want to accept Apple Pay or Google Pay you need to initialise them separately with cashflows.initApplePay(`#apple-pay`) and cashflows.initGooglePay(`#google-pay`).
Example with both Apple Pay and Google Pay
<script>
window.onload = function() {

var cashflows = new Cashflows('yourpaymentintenttoken', true);
var inits = [
    cashflows.initCard('#card-number', '#card-name', '#card- expiration', '#card-cvc', '#pay-with-card'),
    cashflows.initApplePay('#apple-pay'), cashflows.initGooglePay('#google-pay')
];

Promise.all(inits)

.then(() => {
cashflows.checkout()

.then(() => {
var el = document.getElementById('card'); el.style.display = "none";
el = document.getElementById('alert-success'); el.style.display = "block";
})

.catch(e => {
var el = document.getElementById('card'); el.style.display = "none";
el = document.getElementById('alert-error'); el.style.display = "block"; el.querySelector('#message').innerHTML = e;
});
})

.catch(e => {
var el = document.getElementById('card'); el.style.display = "none";
el = document.getElementById('alert-error'); el.style.display = "block"; el.querySelector('#message').innerHTML = e;
});

}
</script>
Testing and going live
To enable you to test your embedded frames before going live, we have an integration environment where you can simulate different payment scenarios:
Integration environment: https://gateway-int.cashflows.com
Production environment: https://gateway.cashflows.com
If you are testing card payments, you need to use a valid card number. We provide some test cards that you can use, see the Cashflows Help Centre.
For more information about testing your integration and preparing to go live, see the Cashflows Gateway Get Started guide.
Enabling Apple Pay
To use Apple Pay with Embedded Frames you need to have verified your Apple Pay Domain with Apple and enabled Apple Pay within Cashflows.
Verifying your Apple Pay Domain
To verify your Apple Pay Domain your need to host a domain verification file on your domain.
Contact implementations@cashflows.com requesting Apple Pay verification files.
Host the received files in the
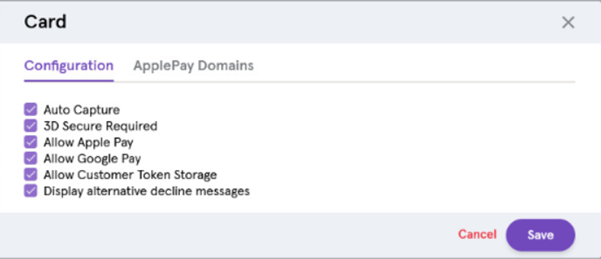
.well-knownfolder of your domain:https://[DOMAIN_NAME]/.well-known/apple-developer-merchantid-domain-associationLogin to Cashflows Portal, then navigate to Configuration.
Select Payment Methods, then select Card.
Enable Allow Apple Pay in the configuration section:
Select ApplePay Domains.
Select Add Domain, enter your domain and select Save, this will automatically request Apple to check your domain.
Once Apple has approved your domain (usually after an hour), you will be able to take payments with Apple Pay through Embedded Frames.
Enabling Google Pay
Cashflows handles most of the work for Google Pay behind the scenes, to enable Google Pay in Embedded Frames you need to:
Login to Cashflows Portal, then navigate to Configuration.
Select Payment Methods, then select Card.
Enable Allow Google Pay in the configuration section:
Include a button in your checkout page that is referenced in the initialisation step.